The basis of the patterns of the dress is the most accurate. Constructing a dress base pattern and design modeling
Do you want to learn how to sew? TIME MEANS TO TAKE THIS NEW BOUNDARY. And by ourselves, with our own hands and with our brains, master the wisdom of sewing on real adult patterns.
We ourselves will draw the base pattern in a new easy way (I spent more than one week to create this lightweight method of constructing the base pattern). And then we will sew a bunch of any dresses, tops and tunics.
No - I will not give you a single finished pattern - I am not Madame Burda. I am Madame Klishevskaya.))) And the main harmfulness of my character is ... that I will make your head work and give birth to bright and clear discoveries in the field of sewing. The easiest and most understandable of all types of arts. Believe me, it is.
Yes - Sewing yourself is very easy and simple. Right from scratch you will get more and more beautiful and well-sewn things.
And you will do everything yourself, without a state of hypnosis, but in a sober mind and bright memory. YOU WILL DO IT - moreover you will UNDERSTAND what exactly you are doing.
I will tell you the secrets that I know.Moreover - I will teach you to discover more and more secrets of the world of sewing and modeling clothes.
I will not lead you (blind and stupid) by the handle in the chaos of letters and numbers denoting the intricacies of numerous lines of drawing patterns. NO, I WILL NOT TELL YOU HERE:
Well, you see, one such picture can catch fear and make a girl who doubts her own abilities really, really wants to sew a dress - but i was not friends at school with geometry and drawing. Even I, who adored both of these school subjects, went around and around for several years — not daring to start delving into the construction of such a drawing: “How long does it take to draw such a thing and you need to calculate everything correctly and not get lost in letters…”.
And, nevertheless, today we will draw a pattern.
We will draw a pattern-base (this is a piece of it you see from above.))))
But - do not rush to be scared - we will create our pattern a little differently. Away from the engineering method - and closer to human understanding.
We will draw one with you - only one - pattern.
And then from it we will create more and more new models of dresses. And it will be very easy and simple.
- No obscure formulas
- No confusing calculations.
- And without the letter-spider web.
How? Have I removed a bit of your concerns?
I now relax - we will not start drawing right now. To begin with, we will take a pleasant walk through the pattern. The purpose of the walk is to get acquainted, make friends with the pattern and remove the last doubt that you can sew any dress.
So ... what is a pattern - the basis?
To put it figuratively, it is a cast from your body. This is your personal print. Any thing sewn according to YOUR pattern-base will ideally sit on YOUR figure.
Yes, you heard right - ANYTHING can be sewn on the basis of one and only pattern. All-all models of dresses - are born, modeled, and sewn from one source - this is the base pattern.
I’ll prove it to you now with an example. Even in three examples - in the form of photos and pictures.
Here is the first photo (below). Our base pattern is, in fact, your sheath dress (one that fits perfectly on the figure). Custom Made Dress your pattern-based, will repeat all the bends your his body. This simple sheath dress is sewn according to the usual pattern-based. See, it’s like a plaster cast from a girl’s figure.
And already today, having drawn the base pattern, you can safely do the cutting on the fabric - and you will get such a dress. The only thing you can change the neckline is to give it the shape that suits your face contour.

All other (any-adorable) dress models are just a modification of the sheath dress - a fantasy on a free theme.
Here's how it goes in the fashion world.
Once a fashion designer thought ...“But what if the bodice of the dress at the top will hold a round yoke (yellow outlines - the figure below), and the bodice itself will be made in the form of oncoming triangles overlapping (red outlines - see the figure below). The result is what we see in the photo below.

Handsomely? Handsomely.
What did the fashion designer base his fantasies on? On a pattern basis.
And you can come up with something of your own. In us - in women - just a lot of imagination.
And another fashion designer thought: “And what if you give the sheath dress a looser cut - make it wider. And make the line of the shoulder longer so that it hangs on the arm. ” And in the end, a new model is born (photo below) - also very beautiful. And very simple.

You can do that too. If you will UNDERSTAND what the base pattern consists of. And by what laws does it exist.
That is why i do not want to stupidly give you instructions to create a base pattern (such as “draw a line from point P6 to point P5 and mark the point of its intersection with line X as the next point ...” - pah!).
I want to wake you up little thing. I want you to feel the pattern, know its soul. Learned to see what a simple essentially drawing hiding behind a photograph of any, even intricately tailored, dress.
Therefore, we will not draw anything in the next 30 minutes - we will walk around the pattern itself. We will get acquainted with all its elements - we will identify why each line serves, and why it is located here and drawn just like that ..
After such a “cognitive walk” you will feel joyful clarity of understanding of all-all-all. It’s as if you have already painted the base patterns many times. And take up the drawing with the feeling that this is a couple of trifles. Ha! Business!
As the sage said: “We are only afraid of what we cannot understand and explain logically. But as soon as the thing that scares us becomes clear to us, it ceases to cause us fear. ”
So let's go and tame this "terrible beast" - the base pattern. Tame and draw in 20 minutes. Yes, in 20 minutes - because after a walk - the drawing of the pattern will seem to you an old and well-known simple pattern - like a grating for playing tic-tac-toe.
Where does the base pattern come from
So where does the pattern come from - usually it is extracted from such a Thursday:

In the drawing there is half of the back part + half of the front part.
We will also draw a similar drawing with you - only more simply and clearly.
And why are these halves needed, and where to apply them - now I will clearly show everything.
Here (!) I dug up a wonderful mischief - below - in the photo of the black-and-white dress, our halves are very clearly visible - both the half of the back and the half of the front. So to speak - clearly and clearly.
Yes, in Potnovsky language halves are called "shelves." We will draw these very shelves of the front and back today. But first, a detailed look at what elements each shelf consists of. And most importantly, I will tell you why each element is needed, what it serves.
To make everything as clear as possible, I will illustrate each of the elements both in pictures and in photographs of real models of dresses.
First, get acquainted with two obscure words: TAP and ARMHOLE.
Of course, maybe you know them. Or maybe not. My business is to introduce.
So, get acquainted - PROYMA.

When drawing the base pattern, you will create exactly that bend and the sizearmholes that suits you - when the armhole does not pull and does not stick into the arm.
That is, the pattern base contains permissible minimum armhole size. You can simulate the armhole for your taste, any configuration. But your fantasy armhole should not be less than on a pattern-based. That is, an armhole on a pattern basis - these are the boundaries beyond which your imagination should not cross.
Your model armhole can be arbitrarily larger - but it cannot be smaller than on a pattern-based basis. More - yes, less - no - otherwise it will dig into the armpit. Here is a rule in modeling design armholes.
Now let's get to know the tucks.
BACK ON BACK - shoulder tuck + waist tuck.

Here in the picture above, I wrote everything about the undercut of the back - and in the photo of the dress you can find 2 waist tucks - one to the right of the zipper, the other to the left of the zipper.
But you don’t see a shoulder tuck on this dress. And on many dresses she is not there either. Because for convenience and beauty - this tuck is transferred from the middle of the shoulder to the zipper. That is, the excess tissue does not pinch at the middle of the shoulder and does not stitch inside the tuck. And excess tissue cropped as a corner at the edge of the shelf, where the zipper is sewn in ..
Tucks are also optional if you are sewing from stretch fabric - it repeats the bends of your body and is compressed both in the area of \u200b\u200bthe shoulder and in the area of \u200b\u200bthe waist.
Next, get to know ... TIRES IN THE FRONT OF THE FRONT.
Oh, you can write a whole poem about her.
I took a long time to figure out how to explain it more clearly - why it is needed and by what laws it lives. Thought, thought ... and came up with.
The fact is that a woman has breasts.))) That is, the front adult girl is no longer flat. This means that the dress in the chest should be convex. A tuck on the shoulder is in front and gives the dress this same bulge in the chest area. Now I will show everything in the pictures. How does this happen.
For example - we have a flat piece of fabric, but we need to make a convex piece of it. To do this, you need to make a tuck on it. For example, this flat circle made of cardboard, with the help of a tuck, will now become convex.

And here is how the chest protrusion creates a bulge on the front part

You noticed that the peak of the bulge (that is, the peak of our rounded pyramid) is at the tip of the tuck. Pay attention to this. Because when we draw the tuck for the chest, the tip of our tuck will be on top of the chest (where the nipple or dome of the bra is usually located).
Remember that sometimes you measured in a store a dress of your size, which somehow strangely skewed on your chest - this is because the tuck in the dress with its tip was directed past tops of your chest. Here the chest did not fit perfectly into the bulge of the dress. This product is not tailored to your breast shape in the factory.
But that is not all,
what do I want to say about a chest tuck.
The fact is that in almost all dresses this chest dart is located not on the shoulder - a side just below the armpit. It is made for beauty. The tuck on the shoulder is more striking, but on the side, and even covered with a hand, it is not noticeable.
Creating a base pattern, we draw a chest tuck on the shoulder only by the fact that it is more convenient to draw there from the point of view of drawing construction.
And after the drawing of the base pattern is ready, we very easily and simply transfer the tuck from the shoulder zone to the axillary zone. Do not think that for this you need to make new drawings. Nah, everything is simple - how to open a package of milk - one minute and that’s all.
Here, in the picture below, I schematically depicted transfer of chest tuck from the shoulder to the side suture at hand.

Well, how do you already feel how you have grown wiser in these 15 minutes?)))
It's only the beginning…
We continue to walk around the pattern and now get acquainted with the lines. Horizontal lines
BREAST LINE
The first acquaintance is the line of the chest. (A beautiful dress, isn't it? We will sew it with you. Do not even doubt it)

The chest line is the most wonderful line on the pattern. It is so convenient to focus on it when drawing the base pattern, because:
- We know that we are finishing drawing a waist tuck in the back on the chest line.
- We know that we finish drawing the waist tuck in front before reaching 4 cm to the chest line.
- We know that the humeral tuck is in front - we finish drawing on the chest line.
- We know that the lower edges of the armholes also extend along the chest line.
Well no, of course, you still don't know that. I will give all these simple rules when we start drawing. And now I just want you to know that when drawing many elements of the pattern, you can just focus on the chest line (and there is no need to painstakingly put down these letters and letters).
WAISTLINE

We focus on this line when drawing the waist tucks - both on the front part and on the back part. The widest point of the tuck is exactly on the waistline.
HIP LINE

So why is it easy and simple to draw a base pattern? Now you will understand.
WHY DRAW THE BASIS FOR A BASIS - IT'S EASY AND SIMPLY
I want to draw attention to 2 wonderful points.
Wonderful moment number 1 - the whole pattern is created inside the rectangle (I filled it with pink to make it clear)


Wonderful moment number 2 - the most laborious is to draw the upper part of the pattern - where there is a neckline, and a shoulder line, and tucks, and armholes for hands.
And so that it would be morally easier for you to draw, I divided the upper part of the pattern into three simple zones. In each zone, we will draw 2-3 simple lines - and that's it - the upper part is ready.

As you can see, if you divide the hard-looking work into 3 parts, each of the 3 parts alone does not seem difficult. As a result, you will not notice how everything has already been drawn.
Everything is simple- First, draw a large rectangle, then divide its upper part into three zones. In each zone we draw 2-3 lines. And all that remains is to go down below and draw the waist tucks, and the line of the hips. Ha! Business!
Do you feel now how easy it is?Draw your first real base pattern.
Well then, let's get started. And draw it all in 20 minutes. Stop the timer.
WE BEGIN TO DRAW THE PATTERN BASIS - WE TAKE MEASURES.
WE TAKE MEASURES
Future product height (from the cervical vertebra to the bottom of the hem of the dress)
Half bosom - (chest circumference divided by 2)
Measure the center of the chest - (the distance between the tops of the chest) in your regular bra.
Back width - (at the level of the middle of the shoulder blades - from hand to hand)
Back length (from the cervical vertebra to the waist)
Shoulder length - (from a lateral point at the base of the neck to the shoulder joint)
Half neck - (neck circumference divided by 2) the tape passes at the base of the neck without compressing it
Hips - (girth divided by 2)
Half Waist - (waist circumference divided by 2)
How to remove all these girths of the chest, waist, hips and neck - we know.
And to take other measurements, I give you an indicative picture below:

STEP ONE- draw a rectangle.
Rectangle Height -this is the height of the future product from the cervical vertebra to the bottom of the future dress
Rectangle Width -half chest + a few cm for a loose fit.
How much do you need to add these same centimeters for free adherence, now we will understand.
Conditionally, there are 4 degrees of fitting the sheath dress:
- Strong-fitting dress silhouette
- Adjoining silhouette
- Semi-adjacent silhouette
- Straight silhouette

If you need tight-fitting silhouette - then choose the fabric in which there are elastic fibers, that is, it stretches a little (not like stretch, but slightly) - and then ALLOWING FULL OF CLOTHING MAY BE ABSENT IN GENERAL - that is, the width of the pattern will be equal to the half-girth of your chest.
If you sew a dress from ordinary non-scribble fabric, then you won’t be able to completely stick it to the bends of your body - and the maximum that we can do is cut out adjacent silhouette . And then the ALLOWANCE FOR THE FREEDOM OF BEDROOM WILL BE 3 CM. These three centimeters will need to be evenly distributed between the back area, the armhole area and the chest area. That is, when we will now divide the pattern into 3 zones - and we will calculate and measure their width - then we simply add an additional 1 cm to the width of each zone - and that’s all.
If dress needed semi-adjacent silhouette (one that hides the “flaws” of the figure) - then the ALLOWANCE FOR FULL OF FULL OF WOODENING will be 4-5 cm. (1 cm will go to the back zone, 1.5 cm to the armhole, the rest will automatically fall into the chest zone.
And if we need a basic pattern for a dress straight silhouette - then add 6-7 cm.

STEP TWO -zoning the upper part of the rectangle into three zones: the back zone, the armhole zone, and the chest zone.
The width of the back zone is a measure of the width of the back divided by 2
The width of the armhole zone is the half-girth of the chest: 4 + 2 cm
The width of the chest area is what remains.
ATTENTION (!!!) If at the very beginning you made an allowance for freedom of fitting, you will not forget to add a part of this allowance to each zone (as I said a little higher in the article).
STEP THREE - in the back zone, draw 2 lines - the neckline + shoulder line.
Neckline - lies on a rectangle e and only its extreme tip is raised up.
What you need to know:
neck width \u003d 1/3 hem. neck + 0.5 cm
the height of the neckline above the rectangle \u003d 1/10 of the neck half-circumference + 0.8 cm
What do we have to do:
So half the neck is divided by 3 and add 0.5 cm. This distance is measured on the upper line to the left. This we found the width of the neck, marked with a dot.
Now this point must be raised higher above the rectangle. We divide the half-circumference of the neck by 10 + 0.8 cm - and raise the point to the resulting figure.

We all found the edge of the neck - now we need to spend a smooth corner. This can be done simply by hand.
Shoulder line
it goes slightly obliquely - from the edge of the neck and slightly protrudes beyond the border of the back zone.
What you need to know:
Shoulder line length \u003d measure of shoulder length + 1.6 cm for tucking.
The slope of the shoulder line - for normal shoulders 2.5 (for high 1.5 cm, for sloping 3.5 cm) - the level of inclination is noted on the side line of the back zone (we measure from top to bottom).
What do we have to do.
We figured out what type our shoulders belong to. We measured the desired value on the lateral line of the back zone (2.5, 1.5 or 3.5)
Draw a line - from the edge of the neck to the marked incline level.
And on this line we measure the measure of shoulder length + 1.6 cm for tucking. As a result, the line slightly lengthened and went beyond the back zone.

Tuck back:
What you need to know:
The tuck is 4 cm from the edge of the neck
Tuck depth 6 cm (i.e. it drops down 6 cm)
Tuck width is always 1.6 cm
The first side of the tuck is lowered perpendicularly, and the second is tilted to the side.
Both sides of the tuck are equal in length, i.e. 6 cm
What do we have to do(see the picture) - we measured 4 cm from the edge of the neck (put a thick dot) and measure further 1, 6 cm for the tuck (set the point) - these are the edges of our tuck.

Now they lowered the perpendicular 6 cm down, then went up to the other edge of the tuck. Moreover, they also climbed exactly 6 cm. Yes, we will slightly rise above the shoulder line. But it is important for us that the sides of the tuck are the same length - we will stitch them together (close the tuck) - and they should coincide in length. If they do not match in length, the shoulder line will be broken, after closing the tuck.
STEP FOUR- we find the chest line and in the armhole zone draw the armhole of the back and armhole in front.
Armhole line backrest
What you need to know:
The armhole line drops down evenly to the chest line.
And the height of the armhole of the back is always \u003d 1/4 of the half-circumference of the chest + 7 cm
The extreme (axillary) point of the armhole line is exactly in the middle of the armhole zone (on the chest line).
The upper 2/3 of its height of the armhole goes almost exactly down
Lower 1/3 of its height + 2 cm - the armhole bends to the side to the midpoint of the armhole zone.
Draw a chest line
Find the height of the armhole. It is equal to \u003d half-circumference of the chest: 4 + 7 cm. The armhole of exactly this height will be optimal for your hand, will not crash into the armpit, or pull the shoulder.
Found this value - and now we measure this distance down from the edge of the shoulder. Measured and put an end.
We have now found not only the lower edge of the armhole - we have now automatically found the level of the chest line. This very important line is found only in this way. Its level is always the magnitude of the armhole, measured down from the shoulder.

And to draw the line of the chest exactly horizontally. It is necessary to measure with a centimeter the distance from this point to the upper edge of the square of our pattern. And then measure the obtained value on both sides of the pattern - slap the dots - and connect them with a horizontal line.
We draw a line of the armhole of the back.
Now we will draw the line of the armhole of the back.
The lower extreme (axillary) point of the armhole is always in the middle of the armhole zone on the chest line. They measured the zone of the armholes with a centimeter - found the middle - slapped the point.

The armhole line starts from the edge of the shoulder, goes down and begins to bend to the side only at the level of 1/3 of its height + 2 cm. This distance is measured from the chest line. That is, the height of the armhole: 3 + 2 cm \u003d the distance from the chest line, where the armhole begins its bend towards the axillary point. But to be honest, I don’t always remember about these extra 2 cm and always draw a curve in the eye, from the hand - I determine about 1/3 and start to round off from it.
Front armhole line
What you need to know:
The height of the armhole of the front is \u003d half-circumference of the chest: 4 + 5 cm
The armhole has 2 bends:
The upper bend is deflected to the side of the border of the armhole line at 1/10 measurements of bosom
Lower bend - starts at 1/3 of the height of the armhole from the chest line
What do we have to do:
We find the level of the upper bend of the armhole - half-circumference of the chest: 4 + 5 cm - slap the point. Now this point must be moved to the left to a distance equal to \u003d half chest: 10.
Now we find the level of bend of the armhole to the armpit - the height of the armhole: 3. Measure this distance on the side line of the armhole zone - slap the point.
And we still have that same axillary point. We get only three points. Now through these three points we draw a smooth line of the armhole.

STEP FIVE - DRAW THE LINES OF THE BREAST AREA (neck, shoulder and thoracic tuck)
Neckline
What you need to know:
Width and neck of the front is the same as that of the neck of the back \u003d half neck: 3 + 0.5 cm
Neck depth \u003d half neck: 10 + 2 cm
Neck edge height measured from the chest line and equal \u003d half-chest: 2 + 3,5 (or + 2 cm for girls)
The diagonal depth of the neck is \u003d 1/3 half neck circumference + 1 cm
What do we have to do:
We find neck width (half neck circumference: 3 + 0.5 cm) - measure it from the corner of the pattern to the left - slap the point.
We find neck depth (half neck circumference: 10 + 2 cm) - measure it from the corner of the pattern down - slap the point.
Now raise the edge of the neck - it should be equal to the distance above the chest line (half-circumference of the chest: 2 + 3.5 cm (or for girls + 2 cm).
We measure this distance upward from the chest line - and at this level we raise the edge of the neck.
Now, to make it more convenient for us to draw the correct rounded bend of our neckline line - we measure the diagonal size of our neckline . It is measured with a centimeter tape from the imaginary place of intersection of the continuation of the edge of the pattern and the level of the upper point of the neck (light green lines in the figure).
Shoulder line
- you do not need to know anything. Here, in general, everything is simple - we connect the edge of the neck of the front and the upper edge of the armhole of the front - the gray line in the figure.
Breast tuck.
What you need to know:
The tip of the thoracic protrusion reaches the line of the chest.
The tip of the thoracic tuck should exactly coincide with the top of the chest (this is where the measurement of the center of the chest comes in handy).
The width of the tuck is found empirically, which is described below.
What do we have to do:
We find the top of the chest on our pattern. To do this, measure on the chest line from the right edge of the pattern half measure of the center of the chest + 1 cm. Only half, because we have only half of the shelves in front of the pattern.

We put a point - and from it we draw a perpendicular straight line straight up - to the shoulder line. Here we have just determined the location of the thoracic protrusion, so that its tip is directed evenly at the top of our chest. The chest will ideally lie in the bulge of the dress - without distortions.
Now we need to draw the second side of the tuck - BUT for this we need to know its width.
There are no formulas here. Tuck width is recognized empirically. For this we need
1.) Know the measurement of the length of your shoulder (we took this measurement at the very beginning)
2.) Measure with a centimeter the length of the shoulder line on the pattern.
3.) Compare these values \u200b\u200bwith each other.
4.) The difference in magnitude will be the width of our tuck. For flat-chested kids, this difference is zero, which means that the width of the tuck is zero. That is, it is not there. Well, that’s right, little girls don’t have a chest - why do they need a tuck.
5.) The found width and measure to the left of the edge of the tuck. We mark with a dot. And from this second point we draw a line down to the tip of our tuck. Oops! And the tuck is almost ready.
6.) It remains only to make both sides of the tuck the same in length. Measure the first side of the tuck. And we measure the same distance on the other side of the tuck. So that they are the same and coincide with each other, when we close this tuck.
7.) The shoulder line turned out to be slightly broken (raised after tucking). But it is so. After closing the tuck, it will lower and will be perfectly smooth.


WE FINISHED WITH THE TOP OF THE PATTERN. URAAAAAAAAAAAAAAAAAA
It remains to separate the shelf of the back from the shelf of the waist. Then find the waist line and the hips line. On the waist line draw a lateral bend and 2 waist tucks (on the back and front). On the hips line draw the hem extension to the sides.
We’ll do this quickly and that’s all - it will be possible to open the bar with drinks and mark this thing.
Well, let's get started ...
STEP SIX - we divide the pattern into a shelf on the back and a shelf on the front - that is, on the right and left sides.
What you need to know:
Side seam line - divides the pattern into a back shelf and a front shelf.
The line of the side seam does not extend in the middle, but shifts towards the back (you need to divide the width of the zone of the armhole into 3 identical parts by two points - and just through the left point, which is closer to the back) and the side line will pass)
What do we have to do:
Measure the width of the armhole zone. Divide it into 3 identical segments - two points. And through the left point and draw a vertical line. This will be the lateral line of our shelves (back and front).

STEP SEVEN - we draw a line of a waist and a line of hips.
What you need to know.
The waistline is below the cervical vertebra at a distance equal to the measurement of the length of the back.
The hips line is below the waist line at a distance equal to half the measure of the length of the back.
Waist line and hips line - has a slight deflection (1.5 cm) on the half of the front (this deflection is necessary for the roundness of the tummy, which is even the worst).
What do we have to do.
We measure the level of the waistline - from the top of the pattern we measure down back length measurement - draw a line.
We measure the level of the hips line - from the waist line we measure down half measure back length - draw a line.

On the right side of the pattern, mark the points that are 1.5 cm below the lines - to this point we bend the line (as shown in the figure).

STEP EIGHT - we draw the lateral bends of the front and back + waist waist protrusions of the front and back.
We calculate the width of the tucks and side bends
What you need to know:
Width of the lateral bend of the front \u003d width of the lateral bend of the back \u003d width of the waist tuck of the back \u003d width of the waist tuck of the front. That is, in the process of fitting the dress, we remove the same amount of excess fabric in the side bends and in the tucks.
To find out the width of the tuck or bend. You need to know the amount of excess tissue, the one that should be cut in the lateral bend or hide in a tuck. And to divide this total amount of excess tissue into 4 (each of these 4 pieces will be removed in its tuck or in its lateral bend). So ...
Tuck (or lateral bend) width \u003d number of excess fabric: 4
Number of excess fabric \u003d pattern width minus half waist.
A bit confusing, but now I will show everything with a specific example ....
What do we have to do.
1.) We know the width of the pattern (remember, it is equal to half-circumference of the chest + 6 cm)
2.) We know the waist circumference (we took measurements at the very beginning)
3.) Subtract the waist half-width from the width of the pattern and additionally subtract 2 cm.
4.) The resulting figure is the number of excess tissue that will go into a lateral bend or into tucks.
5.) Width of one tuck (or lateral bend) \u003d number of excess tissue: 4.
For example, the width of my pattern is 52 cm, and the half-circumference of my waist is 36 cm.
The amount of excess tissue in the waist area will be 52 - 36 - 2 \u003d 14 cm.
It is this number of fabric that should be partially cut off at the lateral bend of my pattern, partially hidden inside the tucks of the front and back.
On the pattern there are 2 bends (at the side of the front and at the side of the back) and 2 tucks (one at the front, one at the back).
So, my excess of 14 cm should be evenly distributed between all these four elements. That is 14 cm: 4 \u003d 3.5 cm.
That is, 3.5 cm will be the width of the back tuck + 3.5 cm will be the width of the front tuck + 3.5 cm will go into the bend of the side line of the back + 3.5 cm will go into the lateral bend of the front line.
Now it’s clear how to find out the width of the tucks and bends.
We can draw the lateral bends right away - we measure one size (in my case, 3.5 cm) on both sides of the midline:

And in order to draw the waist tucks on the back and front - you still need find their correct location on the pattern.
We draw a waist tuck in the back.
What you need to know:
The central axis of the waist back protrusion - runs in the middle of the back zone. That is, it is located from the left edge of the pattern at a distance equal to \u003d back width measure: 4
The top vertex of the waist tuck of the back is located exactly on the chest line (where the axis intersects this line)
The lower apex of the waist tuck in the back - does not reach the hip line by 4 cm.
What do we have to do:
First, draw the center line of the tuck - that is, a straight line that will indicate the center of the tuck. On this centerline will be the peaks of the tuck.
The center line of the waist back protrusion runs exactly in the middle of the back zone.
That is, you can simply measure the width of the back zone and find its middle.
Or measure from the edge of the shelf to the right a value equal to \u003d back width measure: 4.

Find the peaks (sharp tips) of the tuck: The top peak lies on the chest line, where the axis of the tuck intersects it. The lower one lies on the axis, at a distance of 4 cm from the line of the hips.
Now we draw a tuck: on the waist line on both sides of the axis we measure half the width of the tuck. And from these points we draw lines to the top of the tuck and to the bottom of the tuck ..
Waist tuck in front.
What you need to know:
Waist tuck in front - lies on the same axis as the tuck in the chest. That is, the axis of the tuck is also located at a distance equal to \u003d half measure of the center of the chest + 1 cm
The tops of the waist are on the line of its axis: the top does not reach 4 cm to the line of the chest, the lower top does not reach 4 cm to the line of the hips.
What do we do:
We find the axis of the waist tuck in front - either we continue down the line of the tuck of the chest, or we measure from the right edge of the pattern a distance equal to \u003d half the measure of the center of the chest + 1 cm.
We measure this distance along the line of the chest and along the line of the hips - we put the points together and get the axis of the tuck.
On the axis, we mark the vertices of the waist projection of the front - the upper vertex does not reach 4 cm to the chest line, the lower vertex does not reach 4 cm to the thigh line.
On the waist line on both sides of the axis we measure half the width of the tuck - and from these points we draw the lines down and up to the vertices of the tuck.

STEP NINE - draw an extension in the hips and a smooth roundness of the bottom of the product.
What you need to know:
Hem dresses expands in the zone of the hips line by 1.5 cm.
And if you want a slightly widened hem, then also expand on the bottom line of the product an additional 1.5 cm (that is, the total hem below will expand by 3 cm).
Anyway, when trying on, you will see the optimum hem width and yourself there you will sew the side seam under the hips line if you want to narrow the hem.
The bottom of the product also has a slight curvature (1.5 cm) to the edge of the front and back shelves.
What do we do:
On the line, we measure 1, 5 cm on both sides of the lateral line of the shelves (put dots).
On the bottom line of the pattern, we measure both sides at 1, 5 cm (or 3 cm if we want a slightly widened hem)

Connect these points in a smooth line, drawing the side lines of the front and back hem. The side lines of the front and back hem are drawn (as you noticed) overlapping each other - crossing each other. Then, having made copies of the base pattern, we will carve out separately a shelf on the back, a separate shelf on the front, that is, we will divide these halves, leaving each of them with its own hemline.
Now for the curved bottom line of the product - we draw dots 1.5 cm lower than the lower corners of the pattern. We connect these points with smooth lines with the extreme lateral points of the hem.


Done, comrades girls !!! We are in a sober mind and memory just made a pattern-base !!!And at the same time, they never even turned off the brain and Nikki abb-cadabra with small letters-tsiferki.
Moreover - you didn’t just draw under my pointer - but you understood what is hidden behind each line. And this is a little thing - oh how useful it is for modeling. And we will moderate with you - all sorts of things with pleasure and also with full awareness of what is being done and for what.
Learn to think and turn on the brain, and you can model yourself what you like without waiting for my tutorial articles.
And we will begin to sew on the pattern-based TOPA.
You ask: “Hey, why not immediately dresses?”. I give the answer to this question already in the first article of the series “Sewing tops and shirts is quick and easy.” So to be continued))) Let's go ....
Good luck with your tailoring!
Olga Klishevskaya, specially for the site “Women's Talks”.
I think you will be interested:
>
There are 46 comments on the record.
| and where to get a sleeve pattern |
|
I will tell you the secrets that I know.Moreover - I will teach you to discover more and more secrets of the world of sewing and modeling clothes.
I will not lead you (blind and stupid) by the handle in the chaos of letters and numbers denoting the intricacies of numerous lines of drawing patterns. NO, I WILL NOT TELL YOU HERE:
Well, you see, one such picture can catch fear and make a girl who doubts her own abilities really, really wants to sew a dress - but i was not friends at school with geometry and drawing. Even I, who adored both of these school subjects, went around and around for several years — not daring to start delving into the construction of such a drawing: “How long does it take to draw such a thing and you need to calculate everything correctly and not get lost in letters…”.
And, nevertheless, today we will draw a pattern.
We will draw a pattern-base (this is a piece of it you see from above.))))
But - do not rush to be scared - we will create our pattern a little differently. Away from the engineering method - and closer to human understanding.
We will draw one with you - only one - pattern.
And then from it we will create more and more new models of dresses. And it will be very easy and simple.
- No obscure formulas
- No confusing calculations.
- And without the letter-spider web.
How? Have I removed a bit of your concerns?
I now relax - we will not start drawing right now. To begin with, we will take a pleasant walk through the pattern. The purpose of the walk is to get acquainted, make friends with the pattern and remove the last doubt that you can sew any dress.
So ... what is a pattern - the basis?
To put it figuratively, it is a cast from your body. This is your personal print. Any thing sewn according to YOUR pattern-base will ideally sit on YOUR figure.
Yes, you heard right - ANYTHING can be sewn on the basis of one and only pattern. All-all models of dresses - are born, modeled, and sewn from one source - this is the base pattern.
I’ll prove it to you now with an example. Even in three examples - in the form of photos and pictures.
Here is the first photo (below). Our base pattern is, in fact, your sheath dress (one that fits perfectly on the figure). Custom Made Dress your pattern-based, will repeat all the bends your his body. This simple sheath dress is sewn according to the usual pattern-based. See, it’s like a plaster cast from a girl’s figure.
And already today, having drawn the base pattern, you can safely do the cutting on the fabric - and you will get such a dress. The only thing you can change the neckline is to give it the shape that suits your face contour.

All other (any-adorable) dress models are just a modification of the sheath dress - a fantasy on a free theme.
Here's how it goes in the fashion world.
Once a fashion designer thought ...“But what if the bodice of the dress at the top will hold a round yoke (yellow outlines - the figure below), and the bodice itself will be made in the form of oncoming triangles overlapping (red outlines - see the figure below). The result is what we see in the photo below.
Handsomely? Handsomely.
What did the fashion designer base his fantasies on? On a pattern basis.
And you can come up with something of your own. In us - in women - just a lot of imagination.
By the way - since we were talking about a round yoke here - on this site there is already one of my article on creating a dress for a girl on a round yoke simple and a dress on a round yoke flounce.
And another fashion designer thought: “And what if you give the sheath dress a looser cut - make it wider. And make the line of the shoulder longer so that it hangs on the arm. ” And in the end, a new model is born (photo below) - also very beautiful. And very simple.

You can do that too. If you will UNDERSTAND what the base pattern consists of. And by what laws does it exist.
That is why i do not want to stupidly give you instructions to create a base pattern (such as “draw a line from point P6 to point P5 and mark the point of its intersection with line X as the next point ...” - pah!).
I want to wake you up little thing. I want you to feel the pattern, know its soul. Learned to see what a simple essentially drawing hiding behind a photograph of any, even intricately tailored, dress.
Therefore, we will not draw anything in the next 30 minutes - we will walk around the pattern itself. We will get acquainted with all its elements - we will find out why each line serves, and why it is located here and drawn just like that.
After such a “cognitive walk” you will feel joyful clarity of understanding of all-all-all. It’s as if you have already painted the base patterns many times. And take up the drawing with the feeling that this is a couple of trifles. Ha! Business!
As the sage said: “We are only afraid of what we cannot understand and explain logically. But as soon as the thing that scares us becomes clear to us, it ceases to cause us fear. ”
So let's go and tame this "terrible beast" - the base pattern. Tame and draw in 20 minutes. Yes, in 20 minutes - because after a walk - the drawing of the pattern will seem to you an old and well-known simple pattern - like a grating for playing tic-tac-toe.
Where does the base pattern come from
So where does the pattern come from - usually it is extracted from such a Thursday:
In the drawing there is half of the back part + half of the front part.
We will also draw a similar drawing with you - only more simply and clearly.
And why are these halves needed, and where to apply them - now I will clearly show everything.
Here (!) I dug up a wonderful mischief - below - in the photo of the black-and-white dress, our halves are very clearly visible - both the half of the back and the half of the front. So to speak - clearly and clearly.
Yes, in Potnovsky language halves are called "shelves." We will draw these very shelves of the front and back today. But first, a detailed look at what elements each shelf consists of. And most importantly, I will tell you why each element is needed, what it serves.
To make everything as clear as possible, I will illustrate each of the elements both in pictures and in photographs of real models of dresses.
First, get acquainted with two obscure words: TAP and ARMHOLE.
Of course, maybe you know them. Or maybe not. My business is to introduce.
So, get acquainted - PROYMA.

When drawing the base pattern, you will create exactly that bend and the sizearmholes that suits you - when the armhole does not pull and does not dig into the arm.
That is, the pattern base contains permissible minimum armhole size. You can simulate the armhole for your taste, any configuration. But your fantasy armhole should not be less than on a pattern-based. That is, an armhole on a pattern basis - these are the boundaries beyond which your imagination should not cross.
Your model armhole can be arbitrarily larger - but it cannot be smaller than on a pattern-based basis. More - yes, less - no - otherwise it will dig into the armpit. Here is a rule in modeling design armholes.
Now let's get to know the tucks.
BACK ON BACK - shoulder tuck + waist tuck.

Here in the picture above, I wrote everything about the back tucks - and in the photo of the dress you can find 2 waist tucks - one to the right of the zipper, the other to the left of the zipper.
But you don’t see a shoulder tuck on this dress. And on many dresses she is not there either. Because for convenience and beauty - this tuck is transferred from the middle of the shoulder to the zipper (or along the edge of the armhole, where the sleeve will simply be cut off the corner). That is, the excess tissue does not pinch at the middle of the shoulder and does not stitch inside the tuck. And excess tissue cropped as a corner at the edge of the shelf, where the zipper is sewn in, or at the edge of the armhole, where the sleeve will be sewn.
Tucks are also optional if you are sewing from stretch fabric - it repeats the bends of your body and is compressed both in the area of \u200b\u200bthe shoulder and in the area of \u200b\u200bthe waist.
Next, get to know ... TIRES IN THE FRONT OF THE FRONT.
Oh, you can write a whole poem about her.
I took a long time to figure out how to explain it more clearly - why it is needed and by what laws it lives. Thought, thought ... and came up with.
The fact is that a woman has breasts.))) That is, the front adult girl is no longer flat. This means that the dress in the chest should be convex. A tuck on the shoulder is in front and gives the dress this same bulge in the chest area. Now I will show everything in the pictures. How does this happen.
For example - we have a flat piece of fabric, but we need to make a convex piece of it. To do this, you need to make a tuck on it. For example - this flat circle made of cardboard, with the help of a tuck, will now become convex.
And here is how the chest protrusion creates a bulge on the front part

You noticed that the peak of the bulge (that is, the peak of our rounded pyramid) is at the tip of the tuck. Pay attention to this. Because when we draw the tuck for the chest, the tip of our tuck will be on top of the chest (where the nipple or dome of the bra is usually located).
Remember that sometimes you measured in a store a dress of your size, which somehow strangely skewed on your chest - this is because the tuck in the dress with its tip was directed past tops of your chest. Here the chest did not fit perfectly into the bulge of the dress. This product is not tailored to your breast shape in the factory.
But that is not all,
what do I want to say about a chest tuck.
The fact is that in almost all dresses this chest dart is located not on the shoulder - a side just below the armpit. It is made for beauty. The tuck on the shoulder is more striking, but on the side, and even covered with a hand, it is not noticeable.
Creating a base pattern, we draw a chest tuck on the shoulder just because it is more convenient to draw it there from the point of view of drawing construction.
And after the drawing of the base pattern is ready, we very easily and simply transfer the tuck from the shoulder zone to the axillary zone. Do not think that for this you need to make new drawings. Nah, everything is simple - how to open a package of milk - one minute and that’s all.
Here, in the picture below, I schematically depicted transfer of chest tuck from the shoulder to the side suture at hand.
Well, how do you already feel how you have grown wiser in these 15 minutes?)))
It's only the beginning…
We continue to walk around the pattern and now get acquainted with the lines. Horizontal lines
BREAST LINE
The first acquaintance is the line of the chest. (A beautiful dress, isn't it? We will sew it with you. Do not even doubt it)
The chest line is the most wonderful line on the pattern. It is so convenient to focus on it when drawing the base pattern, because:
- We know that we are finishing drawing a waist tuck in the back on the chest line.
- We know that we finish drawing the waist tuck in front before reaching 4 cm to the chest line.
- We know that the humeral tuck is in front - we finish drawing on the chest line.
- We know that the lower edges of the armholes also extend along the chest line.
Well no, of course, you still don't know that. I will give all these simple rules when we start drawing. And now I just want you to know that when drawing many elements of the pattern, you can just focus on the chest line (and there is no need to painstakingly put down these letters and letters).
WAISTLINE

We focus on this line when drawing the waist tucks - both on the front part and on the back part. The widest point of the tuck is exactly on the waistline.
HIP LINE
On this line we draw the extension of the hem. The classic extension of the hem of 1.5 cm to the left and right will be necessary for us so that at least the dress does not rub too much on the body, does not warp.
If you sew from stretching fabrics, then this hem extension will prevent one very unpleasant thing - when the hem of the stretch dress, while walking, begins to slowly creep up the hips, fastening to the waist - and then you have to pull it constantly every 5-10 steps .
Also, the extension of the hem can be larger than the classic 1.5 cm in the event that the circumference of your thigh is much wider than the circumference of your chest. .. Then the hem will be expanded already in accordance with the size of the difference between these volumes (I will describe in more detail below, when constructing the pattern).

So why is it easy and simple to draw a base pattern? Now you will understand.
WHY DRAW THE BASIS FOR A BASIS - IT'S EASY AND SIMPLY
I want to draw attention to 2 wonderful points.
Wonderful moment number 1 - the whole pattern is created inside the rectangle (I filled it with pink to make it clear)


Wonderful moment number 2 - the most laborious is to draw the upper part of the pattern - where there is a neckline, and a shoulder line, and tucks, and armholes for hands.
And so that it would be morally easier for you to draw, I divided the upper part of the pattern into three simple zones. In each zone, we will draw 2-3 simple lines - and that's it - the upper part is ready.

As you can see, if you divide the hard-looking work into 3 parts, each of the 3 parts alone does not seem difficult. As a result, you will not notice how everything has already been drawn.
Everything is simple- First, draw a large rectangle, then divide its upper part into three zones. In each zone we draw 2-3 lines. And all that remains is to go down below and draw the waist tucks, and the line of the hips. Ha! Business!
Do you feel now how easy it is?Draw your first real base pattern.
Well then, let's get started. And draw it all in 20 minutes. Stop the timer.
WE BEGIN TO DRAW THE PATTERN BASIS - WE TAKE MEASURES.
WE TAKE MEASURES
Future product height (from the cervical vertebra to the bottom of the hem of the dress)
Half bosom - (chest circumference divided by 2)
Measure the center of the chest - (the distance between the tops of the chest) in your regular bra.
Back width - (at the level of the middle of the shoulder blades - from hand to hand)
Back length (from the cervical vertebra to the waist)
Shoulder length - (from a lateral point at the base of the neck to the shoulder joint)
Half neck - (neck circumference divided by 2) the tape passes at the base of the neck without compressing it
Hips - (girth divided by 2)
Half Waist - (waist circumference divided by 2)
How to remove all these girths of the chest, waist, hips and neck - we know.
And to take other measurements, I give you an indicative picture below:
STEP ONE- draw a rectangle.
Rectangle Height -this is the height of the future product from the cervical vertebra to the bottom of the future dress
Rectangle Width -half chest + a few cm for a loose fit.
How much do you need to add these same centimeters for free adherence, now we will understand.
Conditionally, there are 4 degrees of fitting the sheath dress:
- Strong-fitting dress silhouette
- Adjoining silhouette
- Semi-adjacent silhouette
- Straight silhouette
If you need tight-fitting silhouette - then choose the fabric in which there are elastic fibers, that is, it stretches a little (not like stretch, but slightly) - and then ALLOWING FULL OF CLOTHING MAY BE ABSOLUTELY AVAILABLE - that is, the width of the pattern will be equal to the half-girth of your chest.
If you sew a dress from ordinary non-scribble fabric, then you won’t be able to completely stick it to the bends of your body - and the maximum that we can do is cut out adjacent silhouette . And then the ALLOWANCE FOR THE FREEDOM OF BEDROOM WILL BE 3 CM. These three centimeters will need to be evenly distributed between the back area, the armhole area and the chest area. That is, when we will now divide the pattern into 3 zones - and we will calculate and measure their width - then we simply add an additional 1 cm to the width of each zone - and that’s all.
If dress needed semi-adjacent silhouette (one that hides the “flaws” of the figure) - then the ALLOWANCE FOR FULL OF FULL OF WOODENING will be 4-5 cm. (1 cm will go to the back zone, 1.5 cm to the armhole, the rest automatically falls into the chest zone.
And if we need a basic pattern for a dress straight silhouette - then add 6-7 cm.

STEP TWO -zoning the upper part of the rectangle into three zones: the back zone, the armhole zone, and the chest zone.
The width of the back zone is a measure of the width of the back divided by 2
The width of the armhole zone is the half-girth of the chest: 4 + 2 cm
The width of the chest area is what remains.
ATTENTION (!!!) If at the very beginning you made an allowance for freedom of fitting, you will not forget to add a part of this allowance to each zone (as I said a little higher in the article).
STEP THREE - in the back zone, draw 2 lines - the neckline + shoulder line.
Neckline - lies on a rectangle e and only its extreme tip is raised up.
What you need to know:
neck width \u003d 1/3 hem. neck + 0.5 cm
the height of the neckline above the rectangle \u003d 1/10 of the neck half-circumference + 0.8 cm
What do we have to do:
So half the neck is divided by 3 and add 0.5 cm. This distance is measured on the upper line to the left. This we found the width of the neck, marked with a dot.
Now this point must be raised higher above the rectangle. We divide the half-circumference of the neck by 10 + 0.8 cm - and raise the point to the resulting figure.

We all found the edge of the neck - now we need to spend a smooth corner. This can be done simply by hand.
Shoulder line
it goes slightly obliquely - from the edge of the neck and slightly protrudes beyond the border of the back zone.
What you need to know:
Shoulder line length \u003d measure of shoulder length + 1.6 cm for tucking.
The slope of the shoulder line - for normal shoulders 2.5 (for high 1.5 cm, for sloping 3.5 cm) - the level of inclination is noted on the side line of the back zone (we measure from top to bottom).
What do we have to do.
We figured out what type our shoulders belong to. We measured the desired value on the lateral line of the back zone (2.5, 1.5 or 3.5)
Draw a line - from the edge of the neck to the marked incline level.
And on this line we measure the measure of shoulder length + 1.6 cm for tucking. As a result, the line slightly lengthened and went beyond the back zone.
Tuck back:
What you need to know:
The tuck is 4 cm from the edge of the neck
Tuck depth 6 cm (i.e. it drops down 6 cm)
Tuck width is always 1.6 cm
The first side of the tuck is lowered perpendicularly, and the second is tilted to the side.
Both sides of the tuck are equal in length, i.e. 6 cm
What do we have to do(see the figure) - we measured 4 cm from the edge of the neck (put a thick dot) and measure further 1, 6 cm for the tuck (set the point) - these are the edges of our tuck.

Now they lowered the perpendicular 6 cm down, then went up to the other edge of the tuck. Moreover, they also climbed exactly 6 cm. Yes, we will slightly rise above the shoulder line. But it is important for us that the sides of the tuck are the same length - we will stitch them together (close the tuck) - and they should coincide in length. If they do not match in length, the shoulder line will be broken, after closing the tuck.
STEP FOUR- we find the chest line and in the armhole zone draw the armhole of the back and armhole in front.
Armhole line backrest
What you need to know:
The armhole line drops down evenly to the chest line.
And the height of the armhole of the back is always \u003d 1/4 of the half-circumference of the chest + 7 cm
The extreme (axillary) point of the armhole line is exactly in the middle of the armhole zone (on the chest line).
The upper 2/3 of its height of the armhole goes almost exactly down
Lower 1/3 of its height + 2 cm - the armhole bends to the side to the midpoint of the armhole zone.
Draw a chest line
Find the height of the armhole. It is equal to \u003d half-circumference of the chest: 4 + 7 cm. The armhole of exactly this height will be optimal for your hand, will not crash into the armpit, or pull the shoulder.
Found this value - and now we measure this distance down from the edge of the shoulder. Measured and put an end.
We have now found not only the lower edge of the armhole - we have now automatically found the level of the chest line. This very important line is found only in this way. Its level is always the magnitude of the armhole, measured down from the shoulder.

And to draw the line of the chest exactly horizontally. It is necessary to measure with a centimeter the distance from this point to the upper edge of the square of our pattern. And then measure the obtained value on both sides of the pattern - slap the dots - and connect them with a horizontal line.
We draw a line of the armhole of the back.
Now we will draw the line of the armhole of the back.
The lower extreme (axillary) point of the armhole is always in the middle of the armhole zone on the chest line. They measured the zone of the armholes with a centimeter - found the middle - slapped the point.
The armhole line starts from the edge of the shoulder, goes down and begins to bend to the side only at the level of 1/3 of its height + 2 cm. This distance is measured from the chest line. That is, the height of the armhole: 3 + 2 cm \u003d the distance from the chest line, where the armhole begins its bend towards the axillary point. But to be honest, I don’t always remember about these extra 2 cm and always draw a curve in the eye, from the hand - I determine about 1/3 and start to round off from it.
Front armhole line
What you need to know:
The height of the armhole of the front is \u003d half-circumference of the chest: 4 + 5 cm
The armhole has 2 bends:
The upper bend is deflected to the side of the border of the armhole line at 1/10 measurements of bosom
Lower bend - starts at 1/3 of the height of the armhole from the chest line
What do we have to do:
We find the level of the upper bend of the armhole - half-circumference of the chest: 4 + 5 cm - slap the point. Now this point must be moved to the left to a distance equal to \u003d half chest: 10.
Now we find the level of bend of the armhole to the armpit - the height of the armhole: 3. Measure this distance on the side line of the armhole zone - slap the point.
And we still have that same axillary point. We get only three points. Now through these three points we draw a smooth line of the armhole.

STEP FIVE - DRAW THE LINES OF THE BREAST AREA (neck, shoulder and thoracic tuck)
Neckline
What you need to know:
Width and neck of the front is the same as that of the neck of the back \u003d half neck: 3 + 0.5 cm
Depth of neck \u003d half neck: 3 + 2 cm
Neck edge height measured from the chest line and equal \u003d half-chest: 2 + 3,5 (or + 2 cm for girls)
The diagonal depth of the neck is \u003d 1/3 half neck circumference + 1 cm
What do we have to do:
We find neck width (half neck circumference: 3 + 0.5 cm) - measure it from the corner of the pattern to the left - slap the point.
Now raise the edge of the neck - it should be equal to the distance above the chest line (half-circumference of the chest: 2 + 3.5 cm (or for girls + 2 cm).
Measure this distance up from the chest line - and at this level we raise the edge of the neck. And do not be afraid, if suddenly this point rises too high in your opinion above the edge of the main rectangle of the pattern. The larger your figure, the wider the horizontal plane of your shoulder, and the more you will have to raise this point of the upper edge of the neck.
For example, with a chest girth of 80 cm - this point usually rises to somewhere by 4.5 cm (plus or minus 1 cm, depending on how much sloping your shoulders are). And when the chest girth is 110 cm, then the point can rise above the main square of the pattern as much as 7 cm. Let yours not be scary - feel free to draw, and don’t worry ... you are doing everything right.

Now that you have raised the neckline up beyond the pattern, you need to draw weak intersection lines this new horizontal level and a line mentally extending up the side of the pattern (see in my drawing these lines I drew a bright green color). These lines are needed as guidelines - because it is their intersection points that we will measure our next measurements - the vertical depth of the neck (neckline) and the diagonal depth.
Find the depth of the neck (half neck circumference: 3 + 2 cm) - measure it from the angle of intersection of imaginary lime lines down - measure and slap the point.
Now, to make it more convenient for us to draw the correct rounded bend of our neckline line - we measure the diagonal size of our neckline . It is measured with a centimeter tape from the intersection of the lime line - diagonally to the left.
Shoulder line
You don’t need to know anything. Here, in general, everything is simple - we connect the edge of the neck of the front and the upper edge of the armhole of the front - the gray line in the figure.
Breast tuck.
What you need to know:
The tip of the thoracic protrusion reaches the line of the chest.
The tip of the thoracic tuck should exactly coincide with the top of the chest (this is where the measurement of the center of the chest comes in handy).
The width of the tuck is found empirically, which is described below.
What do we have to do:
We find the top of the chest on our pattern. To do this, measure on the chest line from the right edge of the pattern half measure of the center of the chest + 1 cm. Only half, because we have only half of the shelves in front of the pattern.
We put a point - and from it we draw a perpendicular straight line straight up - to the shoulder line. Here we have just determined the location of the thoracic protrusion, so that its tip is directed evenly at the top of our chest. The chest will ideally lie in the bulge of the dress - without distortions.
Now we need to draw the second side of the tuck - BUT for this we need to know its width.
There are no formulas here. Tuck width is recognized empirically. For this we need
1.) Know the measurement of the length of your shoulder (we took this measurement at the very beginning)
2.) Measure with a centimeter the length of the shoulder line on the pattern.
3.) Compare these values \u200b\u200bwith each other.
4.) The difference in magnitude will be the width of our tuck. For flat-chested kids, this difference is zero, which means that the width of the tuck is zero. That is, it is not there. Well, that’s right, little girls don’t have a chest either - why should they tuck.
5.) The found width and measure to the left of the edge of the tuck. We mark with a dot. And from this second point we draw a line down to the tip of our tuck. Oops! And the tuck is almost ready.
6.) It remains only to make both sides of the tuck the same in length. Measure the first side of the tuck. And we measure the same distance on the other side of the tuck. So that they are the same and coincide with each other, when we close this tuck.
7.) The shoulder line turned out to be slightly broken (raised after tucking). But it is so. After closing the tuck, it will lower and will be perfectly smooth.

WE FINISHED WITH THE TOP OF THE PATTERN. URAAAAAAAAAAAAAAAAAA
It remains to separate the shelf of the back from the shelf of the waist. Then find the waist line and the hips line. On the waist line draw a lateral bend and 2 waist tucks (on the back and front). On the hips line draw the hem extension to the sides.
We’ll do this quickly and that’s all - it will be possible to open the bar with drinks and mark this thing.
Well, let's get started ...
STEP SIX - we divide the pattern into a shelf on the back and a shelf on the front - that is, on the right and left sides.
What you need to know:
Side seam line - divides the pattern into a back shelf and a front shelf.
The line of the side seam does not extend in the middle, but shifts towards the back (you need to divide the width of the zone of the armhole into 3 identical parts by two points - and just through the left point, which is closer to the back) and the side line will pass)
What do we have to do:
Measure the width of the armhole zone. Divide it into 3 identical segments - two points. And through the left point and draw a vertical line. This will be the lateral line of our shelves (back and front).

STEP SEVEN - we draw a line of a waist and a line of hips.
What you need to know.
The waistline is below the cervical vertebra at a distance equal to the measurement of the length of the back.
The hips line is below the waist line at a distance equal to half the measure of the length of the back.
Waist line and hips line - has a slight deflection (1.5 cm) on the half of the front (this deflection is necessary for the roundness of the tummy, which is even the worst).
What do we have to do.
We measure the level of the waistline - from the top of the pattern we measure down back length measurement - draw a line.
We measure the level of the hips line - from the waist line we measure down half measure back length - draw a line.

On the right side of the pattern, mark the points that are 1.5 cm below the lines - to this point we bend the line (as shown in the figure).

STEP EIGHT - we draw the lateral bends of the front and back + waist waist protrusions of the front and back.
We calculate the width of the tucks and side bends
What you need to know:
Width of the lateral bend of the front \u003d width of the lateral bend of the back \u003d width of the waist tuck of the back \u003d width of the waist tuck of the front. That is, in the process of fitting the dress, we remove the same amount of excess fabric in the side bends and in the tucks.
To find out the width of the tuck or bend. You need to know the amount of excess tissue, the one that should be cut in the lateral bend or hide in a tuck. And to divide this total amount of excess tissue into 4 (each of these 4 pieces will be removed in its tuck or in its lateral bend). So ...
Tuck (or lateral bend) width \u003d number of excess fabric: 4
Number of excess fabric \u003d pattern width minus half waist.
A bit confusing, but now I will show everything with a specific example ....
What do we have to do.
1.) We know the width of the pattern (remember, it is equal to half-circumference of the chest + 6 cm)
2.) We know the waist circumference (we took measurements at the very beginning)
3.) Subtract the waist half-width from the width of the pattern and additionally subtract 2 cm.
4.) The resulting figure is the number of excess tissue that will go into a lateral bend or into tucks.
5.) Width of one tuck (or lateral bend) \u003d number of excess tissue: 4.
For example, the width of my pattern is 52 cm, and the half-circumference of my waist is 36 cm.
The amount of excess tissue in the waist area will be 52 - 36 - 2 \u003d 14 cm.
It is this number of fabric that should be partially cut off at the lateral bend of my pattern, partially hidden inside the tucks of the front and back.
On the pattern there are 2 bends (at the side of the front and at the side of the back) and 2 tucks (one at the front, one at the back).
So, my excess of 14 cm should be evenly distributed between all these four elements. That is 14 cm: 4 \u003d 3.5 cm.
That is, 3.5 cm will be the width of the back tuck + 3.5 cm will be the width of the front tuck + 3.5 cm will go into the bend of the side line of the back + 3.5 cm will go into the lateral bend of the front line.
Now it’s clear how to find out the width of the tucks and bends.
We can draw the lateral bends right away - we measure one size (in my case, 3.5 cm) on both sides of the midline:
And in order to draw the waist tucks on the back and front - you still need find their correct location on the pattern.
We draw a waist tuck in the back.
What you need to know:
The central axis of the waist back protrusion - runs in the middle of the back zone. That is, it is located from the left edge of the pattern at a distance equal to \u003d back width measure: 4
The top vertex of the waist tuck of the back is located exactly on the chest line (where the axis intersects this line)
The lower apex of the waist tuck in the back - does not reach the hip line by 4 cm.
What do we have to do:
First, draw the center line of the tuck - that is, a straight line that will indicate the center of the tuck. On this centerline will be the peaks of the tuck.
The center line of the waist back protrusion runs exactly in the middle of the back zone.
That is, you can simply measure the width of the back zone and find its middle.
Or measure from the edge of the shelf to the right a value equal to \u003d back width measure: 4.

Find the peaks (sharp tips) of the tuck: The top peak lies on the chest line, where the axis of the tuck intersects it. The lower one lies on the axis, at a distance of 4 cm from the line of the hips.
Now we draw a tuck: on the waist line on both sides of the axis we measure half the width of the tuck. And from these points we draw lines to the top of the tuck and to the bottom of the tuck ..
Waist tuck in front.
What you need to know:
Waist tuck in front - lies on the same axis as the tuck in the chest. That is, the axis of the tuck is also located at a distance equal to \u003d half measure of the center of the chest + 1 cm
The tops of the waist are on the line of its axis: the top does not reach 4 cm to the line of the chest, the lower top does not reach 4 cm to the line of the hips.
What do we do:
We find the axis of the waist tuck in front - either we continue down the line of the tuck of the chest, or we measure from the right edge of the pattern a distance equal to \u003d half the measure of the center of the chest + 1 cm.
We measure this distance along the line of the chest and along the line of the hips - we put the points together and get the axis of the tuck.
On the axis, we mark the vertices of the waist projection of the front - the upper vertex does not reach 4 cm to the chest line, the lower vertex does not reach 4 cm to the thigh line.
On the waist line on both sides of the axis we measure half the width of the tuck - and from these points we draw the lines down and up to the vertices of the tuck.

STEP NINE - draw an extension in the hips and a smooth roundness of the bottom of the product.
What you need to know:
If there is a small difference (2-3 cm) between your chest and your waist, then the dress expands in the hip line area by 1.5 cm (this is a classic hem extension).
If your hips are much larger than your waist then the hip extension will be half the difference between a half hip and half a chest.
And if you want a slightly widened hem (well, so that it is not strictly on the hips, but hangs slightly loose), then also expand on the bottom line of the product an additional 1.5 cm.
Anyway, when trying on, you will see the optimum hem width and yourself there you will sew the side seam under the hips line if you want to narrow the hem.
The bottom of the product also has a slight curvature (1.5 cm) to the edge of the front and back shelves.
What do we do:
We find the difference in the values \u200b\u200bof HALF and HALF. For instance. half-circumference of the chest 42 cm, half-circumference of the hips 45 cm (be careful not to compare whole girths, but half-girths). The difference in half-girths will be \u003d 45-43 \u003d 3 cm.
We divide this difference in half \u003d 3: 2 \u003d 1.5 cm. And thus we find out how much we need to expand our hem.
On the line, we measure 1, 5 cm on both sides of the lateral line of the shelves (put dots).
On the bottom line of the pattern, we measure both sides at 1, 5 cm (or 3 cm if we want a slightly widened hem)
Connect these points in a smooth line, drawing the side lines of the front and back hem. The side lines of the front and back hem are drawn (as you noticed) overlapping each other - crossing each other. Then, having made copies of the base pattern, we will carve out separately a shelf on the back, a separate shelf on the front, that is, we will divide these halves, leaving each of them with its own hemline.
Now for the curved bottom line of the product - we draw dots 1.5 cm lower than the lower corners of the pattern. We connect these points with smooth lines with the extreme lateral points of the hem.


Done, comrades girls !!! We are in a sober mind and memory just made a pattern-base !!!And at the same time, they never even turned off the brain and Nikki abb-cadabra with small letters-tsiferki.
Moreover - you didn’t just draw under my pointer - but you understood what is hidden behind each line. And this is a little thing - oh how useful it is for modeling. And we will moderate with you - all sorts of things with pleasure and also with full awareness of what is being done and for what.
Learn to think and turn on the brain, and you can model yourself what you like without waiting for my tutorial articles.
What other master classes are there in the same understandable pictures and explanations.
If you delve into the sewing section on this site you will find a lot of everything useful for the mind and for sewing.
Namely…
As you see, there are a lot of things !! Therefore, forward - to learn, sew and enjoy life)))
And we will begin to sew on the pattern-based TOPA. It is tops, shirts, tunics and then dresses
You ask: “Hey, why not immediately dresses?”. I give the answer to this question already in the first article of the series “Sewing tops and shirts is quick and easy.” So to be continued))) Let's go ....
Good luck with your tailoring!
Olga Klishevskaya, specially for the site “Women's Talks”.
Copying of the article is allowed ONLY on a personal computer and only on the pages of a personal Internet diary WITH MANDATORY SAVING OF ALL WORKING LINKS OF THE ARTICLE.
You can begin to create a base pattern in 44-58 sizes for a dress, blouse or jacket. I have been using this method for about 18 years, its main advantages are that the pattern is built easily, quickly, logically, very accurately. 7 minutes are enough for me, along with the calculations. For example, a small adjustment of volume and length is enough.
The principle is one, only allowances for a free fit differ. For a basic pattern of a dress and blouse, 6 cm is enough, for a fitted jacket - 8 cm, for a coat, depending on the style, 10-16.
The base pattern is 44-58 sizes for a dress, blouse, cardigan.
It’s better to explain it with a concrete example, then we will learn how to build a base pattern for a blouse or dress in size 48.
About, more precisely, in the next article.
Our pattern will be up to the hip line. For a dress of direct silhouette, it is enough to continue to the required length.
Basic measurements.
Measurement of the back.
Dst (length of the back to the waist) - 41
ShSP (back width) - 35
Shoulder - 12
Merki before.
Dpt (length of the front to the waist) - 43.5
VG (chest height) - 26.5
CH (chest cent) - 18
VGK (chest height oblique) - 24
SH (chest width) - 37
GP (armhole depth) - 20
Necessary preliminary calculations.
The peculiarity of this method is that the main measure in constructing the base pattern is the girth of the chest. A control line is drawn through the exhaust gas point, and all other measures are postponed, based on calculations, relative to this line.
We calculate the exhaust gas for the base pattern: we add an allowance for free fit to the exhaust gas measurement. In our example - 6 cm. Then we divide in half.
Exhaust gas \u003d 96 + 6 \u003d 102: 2 \u003d 51: 2 \u003d 25.5
According to the rules for constructing a pattern - the basis, and in order for the product to look beautiful on the figure, the front pattern should be wider than the back pattern. Therefore, to the resulting measurement of 25.5, for the front half, add 0.5, and for the back - subtract.
Before: 25.5 + 0.5 \u003d 26
Back: 25.5 - 0.5 \u003d 25
Calculation of tucks at the waistline.
In order to determine the size of the lateral tucks, the front and the back, we add 3-4 cm to the waist circumference and divide in half: OT \u003d 75 + 3 \u003d 78: 2 \u003d 39
Then from half the value of exhaust gas with an allowance subtract the resulting figure:
(96 + 6) : 2 = 51 – 39 = 12.
12 cm is the sum of all tucks. There are 4 of them on the pattern: two side, front and back tucks.
3 cm - the size of each tuck and deflection of the side seam from the auxiliary line.
Hip line calculation.
3-4 cm are added to the girth of the hips for a loose fit: 101 + 3 \u003d 104: 2 \u003d 52.
The difference between half OB with allowances and half of exhaust gas with allowances is delayed from the control line. If the hips are narrow, then the side line of the front will be shifted to the right, if wide, to the left.
In our example, the calculated half OG \u003d 51, and half OB \u003d 52. The difference is only a centimeter. Therefore, when building the front, we will need to put 0.5 cm to the left of the control line, and when building the back, to the right.
52 - 51 = 1: 2 = 0,5
We build a grid - the main lines of the base pattern.
It is more convenient to build a pattern on tracing paper. If all the measurements are accurately measured and the calculations are done correctly, then you will get the same beautiful and proportional pattern as on the top collage.
From point 1 (upper right corner) we draw a vertical and horizontal line. On the vertical line, lay down Dtp (the length of the front to the waist). Draw a horizontal waistline.
The line of the hips is located 18-22 cm lower, depending on growth. On average, I draw a line at a distance of 20 cm, both when building patterns of dresses or jackets, and patterns-skirts.
The chest line is drawn from the waist line at a distance that is calculated as follows:
From the measurement of the depth of the armhole (GPR) subtracts 1.5-2 cm for a dress or top without sleeves, 2-2.5 cm for a dress with a single-seam sleeve, 2.5-3 cm for a fitted jacket, 3-7 cm - for coat, depending on the style of the sleeve.
The value of this measure for 48 sizes is 19-23 cm, in our example - 20 cm.
Гпр \u003d 20 - 2 \u003d 18 cm. We postpone 18 cm from the waistline up and draw a horizontal line of the chest.
Construction of the pattern of the front.

From the top corner, from point 1, lay left and down 7.5 cm for 46-48 sizes. For 50-56 - 8 cm. This value is half the width of the neck. You can deepen or expand it during modeling. Set point 2.
From point 2 to the left, measure 9 cm on the vertical line of the grid pattern, put point 3, at a distance of 3 cm from it down, put point 4, connect points 2 and 4 - this is the slope of the shoulder line. Set aside 7-8 cm on line and set point 5.
On the chest line, set aside 26 cm from the center of the front to the left (half of the exhaust gas + 0.5 cm) and set point 6. Draw a vertical line until it intersects with the hip line. Place point 7 on the waist line and point 8 on the hips line.
Build the top of the front.
From point 5 on the shoulder line, we postpone the distance equal to the size of the chest tuck.
The size of the chest tuck for 42-60 sizes.
The first figure is the exhaust gas without allowances, the second is the tuck value.
82 - 84 cm - 6.5 cm
88 - 90 cm - 7.5 cm
95 - 96 cm - 8.5 cm
100 cm - 9.5 cm
104 - 105 cm - 11 cm
110 - 112 cm - 12.5 cm
122 - 125 cm - 15 cm
For size 48, from point 5, continuing the shoulder line, set the width of the chest tuck 8.5 cm to the left. Put point 9.
From point 2 down, set aside the VG and set the point of the CG. The distance from it to the midline is half the distance of the measurement of the center of the chest (CG) with an allowance of 1 - 2 cm:
(18 + 1) \u003d 19: 2 \u003d 9.5 cm
From this point down draw a vertical line - the center of the front tuck. Its width is, for our example, 3 cm. Set aside 1.5 cm on both sides of the line. Connect the CG point and the tuck point.
We draw a breast tuck.
For this, points 5 and 9 are connected to the point of the central cylinder.
Chest and shoulder width lines.
In order to carry them out and postpone the measured measurements, we add the tracing paper with the pattern as in the collage picture: both lines of the chest tuck should coincide. Secure the tuck with pins.
Then continue the shoulder line and put a point corresponding to the measured measurement: 12 cm
Draw a line of chest width: divide, approximately, the distance of the front height to the waist (WT) in half, and draw it 2 cm higher. We postpone the measurement equal to (ШГ + 1): 2 \u003d 18. If you are not sure that the measurements of the width of the front or back are measured correctly, add 2 cm - cut off the excess allowance in the fitting.
Measure VGK (chest height oblique) - control. The tilt of the shoulder is different for everyone. For sloping shoulders, you will need to draw a shoulder line lower than the drawn line, in accordance with the VGK measurement, and for sports-type figures - higher.
After you have specified the width and slope of the shoulder line, the width of the chest, straighten the pattern and draw the line of the armhole in front of the points of the shoulder, the width of the chest and point 6.
Side tucks.
The side seams of the patterns of the front and back should be completely identical, both in bending and in length. The size of the lateral tuck, according to our calculations, is 3 cm. Set them aside from the control line, from point 7 to the right.
The line of the hips.
For our example, according to calculations, it is necessary to postpone only 0.5 cm to the left of the control line.
Connect all the resulting points: on the chest, waist and hips. The construction of the front pattern is now complete.
Pattern of the back.

It is already much easier to build. On the fold line of the pattern, we postpone, from the waistline up, a measure equal to the length of the back (Dst) \u003d 41 cm
Just as in the construction of the front pattern, we postpone the width of the neckline, 7.5 cm for size 48, only to the right - point 10.
From the received point we measure 9 cm to the right and 2.5 - down. Draw a line of the shoulder and postpone the measured measurement - 12 cm.
The depth of the neckline on the back, as a rule, is 2 - 2.5 cm. From point 10 to the left, we draw a smooth line of the neck of the back.
To build patterns for full figures, I advised me to measure an additional measure - the height of the back from 7 vertebrae to the waist. In principle, you can simply draw a more in-depth neckline - 3 cm.
On the chest line, postpone the calculated measurement: OG of the back (OG + 6): 2) - 0.5 cm \u003d 25 cm Draw down the control line. On the waist line, immediately postpone the size of the lateral tuck - 3 cm
The line of the width of the back.
Divide the distance between the shoulder line and the exhaust line of the back in half, and draw 1 cm lower, closer to the exhaust line. In our example, ШСп \u003d 35 cm
(35 + 2): 2 \u003d 18.5 cm
Tuck the back.
Divide the calculated measure of the exhaust gas of the back in half, then postpone the figure minus 0.5-1 cm from the fold line - so the tuck looks more neat, and the product: a blouse, dress or jacket, softer fits the back. Tuck size - 3 cm
Sometimes, when there is a very noticeable bend on the back, I change the size of the front and rear tucks. I reduce the front ones by 0.5-1 cm, and on the back I increase it.
On the hips line to the right, postpone the calculated value, the same as when constructing the front pattern. In our example, it is 0.5 cm. Draw a line of the side seam, gently rounding it at the waist line.
In order to adjust the constructed base pattern, buy a meter of inexpensive cotton fabric - this will be enough for the main pattern and for the pattern of a short single-seam sleeve.
Products with a central seam on the back: dresses and jackets, it is easier to adjust by fitting, they more accurately fit the figure, slim, as the total volume is "divided" into vertical components.
You can cut a back with a central seam - the pattern will turn out more precisely. To ensure that the volume does not change along the waistline, reduce the back tuck by 1 cm, and on the line of the central seam, make a smooth deflection of 1 cm
When cutting out the halves of the front of the base pattern, add an allowance of 2.5-3 cm along the midline, so that it is more convenient to fix the volume with pins in the fitting. On the right shelf, bend to the seamy side and mark, and on the left - draw or mark the midline.
During the fitting, fasten the shelves exactly along these lines. If the cut out base is wide or narrow, adjust the volume due to side seams and tucks.
When basting, it is important to precisely align the notches on the waistline: the front and back should not be shifted relative to each other. If the front half of the product is shifted downward, oblique creases are formed from the side seam in the direction from the bottom up. If shifted upwards - creases can be both on the back and on a shelf in the chest area.
If the measurements are accurately measured, and the base pattern is built correctly, then you will carry out the fitting quickly, without significant changes. About how to simulate a dress, jacket or vest using this pattern - in the following articles.
Good afternoon, in our time, everything is simplified and the construction of patterns as well. I present to you a simple French method of building a bodice and dresses.
Measurements to be taken from the figure:
| Merka | Identification | Example | |
 | Back to Waist Length | Dst | 41 cm |
 | Front Length to Waist | Dpt | 44 cm |
 | Chest height | Vg | 24 cm |
 | Chest center | Cg | 17 cm |
 | Shoulder length | Dpl | 12 cm |
 | Chest circumference | Og | 92 cm |
 | Waist circumference | From | 74 cm |
 | Neck circumference | Osh | 38 cm |
 | Chest width | Shg | 31 cm |
 | Back width | Cc | 34 cm |
Building a bodice
Grid
The middle of the back, the vertical line on the left, is equal to the measurement. The length of the back to the waist is Dst (in my example 41 cm).
The middle of the shelf, vertical to the right, is equal to the length of the shelf to the waist of Dpt (44 cm).
Back width \u003d Bust / 4 - 1 cm, in my case 92/4 - 1 \u003d 22 cm.
Shelf Width \u003d Bust / 4 + 1 cm, 92/4 + 1 \u003d 24 cm.

Neck
The neck fitting tightly to the neck:
Depth of neckline \u003d Neck circumference / 16;
The width of the necks of the back and shelves \u003d Girth of the neck / 6;
Neck depth \u003d neck width + 2 cm.
My example: the neck of the back: depth 38/16 \u003d 2.38 cm; 38/6 width \u003d 6.3 cm. Shelf neck: 6.3 and 8.3 cm.

Shoulders
On the shoulder line with a protractor, mark an angle of 18 degrees for the back and 26 degrees for the front, then draw the lines of the shoulder along the ruler.

Armhole bottom
Low point of the armhole: Length of the back to the waist / 2 + 1. Set aside up from the waistline.
41/2 + 1 \u003d 21.5 cm

Anchor point for building armholes
B1 \u003d Length of the back to the waist minus the length of the back to the armhole (previous figure) minus the depth of the neck of the back divided by 3 and add 1.
B1 \u003d (41 - 21.5 - 2.3) / 3 + 1 \u003d 6.7 cm.
Set aside from the middle of the back. Back width / 2, 34/2 \u003d 17 cm
Set aside from the middle of the front. Chest width / 2, 31/2 \u003d 15.5 cm

Armhole

Chest tuck
We find the center of the tuck postponing the height of the chest (24 cm) from the top of the construction, and to the left half of the center of the chest (17/2 \u003d 8.5 cm).

Draw the first tuck line from the middle of the shoulder to the chest height mark. Draw the second line from the lower point to the shoulder line, retreating the size of the tuck solution on the shoulder line.
The tuck solution is 1/20 of the chest circumference.
tuck solution \u003d 92/20 \u003d 4.6 cm

The second tuck line should be the same length as the first. In order for the shoulder line to align when closing the tuck, the rest of the shoulder with respect to the second side of the tuck must be drawn at an angle of 72 degrees.

Move the anchor point of the armhole to the opened solution.

Draw the armhole

Tuck in the back
A tuck in the back is located in the middle of the shoulder line and makes an angle of 90 degrees with it.
Tuck solution \u003d +/- 1 cm, tuck length \u003d +/- 7 cm.

It should be noted that shoulder tucks on the back on small sizes are rarely used, but they cannot be avoided on large sizes, as well as for products from thick heavy fabrics (jackets and coats). If a soft, easily draped or stretching fabric is used in the work, then shoulder tucks on the back do not.
Waist Tucks
Sum of Waist Tucks \u003d (Og - From)
The amount should be allocated to seven major tucks:
- 2 tucks in front with vertices on the line chest height; usually their solution does not exceed 3 cm;
- 2 tucks on the back (the center line of each such tuck is на of the width of the back); usually their solution does not exceed 3 cm;
- 2 side tucks; half of the solution of such tucks does not exceed 4 cm;
- 1 tuck in the middle of the back; ½ of its solution can vary from 1 to 2 cm.
Calculation example for equalizing the size of tuck solutions according to Og 92 cm and From 74 cm.
92 - 74 \u003d 18 cm.
18/2 \u003d 9 cm - the total value of the solutions for the drawn half of the base.
9 - 1 (in the middle of the back) \u003d 8 cm;
8/4 \u003d 2 cm on average for each tuck, which can be distributed 2.5 cm for the side tucks and 1.5 cm for the tucks of the shelf and back.

The length of the back tucks usually does not extend beyond the line of the lower point of the armhole. The length of the tucks of the front should reach the protruding points of the chest.
Allowances
Add-ons are a slight increase in the values \u200b\u200bof the taken measurements to give the product additional volume in certain places. The increments may vary depending on the shape of the product, the desired volume or comfort.
To get the correct pattern of the model, you must first build on the taken measurements a pattern - the base, and then perform the increments. If you add the increase immediately, that is, the risk of getting an insufficiently accurate pattern, which will later be inconvenient to work with, and the product may not work at all.
The values \u200b\u200bshown in the figure below correspond to the main increments for the classic thing. They are minimal.

For products with shoulder pads, it is necessary to raise and extend the shoulder line. For example, for a shoulder pad 1 cm thick, it is necessary to raise and extend the shoulder line also by 1 cm.

If you just decided to do sewing clothes, the first thing you have to get acquainted with is the rules for drawing up the pattern. But it is she who is needed to create a beautiful and stylish outfit on the figure. Therefore, in this article we will talk about how to make a dress pattern.
Where does tailoring begin?
Before you sew any clothes, whether it be a children's summer sundress or a women's sheath dress, you need to decide on the model. In addition, we advise you to pay attention to the style of clothing: it will be a tight-fitting or loose dress. In particular, the definition of style will help in the future to make an increase in the calculations.
Suppose you decide to sew a fitted dress of size 48, choose a model, and then you should take a centimeter and take measurements from yourself or the person to whom you are going to sew a suit. How to do it? What to measure? And how to make a dress pattern using improvised materials?
To begin with, in addition to a centimeter, take a sheet of paper and a pen. Then attach a centimeter to the shoulder line and lead it until you decide where exactly your clothes will end (i.e. how long the product will be).

Therefore, before you make a dress pattern yourself, measure and write down its estimated length. For example, the length of your dress, taking into account height, is 90 cm (this is approximately to the knee). Next, you will need to make calculations, measurements and record the following data:
- back length (to the waist);
- shoulder length;
- half-circumference of your neck;
- half girth of the chest;
- half-circumference over the chest;
- half hips;
- waist circumference;
- the depth of the armhole.
How to carry out key measurements?
In order to correctly perform all key measurements, you need to know from what and to what place it is necessary to conduct a centimeter. For example, the length of the back is measured starting from the seventh vertebra, and is carried out to the line of restriction of your waist. The height of the shoulder is measured by taking a centimeter from the upper shoulder point to the point connecting the spine and your waistline. That is, an oblique line is obtained.
Before you make a dress pattern on your figure, measure the width of the shoulder. To do this, take a centimeter, attach one part to the highest point of the proposed shoulder seam (located at the very base of your neck) and lead the other part to its end point (at which the shoulder ends and the arm begins). To measure the circumference of the sleeve you need to take the fullest part of your shoulder and grab it with a centimeter. In this case, the measuring tape should close on the outer surface of your hand. Sleeve length is measured from the highest shoulder point. Then the centimeter is passed on the outside of the hand, goes along the forearm and ends at the limit of length that you need.

The semi-girth of the neck is calculated taking into account its girth. To do this, wrap a centimeter around the neck and divide the resulting figure in half. All other measurements with semi-girth are carried out according to a similar principle.
For example, you may have the following measurements:
DS (back length) - 39 cm;
DP (shoulder length) - 14 cm;
PSh (half neck circumference) - 19 cm;
PNG (semi-girth above chest level) - 45 cm;
PG (half chest) - 49 cm;
PT (half waist) - 38 cm;
PB (half hips) - 51 cm;
GP (armhole depth) - 21.5 cm.
OG (chest girth) - 98 cm;
Pr (increase in fit) - 1.5 cm.
How to calculate the width of the back?
Before you make a dress pattern with your own hands, make calculations of measurements. To do this, using formulas, we perform the corresponding calculations. So, when measuring the width of the back, it is necessary to pay attention to the protrusions of both blades, since the measurement is performed from one blade to the other. Further, the resulting measurement is divided into two. For example, the back width is 38 cm, therefore, after dividing this number in half, we get - 19 cm.
You can verify the correctness of your calculations using the following formula: ШС \u003d ОГ / 8 + 5.5 cm. For example, ОГ (chest volume) is 110 cm, therefore, 110/8 + 5.5 \u003d 19.25 cm. As can be seen from calculations, exhaust gas measurements showed a value of 19 cm, and calculated - 19.25 cm. This means that there is a need to double-check their measurements. If everything is correct, then to draw up a future pattern, write the first number, which will be true.
How to make a dress pattern: measurements of the width of the armhole
The width of the armhole can be calculated using the formula: ШП or ШПр \u003d Д пзр (anteroposterior diameter of your arm) + П шпр (allowance leading to the wide part of the armhole). For example, if D spz is 10 cm, and P spr is 5 cm, then Wpr \u003d 10 + 5 \u003d 15 cm. Also, this indicator can be checked by the standard size grid.

How to measure the width of the chest for the pattern?
The width of the chest is measured in two sets. At the first stage, this value is obtained by measuring from one front corner of the armpit to the other, bypassing the protruding parts of your bust. This way you measure the width of your chest. At the second stage, it is necessary to measure the width of the front of the body based on the distance between the protruding parts of the mammary glands.
In addition, the breast width can be calculated by the following formula: ¼ Exhaust gas - 4 cm. If our breast volume is 98 cm, then substituting this value, we get the following: 20.5 cm. Recall that all these measurements and calculations need to be performed before how to make a dress pattern (for beginners).
What to do after receiving the necessary measurements?
After you have received the required basic measurements, proceed to create the pattern itself. To do this, you need tracing paper or any thin paper. Take a photo with the dress that you plan to sew and, looking at it, start transferring your measurements to paper. But keep in mind that your pattern should consist of two parts - the back and the shelves (front). Therefore, carefully consider your sketch. Next, see the approximate transfer of numbers to tracing paper.
So, put a large sheet of paper corresponding to the length of your future outfit (recall, we have it equal to 90 cm), make a small indentation from above (10-15 cm) and put the point “A” in the upper left corner. From it should draw a vertical line down and put the point "D" (its length should correspond to 90 cm). From point “A” draw a horizontal line (its length should be equal to ½ OG + 1.5 cm) and put point “B”. Draw a vertical line from it and set point “C” (it should be parallel to point “D”). Connect the dots and get the segment "SD".
You still do not know how to make a dress pattern on your figure, then we continue. From point “A” we postpone along point “HELL” point “G” corresponding to the depth of the armhole + 0.5 cm. We repeat the same action on the other side. Set the point "G1". We connect and get the segment "GG1".
From the point "G" we measure the loop (back width), put a point at the end. Then, from it, we count the Shpr (armhole width) + 0.5 cm and ShG (chest width) + 1 cm. Further, according to earlier measurements, we mark the lines of the waist and hips in the figure, draw the alleged neckline, outline the lines of the darts.
Cut out the pattern and transfer to the fabric
After the pattern is ready, check the correctness of its composition and carefully cut the paper along the contour. Then attach the paper to the cut of the fabric (it is better to grab it with invisibility) and circle with white chalk. After that, cut the part of the product using scissors. It remains only to sew everything on a sewing machine.

How to make an increase in fitting the product?
Before you make a dress pattern, pay attention to its style. It will depend on him how many centimeters you will need to leave for an increase in fitting. In total, there are four types of dresses:
- too close cut;
- fitting exclusively silhouette;
- semi-adjacent type;
- direct type.
For too tight dress cuts, an indent of 1.5 cm is suitable. For an adjacent silhouette - 3 cm. For a semi-fit - 4-5 cm. And for a straight - 6-7 cm.
Attention! When making an increase, do not forget to add additional centimeters to the girth of the chest and hips.
What does the concept of “base pattern” mean?
Often lovers of cutting and sewing advise newcomers to first make the pattern-basis of the dress, and then make the product itself. What does it mean? The base pattern is a kind of pattern according to which, as experienced masters say, you can sew any outfit.
For example, any dress can be based on a standard sheath dress. And from this form, as they say, you can already dance further. For example, to increase the sleeves, to make the dress more loose, to add a lap, to increase or decrease the sleeves, to change the neckline area.

How to make a dress pattern for the summer?
Decided to learn how to make a pattern of a summer dress? First, select a lightweight, suitable material, make the necessary measurements, and then draw up a base pattern on paper that was created exclusively according to your parameters.
After that, transfer the paper pattern to the fabric, cut out the sample and sew. The dress is ready. By a similar principle, it’s worthwhile to act after the decision you made on sewing clothes for children. Before you make a dress pattern for a girl, pay attention to the photo of the model, take measurements and a base pattern.

Tissue and physique are two important indicators.
Before creating a pattern, pay attention to your physique and the selected fabric. For example, ladies with a thin physique can sew dresses from almost any fabric.
The increase is recommended to be made large - 10-20 cm. For full girls it is better to give preference to stiff and poorly draped fabric. The increase in this case is best done at a minimum, especially in the thigh area, since there is a likelihood of giving more volume. If you are the owner of bright forms of the chest and buttocks, then the best material for your clothes will be knitwear. So, before you make a dress pattern, consider these points.
What do you need to remember when creating a pattern?
The pattern will fully correspond to the parameters of your figure only if you follow our advice. For example, to finish drawing a tuck for the back (at the waist level), you need exactly the level of the chest. The waist tuck is drawn with a preliminary indent 4 cm from the marked line of the chest. The humeral tuck ends on the line of your chest. The lower edge of the armhole also runs along the chest line.
Before you make a dress pattern, take measurements. When creating a base pattern, remember that the entire pattern is placed inside a large rectangle. The height of this geometric figure must necessarily correspond to the length of your product. The width of the pattern itself on paper corresponds to the sum of the half-circumference of the chest and a couple of centimeters. That is, they measured the chest circumference, divided the obtained value in half and added up to 7 cm (this number will directly depend on the cut of the dress and the stock).
The most important part of the pattern is the top. In order to draw armholes, tucks and a neckline zone it was more convenient, divide the upper part of the picture conditionally into three parts: in the middle there will be an armhole, and on the sides there will be tucks, a line of shoulders and a neckline.
In a word, do everything right, following our advice.
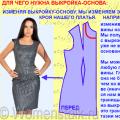 Constructing a dress base pattern and design modeling
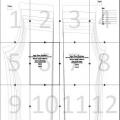 Patterns of children's trousers and sewing master classes Building the back half of trousers
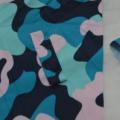 Building a pattern of vests for boys: the easiest way