We sew overalls for the fall of 3 6 months. Building the basis of children's overalls
Today you will find out how to sew a jumpsuit for a newborn do it yourself. Workshop on sewing Nadia Britvina.
A light knitted jumpsuit is simply a necessary thing for a baby, in cold weather it can be used as a pouch for warm clothes, on warm days - as an independent item. The fabric for sewing overalls should be stretchable and soft, I used a knitted terry.
Necessary materials:
- main fabric 50 cm,
- fabric for decoration (highly tensile knitwear or ribbed is used) - 10 cm with a width of at least 150 cm,
- pattern
- tailor's scissors,
- sewing threads,
- non-woven,
- ruler
- tailor chalk (a dry bar of soap is also suitable),
- overlock
- metal buttons and a press for their installation (you can replace the buttons with buttons).

So, we sew a jumpsuit with our own hands. Sewing progress:
1. We print a pattern. These sizes are given for a child up to 56 cm tall, if desired, the pattern is easy to increase by adding a few cm along the shoulder, step and lower sections.

2. Using chalk, transfer the pattern to the fabric folded with the front side inward, the lobar is located along the details of the overalls. The material must first be washed, dried and ironed. Detail of the back we place a fold to the fold of the fabric. We cut out the parts of the product, adding allowances of 7-8 mm from all sides. We get one piece of a one-piece back, two shelves, two sleeves.

3. Cuffs are cut from the rib on the bottom of the sleeves and legs (4 strips 8 cm wide, 17 cm long), a collar (strip for processing the neckline on the pattern) and two slats for fastening 31 cm long, 5 cm wide. It is advisable to choose a fabric for decoration that matches well with the main material in color.

4. In order for the fastener strips to keep their shape well, they must be glued with non-woven fabric (special reinforcing material, glued to the wrong side with the adhesive side down using an iron).

5. Taped the non-woven strips bend along and iron.

6. Stitch the slats to the central sections of the shelves at a distance of 0.7 cm.

7. We grind the sewing sections from the side of the planks.

8. On the front side of the shelves we cut off the allowance for attaching the strips with a stitch to the width of the foot.

9. We put the bar one on top of the other and fasten the bottom with machine stitching.

10. Fold the shelf with the back facing inward, grind and overcast shoulder sections.

11. We wind and grind the sleeves; we grind the grind in the seam from the side of the shelf. It turns out such a vest.

12. Stitch the seams of the sleeves and side seams with a single line. This method of connecting the sleeves is much easier than embedding the finished sleeves in the armholes. We sew step slices. If you can’t immediately smoothly download, then pre-schedule everything manually. We cut all sections from the side of the shelves.

13. Fold the cuffs facing inward and grind the cross sections.

14. We turn the cuffs on the face, put the sleeve / leg in the cuffs, combine the transverse seams, equalize the sections and grind at a distance of 0.7-0.8 cm. When the cuff is stitched, slightly stretch.

15. We sew seams on the side of the cuffs.

16. The collar (strip for the neck) is folded along the front side outward, we are stitched to the neck, evenly distributing the fit, the seam of the stitching of the collar is swept. At the ends, overlay stitch is fixed with knots or manually.

17. On the front side we give the finishing line along the neck at a distance of the width of the foot.

18. It remains only to install the buttons using the press, or just sew the buttons on one bar and sweep the loops on the other

and iron the product at all seams.
The overalls are ready, the baby will feel good and comfortable in it. ”


As you can see, it’s quite possible to sew a jumpsuit for a baby with her own hands for a mom or grandmother who knows how to sew.
Another option for a creative gift for a newborn is a personalized bodysuit:


More interesting:
See also:
Booties for girls in the form of sandals (crochet)
Elena Khorolskaya again pleases us with a new master class on how to tie booties and sandals for a girl ...
We sew a skirt for the girl
It is no secret that the site is not only an excellent trading platform where you can purchase everything that ...
Pink booties (crochet, with patterns)
Bright booties for newborns are relevant at any time of the year, especially in autumn and winter. Knitted booties ...
Knitted sweater for a boy (knitting)
A cozy sweater for a boy of 4 years old (height 110 - 116 cm) was knitted by Svetlana Elina. To tie such a ...
Crochet summer suit for the girl "Wave"
I want the child to go in the summer in beautiful, bright and original clothes. Run beautiful models ...
Hat for girls crochet (summer)
Every mommy knows that in summer the baby’s head must be protected from the sun to prevent ...
 Jumpsuit is a good solution for those who have time and desire to sew something for their child with their own hands. This is economically feasible: after all, fabric and accessories are cheaper than ready-made clothes. In such a thing (warm or lightweight), the child will feel good both in winter and in summer. It will be convenient for him to run, jump, explore the world. Or sleep in a stroller, if he is still completely crumb.
One of the most convenient and practical things in a children's wardrobe is recognized as overalls. In both winter and summer versions of this costume, the child is protected as much as possible. In winter - from the cold, in the summer - from dust and dirt. The baby’s movements are free, maximum comfort is ensured: nothing falls off, does not open, if the clothes are with zipper or Velcro.
Sewing a jumpsuit on your own is easy, you just need to show a little patience and zeal.
You can make out such clothes in any way - with many pockets, embroidery, applique.
When sewing, pay attention to the following points:
- The seams should not be coarse, especially if the clothes are summer.
- The fabric may contain a small percentage of synthetics so that it does not sit down during washing, but if we are talking about a summer jumpsuit, this admixture should be small. A damp-proof suit that is resistant to damp will be synthetic, but then it is better to provide a “breathing” lining.
- It is better to choose a spacious cut so that the baby is really comfortable.
- Velcro is easier to sew than a zipper, but it will be easier for an older child to accidentally unfasten them.
 Overalls made of raincoat, waterproof fabric will solve the problem of autumn dampness. The summer jumpsuit made of natural fabrics will be aired, it is easily removable after hectic games. Denim top and pants are the most practical option for walking.
How to make a jumpsuit pattern yourself
It will take parameters. Measure your child’s height, back length, sleeve lengths on the arm, neck, waist and chest circumference. These numbers can be operated on. Additionally, the depth of the armhole, the length of the shoulder, legs, and the girth of the wrist may be required.
IMPORTANT!When building a pattern, make allowances for seams - 1.5-2 cm.
The length of the sleeves and legs should also be calculated with a margin of 4-5 cm per hem. At the same time, very many drawings of patterns are just made without allowances, and you have to make the correction yourself.
As a rule, the overalls pattern consists of details of legs, front, back, sleeves with cuffs and a hood. In other embodiments, half of the back and half sleeves are one part, similarly divided into two parts of the front.
For winter overalls, lining is required, for summer ones, optional.
You can use the finished pattern.
Ready-made pattern of winter overalls with a hood for a child from 1 to 3 years
Consider the construction scheme of a winter jumpsuit with a hood of three parts. Due to the long fastener from the throat to the bottom of the baby it will be convenient to wear, pockets will allow you to hide mittens or frozen hands on the way home.
Here the calculations are made for a height of 80–90 cm, but you need to substitute your measurements.

Or jumpsuit with one zipper and funny "ears".

Pattern of summer overalls for a baby from 3 to 5 years
Summer sets will appeal to both boys and girls. Short or long, bright and fun jumpsuit is ideal for playing in the sandbox and running around in the yard.
Here's a fun and fairly simple option - short sleeves and panties, button closure.

ATTENTION!Before cutting material, it makes sense to wash it in warm water first so that the fabric shrinks. Then you will not be disappointed after sewing and first washing. This is especially true of natural materials - flax, twill, satin, chintz.

There is a so-called lazy way to sew the simplest summer jumpsuit. It can be found even from old things. Since the jumpsuit will be very free, you can tailor it without first constructing a pattern. A method for very brave mothers with experience.
Here, only the “seat length" value is needed. It is measured between the legs, a centimeter tape is applied from the back to the waist and passed to the front.
Then shorts are made. A + B - just the depth of the seat.

In this case, the top is made of an old blouse or dress, but the same piece can be cut out from a conventional cut. For the top you will need the length and width of the back plus allowances of 1.5-2 cm for the seams.

Armholes are decorated with frills to taste. Instead of a fastener, you can insert elastic bands or sew a jumpsuit so that it can be removed and worn entirely without fasteners. For reliability, elastic at the waist helps.
TIP!When sewing a long jumpsuit, it is easy to foresee the possibility of growth. To do this, the legs are made a little longer than necessary, and are processed with a wide lapel. The baby adds a centimeter in growth - you release a centimeter of spare tissue.
Pattern denim overalls with elongated shorts for girls 5-7 years old

Jeans are well suited for autumn, spring and summer. This is a natural fabric, practical, so the girl will be comfortable in it. The younger your fashionista, the thinner the better to take the fabric.
That's very A simple jumpsuit that can be decorated with lapels from contrast fabric.

A stylish belt is added to it, which can be tied to a bow.
Important:denim should be sewn with special thread. It is better if the sewing machine has a hot, especially durable needle suitable for this type of work.
You can give preference to a stretch jeans, as it will be convenient to run, and ride a hill, and climb the stairs. Stretch requires a special sewing mode on a typewriter.
Decor and decoration
In childhood, you can afford the most mischievous clothes, and the methods for decorating it are diverse. You just need to follow a few rules:
- jewelry should not be easily separated if the child is still small;
- decor should not be with synthetic paint.
 Everything else is only good!
Embroidery should be applied to the parts before they are sewn. But decorative patches, patch pockets and more - as you like.
Decals in the form of boats, animals, leaves and flowers look good. Simply iron them over the finished thing.
IMPORTANT! Do not overdo it with decorative elements. Give preference to those that are difficult to tear, ruin, tear. Think about how you will erase the new thing. Often, a patch pocket with applique is a good enough decoration.
Children's clothing is not a cheap item. This is especially true of outerwear: jackets, and overalls. In fact, at the cost of materials, these products almost do not differ from knitted clothes, because raincoat fabric is inexpensive! You can learn how to sew a children's jumpsuit right now. Let's start with jumpsuit with Velcro hood.
This type of clasp is quite simple: it’s much more difficult for beginners to sew a zipper. And at the same time, Velcro is suitable for outerwear of infants (newborns), because in the cradle the wind certainly will not blow into the space between the Velcro.
Materials (for overalls 68 sizes):
- Raincoat fabric with print - 0.8 m
- Winter insulation (in our case, silicone 150) - 0.8 m
- Lining fleece “lamb” (artificial sheepskin) - 0.8 m
- Threads matching the main fabric or contrasting
- Velcro tape - 25 cm
- Waste Basting Threads
- Tailor pins
Pattern of children's overalls with a hood
In this master class, a pattern of children's overalls from Ottobre magazine No. 4-2009 (model 1) was used. This jumpsuit in the magazine is wide, but made without insulation. Therefore, in order to get a thinner model with insulation, we did not increase or decrease the patterns. Accordingly, in order to get a wide winter jumpsuit for a well-fed baby, you need to add 2 cm wide on both sides. Well, if you want to get a warm, but thin overalls, use a thinner insulation - for example, Slimtex 200.
Making Velcro Jumpsuit:
1. Cut out all the necessary materials from all three materials (raincoat fabric, insulation and fleece): two back halves, two front halves, a front insert for comfortable dressing, two hood parts. Make the details of the hood from the lining fleece 2 cm longer on the side that will “hug” the face (at the end of the work, you will need to turn the fleece over, making it a small “edge” of the hood).

2. Any outerwear with the use of insulation is sewn from two parts: separately lining and raincoat fabric, connected to the insulation. Therefore, first of all, you need to sew the corresponding parts from the insulation to the details from the raincoat fabric. Set the machine to the largest straight seam interval (for example, interval 4) and grind the parts around their perimeter.

3. For parts of the hood (from raincoat fabric and insulation), immediately grind the cutouts of the darts to make these parts voluminous. Then sew both of these parts, folding them with their faces inward, along the occipital-parietal line. 
4. Sew its fleece lining to the insert part, folding them with their faces inward. In this case, leave the short lower arc of the part unstitched - through it, turn the part to the front side.
 5. Stitch the two rear parts of the overalls, folding them “face” inward. After grinding, cut the allowances close to the seam so that the inverted part has a neat appearance.
 6. Attach the front parts of the overalls to the joint part of the back (with the sides facing inward) and sew along the lines from the neck to the ends of the sleeves.
 7. Now sew the same parts (two front halves and the back of a winter overalls) along the side lines that lead from the ends of the sleeves through the sides to the bottom of the legs. Do not forget to cut off excess allowances close to the seam, after checking if you are satisfied with the result of the seam turned on the front side.

8. It is necessary to complete the “skin” of overalls by sewing a hood on the main part of the product. You also need to do this from the inside out, after comparing the central seam of the hood with the central seam of the back of the overalls.

9. After the outer part of the overalls is ready, you can begin to create a lining. Sew the fleece parts of the hood, before stitching the darts on these parts. Also cut off the excess fabric, slightly stepping back from the seam.

10. Then grind the main part of the lining - connect the two halves of the back with a central seam, and sew two front halves to them along the side lines and the lines of the sleeves.

11. Sew the lining hood to the lining base of the jumpsuit.

12. Lay the lining in the jumpsuit to imagine how the front panel will need to be sewn. Attach a short arc of insertion to the edges of the same arc in the lining of the back so that the fleece is facing inward. Grind this “sandwich” along the arc line using unnecessary threads.

13. Then lead the insertion arc through the top of the jumpsuit and close it with the rainbow arc of the main part of the jumpsuit. In this case, the parts must connect the raincoat sides inward. Sew the arc on a typewriter and twist the jumpsuit.

14. Turn the sleeves from the raincoat fabric inside the overalls and fold their edges with the edges of the lining sleeves so that the wrong side of the raincoat fabric and the wrong side of the fleece are outside. Sew the edges of the sleeves, twist them and check whether everything is sewn correctly.

15. Turn the entire jumpsuit to the wrong side and sew its sides - from the central insert through the center line to the neck. This must be done by folding the front sides of the inside of the raincoat fabric and lining fleece.

16. Turn the product to the front side and straighten all the bends to give the jumpsuit a neat appearance.

17. The hood of the lining must be fixed together with the main hood along the horizontal line of the seam with which you sewed the hood to the base of the product. If we conditionally divide this seam into three parts, then only the central part will need to be sewn - this is enough to prevent the lining from falling out of the hood, and such a product was comfortable to wear. Fold the lining hood towards you, the main one away from you - and sew this section directly along the previously made seams. (The photo was taken before the sides were grinded, but it would be easy to fix the hoods with the finished sides).

18. Bend the protruding edge of the lining hood twice and stitch it on the main hood to make the edge.

19. The children's winter overalls are almost ready - all that remains is to make a velcro fastener!

20. Divide the Velcro tape into 10 equal segments, with the scissors round the corners of all the segments. Gather Velcro in the right places: two fasteners will be on the upper part of the jumpsuit, and the remaining eight pairs will be symmetrically placed on the insert and side parts of the “legs”.

Velcro winter jumpsuit is ready! This is a very practical model with open legs: the baby is comfortable wearing such a robe, and thanks to Velcro, this process is also quite fast. Try sewing with your own hands!


Greetings to all the craftswomen and mothers of the little ones! I know that among my readers there are young mothers who want their children to be comfortable in the clothes that are chosen for them. I want to offer you jumpsuit pattern for baby. With its help, you can independently sew such a necessary and practical thing. In it, your child will feel very comfortable.
A similar wardrobe item for children is now very popular and everyone probably has it. But if you want, you can have as many as you want. It is enough to purchase a beautiful, bright fleece and sew several overalls for the baby with your own hands and change them at least every day.

The pattern is designed for the following sizes:
Chest circumference - 55-56 cm
Waist - 51-52 cm
Hip circumference - 56-58 cm
Back length - 22-23 cm
Sleeve length - 28-31 cm
Neck circumference - 26-27 cm
Height - 86 - 92 cm
FOR WORK OVER OVERALLS
Fleece 1.15 cm with a width of 150 cm
Elastic band (elastic band) 1.10 cm wide 1 cm
Non-woven
The pattern is given without allowances for seams. They will need to be made during cutting: by cuts -1.5 cm, by bottoms-2.5 cm.
1 - front half (2 parts)
2 - backrest (2 parts)
3 - sleeve (2 parts)
4 - hood (2 parts)
5 - the middle part of the hood (1 part with a fold)

On the pattern at number 1 along the middle of the front there is a strap 5 cm wide. This is a subboard. It must be re-edited as a separate additional part.
To process the edge of the strap and the hood, you need a slanting collar 1.5 cm wide (3 cm full width). You will find information on how to make it yourself. On the layout plan, hatched places must be glued with non-woven.
The picture shows the most appropriate arrangement of parts.

WORK DESCRIPTION
1. To sew a back seam
2. Stitch the sleeves to the rear and front halves of the jumpsuit along the raglan line.
3. On the hood, grind the undercut
4. Stitch the middle part of the hood to the side parts
5. Stitch the bead along the edge of the front, after gluing it with non-woven fabric.
6. Stitch the hood in the neck of the overalls
7. To process with a slanting inlay sections of a front and a hood
8. Put buttons
9. To make side and step seams on overalls
10. To bend a bottom on sleeves and trouser-legs
11. Insert the rubber bands
That's all! Jumpsuit for the baby is ready! As always, we managed quickly enough. In this outfit, any child will feel comfortable and warm.
If you wish, you can dream up and come up with a model in which different fabrics, different colors and textures will be combined. For example, the front and back are made of multi-colored fur, and the sleeves are made of plain fleece or thick knitwear. Come up with your own original combinations.
I hope you enjoyed this offer. Take a look at the rubric. There you will find many more interesting and useful for you and your family members.
Sew with pleasure and to the joy of loved ones!
Leave your comments and ask questions if they arise.
Find out even more interesting:

Women's dress of a direct silhouette
I greet all the ladies who love beautiful elegant clothes and are ready to create their own wardrobe with their own hands! The dress is gaining another round of popularity, despite the prevalence of trousers. ...

Women's lace blouse
Greetings to all lovers of lace lacework! Lace products are always a special topic in women's wardrobe, thanks to which it becomes more delicate and sensual. ...
 I sewed this jumpsuit for the baby at the end of winter - the beginning of spring, when it is still quite cold outside. Then we were still very small, we just lay on walks, so I wanted to sew warm and comfortable clothes. I took a pattern of overalls from the magazine of children's clothing Ottobre (No. 4 - 2004), which, in my opinion, is the best magazine for patterns of children's clothing.
I sewed to size 68 (in height), but this pattern can also be sewn to other sizes: 56-62-68-74-80-86.


In detail 3 - from the bottom +2 cm!
The fabric for overalls is polyester on a synthetic winterizer (quilted), if desired, you can insert another layer of insulation (sherstipon, holofiber). For older children, you can use a maid insulation, tinsulate - they are thin but warm, so they are great for kids who begin to walk themselves, and they just need light clothes that will not hamper their movements. Lining - cotton, knitted. It is better to choose natural fabric, because it is in contact with the face and body of the child.
Details (from the main fabric and lining):
1. Breast - 1 child. with a fold.
2. Side inserts in front - 2 children.
3. Back - 2 children.
4. Sleeve - 2 children.
5. Hood - 1 child.
6. Plank - 1 child.
I supplemented the pattern with a pocket on the chest and lapels on the sleeves and trousers, so that it was possible to close the legs and arms.
In addition, I needed two zippers (I took a length of 40 cm, you can 50 cm), Velcro.

I will dwell in more detail on the process of sewing children's overalls. I coped with this task in a few evenings))
Pocket.
Sew on the wrong side the main fabric of the pocket with a lining, turn it out. Stitch along the edge and sew a pocket on the breast.


Zippers. Sew zippers to the chest, but without lining.

We sweep, then we trim along with the lining fabric on the front side. Similarly, we sew the second half of the zipper to the side inserts of the front.


If the zippers are detachable, then the junction of the zippers can be closed with a patch (I used a piece of brown leather).

Back and sleeves. We perform the middle seam of the back on the main fabric and on the lining separately.

Then we also grind the sleeves along the raglan line to the main fabric and the lining.


We sew a step seam and side. These details of the main and lining fabric are sewn separately. Then we turn out the lining and insert it inside the jumpsuit.
Hood. We sew the details of the hood, leaving the edge open, which is sewn to the neck. We twist, we trim along the edge.


We sew the main fabric of the hood to the collar, and then the lining fabric, to hide the seam we sew with a blind seam or we stitch.

Strap. A strap must be sewn onto the breast so that the neck and hood fit tightly around the neck. We sew the details of the bar, we turn it out, we cut it off. Sew one half of Velcro to the ends of the strap, and sew the other to the hood. The length of the Velcro must be chosen so that it is possible to fasten the bar tighter and weaker.

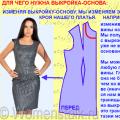 Constructing a dress base pattern and design modeling
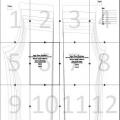 Patterns of children's trousers and sewing master classes Building the back half of trousers
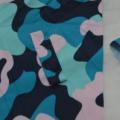 Building a pattern of vests for boys: the easiest way