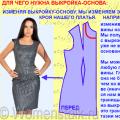
Patterns for overweight women to buy. Patterns of clothing of large sizes
Developing the theme of building patterns for overweight women, we offer one more option to build the basis of the dress. If in the first version we focused on figures of medium splendor and as an example we built a pattern for then in this section we will pay attention to ladies with more attractive shapes and, as an example, we will build the basis of the dress for size 60 semi-adjacent silhouette. This technique, as well as any other one, does not dictate any restrictions whatsoever, but only recommends itself for use in cases where the woman’s chest circumference authoritatively declares itself to be 120 centimeters or more.
To build a drawing of the pattern, you must take the following measurements:
To take measurements more accurately, it is necessary to note the starting points: the seventh cervical vertebra, which is well defined when the head is tilted, as well as the shoulder line at the base of the neck and at the junction of the arm with the shoulder.
Use pins or chalk for this if the woman is wearing. If you need to put a point on the body, use a felt-tip pen, which is easily erased with alcohol-containing liquid after the end of this procedure.
It’s good if the person you are taking measurements with is wearing a thin dress, or better, only underwear. He, or rather she, since we are talking about a woman, should stand upright, without tension, i.e. maintain your normal posture. This is what I draw your attention to. Because, often a woman takes measurements or when trying on, especially if she sees herself reflected in a mirror, wanting to look slimmer, tightens her stomach, straightens her back, etc. The desire to look better is a good desire, but when taking measurements it can distort the real state of things. And a well-fitting dress on a fitting, in ordinary life, will not be as comfortable as we would like, and as it should be.
Therefore, in view of the above, turn the client away from the mirror, distract them in a peaceful conversation, tie a lace around the waist, mark the starting points and proceed with measurements.
For example, we took measurements corresponding to size 60 and during the construction all calculations will be based on the measurements given in the table below.
Be careful, in all formulas in the calculations you substitute their meanings.
The experience of using this pattern building technique suggests that an excellent result is easy to achieve under one condition: you need to accurately and diligently take measurements. The result of all further work depends on this.
Names of measurements and conventions | cm | Taking measurements |
|---|---|---|
Product Length (Di) | Measured from the cervical point (seventh cervical vertebra), bringing a centimeter to the waist and to the required length. |
|
Armhole Depth (GPR) | Measure from the seventh cervical vertebra to the horizontal, carried out with a centimeter through the axillary hollows. |
|
Back length to the waist (Dst) | Measure from the seventh cervical vertebra to the waist line, given the bulge of the shoulder blades. To do this, a thin ruler can be attached to the protruding points of the blades, a centimeter tape should pass over the ruler. |
|
Back Width (W) | Measured horizontally by the shoulder blades, between the upper corners of the armpits. |
|
Half Neck Girth (N) | A centimeter tape should pass along the base of the neck, behind the seventh cervical vertebra, in front of the jugular cavity (indentation). |
|
Half Chest 1 (CgI) | The centimeter tape runs horizontally, behind the protruding points of the shoulder blades, in front of the base of the chest. |
|
Half Chest Girth 2nd (CgII) | A centimeter tape runs horizontally behind the protruding points of the shoulder blades, in front of the protruding points of the chest. |
|
The size of the groove solution (VRV) | Measured vertically. Taken at the same time as the measurements of the half-girth of the chest. This is the distance from the base of the chest to its highest point. |
|
Half Waist (St) | Measured horizontally in the narrowest place. |
|
Half Hips (Sat) | Measured horizontally, behind the protruding points of the buttocks, in front, taking into account the convexity of the abdomen. |
|
Sprout height (Vp) | Measure from the back from the shoulder at the base of the neck to the waistline. A centimeter tape runs parallel to the spine. |
|
Back Arm Height (Air Force) | Measure on the back from the point of articulation of the arm with the shoulder to the waist. |
|
Armhole width (Shpr) | Measured horizontally at hand: from the place of articulation of the arm with the trunk from the back to the articulation of the arm with the trunk from the front. Can be calculated using a ruler located horizontally in the armpit. |
|
Side length (db) | Measured from the back from the upper edge of the ruler located in the armpit to the waist line. |
|
Shoulder length (dp) | Measure on the shoulder from the base of the neck to the point of articulation of the arm with the shoulder. |
|
Chest height (Vg) | Measure from the shoulder line at the base of the neck to the protruding point of the chest. |
|
Front shoulder height (Runway) | Measured from the point of articulation of the arm with the shoulder to the waist. |
|
Front Length to Waist (Dpt) | Measure from the shoulder at the base of the neck to the waistline. |
|
Breast Center (Cg) | Measure horizontally between the most prominent points of the chest. |
|
Front Width (Shp) | Measured horizontally above the base of the chest between the corners of the armpits. |
|
Front width at the protruding points of the chest (BpII) | Measured horizontally between the corners of the axillary hollows at the most prominent points of the chest. |
|
Sleeve length (dr) | Measured from the point of articulation of the arm with the shoulder to the desired length. |
|
Sleeve Length to Elbow (DRL) | Measured from the point of articulation of the arm with the shoulder to the elbow. |
|
Arm Girth (Op) | It is measured horizontally in the fullest upper part of the arm (at the level of the armpits). |
|
Wrist (brush) girth Oz | Measured by the wrist joint taking into account the bones. |
|
Free fit allowance On loose fit to the measurement of the second half-circumference of the chest CrII add 4-5 cm, to the measurement of the semi-circumference of the hips Sb - 3 cm and to the measurement of the semi-circumference of the waist St - 2 cm. |
||
SECONDARY DRESS.
Back.
We draw in the right corner of the prepared sheet of paper a right angle with a vertex at a point R (fig. 1).
Dress length.
From point R down we postpone the measured length of the dress Di(102 cm) and put a point N. (fig. 1).

Fig. 1
The depth of the armhole.
From point Rdown we postpone the taken measurement of the depth of the armhole GPR (23cm)and put a point G.

Fig.2
The length of the back to the waist.
From point Rdown we postpone the taken measurement of the length of the back to the waist Dst (40cm)and put a point T.

Fig.3
Dress length to the line of the hips.
From point T down usually delayed 18 - 20cm. We will take the average 19cm and put a point B.
From points G, T, B and N to the left we draw horizontal lines of depth of the armhole, waist, hips and bottom.

Fig. 4
The midline of the back.
From point Rput off to the left 1cmand put a point P1 (back bevel).Section WGdivide in half and mark the middle with the letter L.Points P1and L Tput off to the left 1.5cmand put a point T1.
Points G, T1and Bconnect the smooth curve as shown in Fig.5.

Fig.5
The width of the back.
From point Gto the left we postpone the taken measurement of the width of the back Cc a plus 0.5cm (increase in free fit) and put a point G1:
GG1 \u003d 21 + 0.5 \u003d 21.5 cm.
Through point G1up and down we draw a vertical line, at the intersection with the waist line we put a point T2.

Fig.6
Distance to the sideline (to the side seam).
From point G1put off to the left 1/2 armhole width Spre (14cm)minus 1cmand put a point G2:
G1 G2 \u003d 14: 2-1 \u003d 6cm.
The distance to the sideline can vary, it depends on the shape and style. If the figure has a protruding belly, then the sideline is closer to the back, and if the figure has protruding buttocks, then it is closer to the front. And, of course, the sideline may be in the middle of the armhole.
From point G2 draw a vertical line down to the hips line and set points at the intersection with the waist and hips lines T3and B1.

Fig. 7
From point P1put aside 1/3 of the neck half to the left N (21cm)a plus 1cmand put a point P2:
P1P2 \u003d 21: 3 + 1 \u003d 8cm.

Fig. 8
From point P2 postpone the difference between the measures of height of the sprout VR (42cm)and the length of the back to the waist Dst (40cm) and put a point P3:
P2P3 \u003d 42-40 \u003d 2cm.
Points P3 and P1connect a smooth curve.

Fig. 9
From point T2 upward we postpone the measured measurement of the height of the back of the shoulder Air force (36 with m)and put a point P.

Fig. 10
Auxiliary point for the design of the armhole.
From point G1put off 1/3 of the segment up PG1and put a point ABOUT. From point ABOUTcompass through the point Pdraw an arc.

Fig.11
Shoulder length.
From point P3 a compass (radius equal to the measured shoulder length plus 2.5 cmon a groove) make a mark on a previously built arc and put a point P1:
R3P1\u003d 13.5 + 2.5 \u003d 16cm.
Points P3 and P1 connect the line.
We make the line of the armhole of the back.
Points P1, O and G2 fig. 12.

Fig. 12
Along the line P3P1, aboutt points P3 put off to the left 1/3 taken measure of shoulder length and put a point IN:
P3B\u003d 13.5: 3 \u003d 4.5cm.
From point INdown parallel to the line RLdraw a straight line of length 9cm and put a point IN 1.

Fig.13
From point INput off to the left 2.5cmand put a point IN 2.From point IN 1through point IN 2draw a line of length 9cmand put a point AT 3.
Point AT 3 connect to the point P1.

Fig. 14
From point T3 put off to the right 2cmand put a point T4which we connect to the point G2.

Fig. 15
From point T4set aside 1cmand put a point T5Points T5and T1connect a smooth curve.

Fig.16
From point B1put aside half the difference between the hips Satand the second half of the chest SGII
B1B2\u003d (Sat + 3cm) -(CgII+4 cm): 2 \u003d65–64: 2 \u003d 0.5cm.
And put an end to B2
Points T5, B2connect a smooth curve. From point B2draw a vertical line down and set a point at the intersection with the bottom line H1. (This is a straight dress). You can expand the bottom of the dress slightly to the bottom. How to do this see section Width of the bottom of the back fig. 18.

Fig. 17
From point G1 set aside 1/3 of the width of the back to the right (7cm)and put a point G3(this isdistance may vary). From point G3draw a straight line down and at the intersection of it with the waist and hips, set the points accordingly T6and B3.From point G3put down 4cmand put a point AT 4, and from the point B3up - 3cmand put a point B4.

Fig. 18
Waistline from point T6 put it left and right 1cmand put the dots T7and T8which we connect with points AT 4and B4.

Fig. 19
Fig. 20
The construction of the back is completed.
From points G2, T3, B1and Н1 to the left we draw horizontal lines: the depths of the armhole, waist, hips and bottom, we put on them approximately 50 cmand set the points accordingly G4, T9, B5 and H2.
Through these points up and down we draw a vertical line.

Fig.21
From point G4 to the right we postpone the distance that we obtain as a result of the following calculation: the taken measure of the second half-girth of the chest SGII(60cm)a plus 4cmfor loose fitting, minus the width of the back according to the drawing (21.5 cm)and minus taken measure of the width of the armhole Spr (14 cm)set a point G5:
G4G5 \u003d 64-21,5- 14 \u003d 28.5 cm.
Through point G5 draw a vertical line down and at the intersection of it with the waist line we put a point T10
Check the front width with the taken measurement, front width at the protruding points of the chest (ShpII). The width of the front in the drawing should be greater than the taken measurement so that it does not appear that the product is narrowed.

Fig. 22
From point G5 to the right we postpone half the taken measure of the width of the armhole Spre (14cm)a plus 1cmandput a point G6,from which we draw a vertical line down and at the intersection of it with the waist and hips we put points T11and B6.
G5G6 \u003d 14: 2 + 1 \u003d 8cm

Fig. 23
From point T9postpone the measured measure of the length of the front to the waist Dpt (47cm)and put a point P4. From point P4. draw a horizontal line to the right.

Fig.24
From point P4put off to the right 1/3 half neck N (21cm)plus 1 cmand put a point P5:
P4P5 \u003d 21: 3 + 1 \u003d 8cm.

Fig.25
From point P4 put down 1/3 half neck N (21cm)a plus 1.5 cmand put a point P6:
P4P6 \u003d 21: 3 + 1.5 \u003d 8.5cm.
We connect the points P5 and P6 by a straight line, divide it in half and mark the middle with a point O1.From point O1set aside right angle 1.5cm and put a point O2.
Points P5, O2and P6 we connect a smooth curve and get a neckline.

Fig. 26
From point P5put off to the right 1/3 measured shoulder length DPL (13.5) and put the point P7:
P5P7 \u003d 13.5: 3 \u003d 4.5 cm.

Fig. 27
From point G4 to the right we postpone the taken measurement of the center of the chest Tsg (12 cm) and put a point G7. Points P7 and G7 connect.

Fig. 28
From point P7 put down 1cm and put a point P2.Points P5and P2connect.

Fig. 29
From point P7 down we postpone the taken measurement of the height of the chest Vg (33cm)and put a point C.

Fig. 30
From point Tsset aside 2.5cmand put a point C 1.

Fig. 31
From point Tsupward we postpone the taken measurement of the size of the tuck solution VRV (14cm)and put a point At.
From point Tsthrough point Atdraw an arc to the right .

Fig. 32
From point Aton the conducted arc we postpone the difference between the measurements CgII (60cm) minus half-chest first CgI (53cm)set a point U1 .
UU1= 60 - 53 = 7cm.
This construction is conveniently done using a compass. To do this, draw an arc from the point Y with a radius of 7 cm to the intersection with the previously constructed arc.
At the intersection we put a point U1.
From point C 1through point U1draw a line on which we postpone a segment equal to the segment Ts1P2,and put a point P3:
Ts1P3 \u003d Ts1P2.

Fig. 33
On a straight line T10G5extending it up we postpone the taken measure of the height of the front shoulder Runway (35.5)and put a point P4.

Fig. 34
From point G5set aside 1/4 segment G5P4(4.65cm)and put a point O3.Point O3 is an check mark when bushing a sleeve into an armhole. From point O3 compass through the point P4 to the right we draw an arc with a radius O3 P4.

Fig. 35
From point P3draw an arc of radius equal to: taken measure of shoulder length Dpl(13.5cm)minus distance P5P2 (4.5cm) to the intersection with the previously built arc. At the intersection we put a point P5.
P3P5 \u003d 13.5-4.5 \u003d 9cm.
Points P3and P5connect a straight line .

Fig. 36
Points P5, O3and G6connect a smooth curve as shown in fig. 37.
Side line.
From point T11put off to the left 1.5cmand put a point T12Points T12and G6 connect.

Fig. 37
From point T12 set aside 1cmand put a point T13Points T13 and T9connect a smooth curve.

Fig. 38
From point B6set aside half the difference between the hips Satand the second half of the chest SGIIwith increments of free fit:
B6B7\u003d (Sat + 3cm) -(CgII+4 cm): 2 \u003d65–64: 2 \u003d 0.5cm,and put a point B7:
Points T13and B7 connect a smooth curve. From point B7, draw a vertical line down and set a point at the intersection with the bottom line H3.
From point H2 put down 2cmand put a point H4.
Points H4 andH3 we connect a smooth curve, so we draw the bottom line (This is a straight dress).
You can expand the bottom of the dress slightly to the bottom. How to do this, see the section “Bottom Width Front”, Fig. 39.

Fig. 39
Build a recess.
Section G5G7 divide in half and put a point G8from which we draw a straight line down and set points at the intersection with horizontal lines T14 and B8.
From point G8put down 6cmbut from the point B8up - 3 cmand put the dots AT 5and B9. From point T14left and right 1.25cm and put the dots T15 and T16which we connect with points AT 5and B9.

Fig. 40
For complete figures, starting from the 60th size and above, it is necessary to draw on the pattern deflection line. For this from the point B5put off to the left 1-1.5cm (depending on the bulge of the abdomen) and put a point B10. Points P6and B10 connect the line, extending it to the bottom line. The drawn line is the middle of the front.

Fig. 41
Construction completed.
But before proceeding with the cutting, do not be too lazy to take a centimeter and once again check the basic measurements. Especially pay attention to the waist circumference, since in this method, when constructing tucks along the waist line, not a calculated value, but a constant is used. If during verification you find significant discrepancies between the figure and the drawing (in waist circumference), they are easy to eliminate by reducing or increasing the solution of tucks along the waistline.

Fig. 42
This is a drawing of the pattern of the basis of the dress - the basis for creating a wide variety of models. Before proceeding to modeling, it is necessary to check the pattern, "put" it on the figure, if necessary, make adjustments. And only after full confidence that everything is in order, you can safely begin to create.
I sincerely wish you success!
Hardworking - a bright light burns through life, lazy - a dim candle
Building a base pattern - THE MOST CLEAR METHOD (for beginners)
Good afternoon! I would even say a beautiful day. Because we are finally starting a series of articles on sewing clothes for adults. We already sewed a lot of things for little girls - and the dresses and bodysuits are different - now we will sew for big girls. That is for yourself. And since we have already trained to sew, the fear of the pioneer has passed.
And it means it's time to take a new frontier. And by ourselves, with our own hands and with our brains, master the wisdom of sewing on real adult patterns. We ourselves will draw the base pattern - in a new easy way (I spent more than one week to create this lightweight method of constructing the base pattern). And then we will sew a bunch of any dresses, tops and tunics.
No - I will not give you a single finished pattern!
I'm not Madame Burda. I am Madame Klishevskaya.))) And the main harmfulness of my character is ... that I will make your head work and give birth to bright and clear discoveries in the field of sewing. The easiest and most understandable of all types of arts. Believe me, it is.
Yes - Sewing yourself is very easy and simple!
Right from scratch you will get more and more beautiful and well-sewn things.
And you will do everything yourself, without a state of hypnosis, but in a sober mind and bright memory. YOU WILL DO IT - moreover you will UNDERSTAND what exactly you are doing.
I will tell you the secrets that I know.Moreover - I will teach you to discover more and more secrets of the world of sewing and modeling clothes.
I will not lead you (blind and stupid) by the handle in the chaos of letters and numbers denoting the intricacies of numerous lines of drawing patterns. NO, I WILL NOT TELL YOU HERE:
Well, you see, one such picture can catch fear and make a girl who doubts her own abilities really, really wants to sew a dress - but i was not friends at school with geometry and drawing. Even I, who adored both of these school subjects, went around and around for several years — not daring to start delving into the construction of such a drawing: “How long does it take to draw such a thing and you need to calculate everything correctly and not get lost in letters…”.
And, nevertheless, today we will draw a pattern.
We will draw a pattern-base (this is a piece of it you see from above.))))
But - do not rush to be scared - we will create our pattern a little differently. Away from the engineering method - and closer to human understanding.
We will draw one with you - only one - pattern.
And then from it we will create more and more new models of dresses. And it will be very easy and simple.
- No obscure formulas
- No confusing calculations.
- And without the letter-spider web.
How? Have I removed a bit of your concerns?
I now relax - we will not start drawing right now. To begin with, we will take a pleasant walk through the pattern. The purpose of the walk is to get acquainted, make friends with the pattern and remove the last doubt that you can sew any dress.
So ... what is a pattern - the basis?
To put it figuratively, it is a cast from your body. This is your personal print. Any thing sewn according to YOUR pattern-base will ideally sit on YOUR figure.
Yes, you heard right - ANYTHING can be sewn on the basis of one and only pattern. All-all models of dresses - are born, modeled, and sewn from one source - this is the base pattern.
I’ll prove it to you now with an example. Even in three examples - in the form of photos and pictures.
Here is the first photo (below). Our base pattern is, in fact, your sheath dress (one that fits perfectly on the figure). Custom Made Dress your pattern-based, will repeat all the bends your his body. This simple sheath dress is sewn according to the usual pattern-based. See, it’s like a plaster cast from a girl’s figure.
And already today, having drawn the base pattern, you can safely do the cutting on the fabric - and you will get such a dress. The only thing you can change the neckline is to give it the shape that suits your face contour.
All other (any-adorable) dress models are just a modification of the sheath dress - a fantasy on a free theme.
Here's how it goes in the fashion world.
Once a fashion designer thought ...“But what if the bodice of the dress at the top will hold a round yoke (yellow outlines - the figure below), and the bodice itself will be made in the form of oncoming triangles overlapping (red outlines - see the figure below). The result is what we see in the photo below.

Handsomely? Handsomely! What did the fashion designer base his fantasies on? On a pattern basis. And you can come up with something of your own. In us - in women - just a lot of imagination.
By the way - since we are talking about a round yoke - this site already has one of my articles on creating and
And another fashion designer thought: “And what if you give the sheath dress a looser cut - make it wider. And make the line of the shoulder longer so that it hangs on the arm. ” And in the end, a new model is born (photo below) - also very beautiful. And very simple.
You can do that too. If you will UNDERSTAND what the base pattern consists of. And by what laws does it exist.
That is why i do not want to stupidly give you instructions to create a base pattern (such as “draw a line from point P6 to point P5 and mark the point of its intersection with line X as the next point ...” - pah!).
I want to wake you up little thing. I want you to feel the pattern, know its soul. Learned to see what a simple essentially drawing hiding behind a photograph of any, even intricately tailored, dress.
Therefore, we will not draw anything in the next 30 minutes - we will walk around the pattern itself. We will get acquainted with all its elements - we will find out why each line serves, and why it is located here and drawn just like that.
After such a “cognitive walk” you will feel joyful clarity of understanding of all-all-all. It’s as if you have already painted the base patterns many times. And take up the drawing with the feeling that this is a couple of trifles. Ha! Business!
As the sage said: “We are only afraid of what we cannot understand and explain logically. But as soon as the thing that scares us becomes clear to us, it ceases to cause us fear. ”
So let's go and tame this "terrible beast" - the base pattern. Tame and draw in 20 minutes. Yes, in 20 minutes - because after a walk - the drawing of the pattern will seem to you an old and well-known simple pattern - like a grating for playing tic-tac-toe.
Where does the base pattern come from?
So where does the pattern come from - usually it is extracted from such a Thursday:
In the drawing there is half of the back part + half of the front part.
We will also draw a similar drawing with you - only more simply and clearly.
And why are these halves needed, and where to apply them - now I will clearly show everything.

Here (!) I dug up a wonderful mischief - below - in the photo of a black and white dress, our halves are very clearly visible - both the half of the back and the half of the front. So to speak - clearly and clearly.
Yes, in Potnovsky language halves are called "shelves." We will draw these very shelves of the front and back today. But first, a detailed look at what elements each shelf consists of. And most importantly, I will tell you why each element is needed, what it serves.
To make everything as clear as possible, I will illustrate each of the elements both in pictures and in photographs of real models of dresses.
First, get acquainted with two obscure words: TAP and ARMHOLE.
Of course, maybe you know them. Or maybe not. My business is to introduce.
So, get acquainted - PROYMA
When drawing the base pattern, you will create exactly that bend and the sizearmholes that suits you - when the armhole does not pull and does not stick into the arm.
That is, the pattern base contains permissible minimum armhole size. You can simulate the armhole for your taste, any configuration. But your fantasy armhole should not be less than on a pattern-based. That is, an armhole on a pattern basis - these are the boundaries beyond which your imagination should not cross.
Your model armhole can be arbitrarily larger - but it cannot be smaller than on a pattern-based basis. More - yes, less - no - otherwise it will dig into the armpit. Here is a rule in modeling design armholes.
Now let's get to know the tucks.
REVERSE DOORS - shoulder tuck + waist tuck
Here in the picture above, I wrote everything about the back tucks - and in the photo of the dress you can find 2 waist tucks - one to the right of the zipper, the other to the left of the zipper.
But you don’t see a shoulder tuck on this dress. And on many dresses she is not there either. Because for convenience and beauty - this tuck is transferred from the middle of the shoulder to the zipper (or along the edge of the armhole, where the sleeve will simply be cut off the corner). That is, the excess tissue does not pinch at the middle of the shoulder and does not stitch inside the tuck. And excess tissue cropped as a corner at the edge of the shelf, where the zipper is sewn in, or at the edge of the armhole, where the sleeve will be sewn.
Tucks are also optional if you are sewing from stretch fabric - it repeats the bends of your body and is compressed both in the area of \u200b\u200bthe shoulder and in the area of \u200b\u200bthe waist.
Next, get to know ... REVERSE HALF REAR
Oh, you can write a whole poem about her.
I took a long time to figure out how to explain it more clearly - why it is needed and by what laws it lives. Thought, thought ... and came up with.
The fact is that a woman has breasts.))) That is, the front adult girl is no longer flat. This means that the dress in the chest should be convex. A tuck on the shoulder is in front and gives the dress this same bulge in the chest area. Now I will show everything in the pictures. How does this happen.
For example - we have a flat piece of fabric, but we need to make a convex piece of it. To do this, you need to make a tuck on it. For example - this flat circle made of cardboard, with the help of a tuck, will now become convex.
And here is how the chest protrusion creates a bulge on the front part
You noticed that the peak of the bulge (that is, the peak of our rounded pyramid) is at the tip of the tuck. Pay attention to this. Because when we draw the tuck for the chest, the tip of our tuck will be on top of the chest (where the nipple or dome of the bra is usually located).
Remember that sometimes you measured in a store a dress of your size, which somehow strangely skewed on your chest - this is because the tuck in the dress with its tip was directed past tops of your chest. Here the chest did not fit perfectly into the bulge of the dress. This product is not tailored to your breast shape in the factory.
But that is not all, what do I want to say about a chest tuck.
The fact is that in almost all dresses this chest dart is located not on the shoulder - a side just below the armpit. It is made for beauty. The tuck on the shoulder is more striking, but on the side, and even covered with a hand, it is not noticeable.
Creating a base pattern, we draw a chest tuck on the shoulder just because it is more convenient to draw it there from the point of view of drawing construction.
And after the drawing of the base pattern is ready, we very easily and simply transfer the tuck from the shoulder zone to the axillary zone. Do not think that for this you need to make new drawings. Nah, everything is simple - how to open a package of milk - one minute and that’s all.
Here, in the picture below, I schematically depicted transfer of chest tuck from the shoulder to the side suture at hand.
Well, how do you already feel how you have grown wiser in these 15 minutes?))) Or else it will be ... We continue to walk on the pattern and now we will get acquainted with the lines. Horizontal lines
BREAST LINE
The first acquaintance is the line of the chest. (A beautiful dress, isn't it? We will sew it with you. Do not even doubt it)

The chest line is the most wonderful line on the pattern. It is so convenient to focus on it when drawing the base pattern, because:
- We know that we are finishing drawing a waist tuck in the back on the chest line.
- We know that we finish drawing the waist tuck in front before reaching 4 cm to the chest line.
- We know that the humeral tuck is in front - we finish drawing on the chest line.
- We know that the lower edges of the armholes also extend along the chest line.
Well no, of course, you still don't know that. I will give all these simple rules when we start drawing. And now I just want you to know that when drawing many elements of the pattern - you can just focus on the chest line (and there is no need to painstakingly put down these letters and letters).
As you can see, there are a lot of things !! Therefore, forward - to learn, sew and enjoy life)))
WHAT SHOULD BE NEXT DONE - WITH A BASIS Pattern? - you ask
And we will begin to sew on the pattern-based TOPA. It is tops, T-shirts, tunics and then dresses.
You ask: "Hey, why not dresses right away?" The answer to this question I give already in the first article of the cycle So to be continued)))
Good luck with your tailoring!
Clothing. It can be different in size. That which may look good on one woman will not work on the other. So why torture yourself with clothes of incomprehensible size when you can wear your sophisticated look of clothes of large sizes. Patterns of clothes of large sizes are not so difficult to do. You just need to make a little effort. You can make patterns of clothes of large sizes of the following types: pattern of dresses or trousers. After all, today the fashion has changed a bit. After all, if a couple of years ago clothes of model sizes were in fashion, today in the world of fashion there is a revolution. Men give more and more preference to women who do not go on these “bony” models. These models torture themselves with different diets, and they look like hungry cats. Yes, women "in the body" come into fashion. Here you can recall that in the old days in Russia, men preferred women to be larger. Why say you? Yes, because they could tolerate healthy offspring. And the thin could not guarantee that their children would be healthy. So the men of women were looking in the "body". They knew that their children would not have health problems. Perhaps the men thought better of it and realized that healthy offspring were more important than these “bones”. So, that lovely women should not be discouraged in their wag, remember what happened in Russia? Yes, fashion is coming back again, so feel free to make patterns of clothes of large sizes, and others envy you the way.
On a conditionally typical figure. This pattern is ideal for women with standard figures. Today, according to your numerous requests, we will tell you how to build a pattern-base of a dress / blouse for a large size - for women with beautiful Rubensian shapes.
Before proceeding with the construction of the dress pattern, it is necessary from the figure. When taking measurements, stand straight, keep your hands freely along the torso. When taking measurements, do not try to reduce the volumes: if there is a small tummy, do not pull it in strongly, as we do not do this constantly in ordinary life and the finished dress may be narrow when worn.
Allowances for freedom of fit should be taken from, according to the chosen silhouette. In the article, the construction is shown by the example of a dress of an adjacent silhouette with an increase in the freedom of fitting 3 cm (to the semi-girth of the chest). Of these, 0.5 cm will be added to the width of the back, 1 cm to the armhole and 1.5 cm to the width of the front of the dress.
To build, use the measurements of the standard 56 size:
- Back width 42 cm
- Armhole width 12.5 cm
- Chest width 48 cm
- Width over chest 38 cm
- h \u003d 12 cm
- Breast center 22 cm
- Chest height 33 cm
- Armhole Depth 22 cm
- Length to the waist of the back 1 (DTS1) 45 cm
- Length to the waist of the back 2 (DTS2) 47 cm
- Shoulder height 48 cm
- Shoulder height slanting front 50 cm
- Shoulder length 13 cm
- Length to the front of the front (accident) 51 cm
- Hips 20 cm
- Neck circumference 42 cm
- Shoulder length 13 cm
- Waist 96 cm
- Hip circumference 122 cm
- The length of the product on the back is 100 cm.
Fig. 1. Pattern dresses for large size - measurements
How to accurately measure the width and depth of the armhole?
To measure the width and depth of the armhole, use a strip of paper 4-5 cm wide and about 30 cm long.
- Armhole width: hold a strip of paper horizontally under the armpit, put serifs on the left and right by hand (Fig. 2).
- Depth of armhole: Hold the strip of paper horizontally under the armpit, and place the strip on the back. Measure the depth of the armhole from the 7th cervical vertebra to a strip of paper (Fig. 3).
Fig. 2. How to take measurements
Advice! To open drawings and drawings in full size, open each in a new window.
Fig. 3. How to take measurements for a pattern
Constructing a dress pattern for a large size
Backrest construction
The construction of the pattern begins with the construction of the back. From the top of the paper, back down 10-15 cm and put point A. In the left corner, draw a vertical and right horizontal line down from point A. AH \u003d 100 cm (dress length by measurement).
The depth of the floodplain dresses. From point A, lay down the length of the depth of the armhole according to the measure + 0.5 cm for a loose fit for all sizes: AG \u003d 22 + 0.5 \u003d 22.5 cm.
Fig. 4. The construction of dress patterns for large size - back
The length of the back to the waist. From point A, lay down the length of the back to the waist by the measure: AT \u003d 45 cm.
A line of hips dresses. From point T, lay down 20 cm: TB \u003d 20 cm (thigh height by measurement). From the received points, draw horizontal lines to the right.
The width of the back. From point G, lay to the right along the 1/2 line of the Width of the back to measure + 0.5 cm (increase in freedom of fitting out). GG1 \u003d 21 + 0.5 \u003d 21.5 cm. From the point G1 draw a straight line up - point B.
Armhole width. From the G1 point, set aside 1/2 the width of the armhole by the measure of 1 cm increase for all sizes: G1G2 \u003d (12.5 + 1) / 2 \u003d 13.5 / 2 \u003d 6.75 cm.
The line of the side of the back. From point G2, lower the perpendicular down to the bottom line. The points T1, B1, H1 are obtained.
Neckline of the back. From point A to the right, set aside 1/6 of the neck circumference according to the measure + 1 cm for all sizes: AA1 \u003d 42/6 + 1 \u003d 8 cm.
From point A1 upward, postpone the difference between the measurements of DTS2 and DTS1: A1A2 \u003d DTS2-DTS1 \u003d 47 cm - 45 cm \u003d 2 cm. Connect points A and A2 with a concave smooth line. Got a neckline neckline.
Shoulder back. From point T, draw an arc of radius R \u003d 48 cm (the height of the shoulder is oblique by measurement).
The length of the shoulder of the back of the dress. The length of the shoulder of the back is calculated by the formula Dpl \u003d Length of the shoulder by measure + 2 cm (for tuck) \u003d 13+ 2 \u003d 15 cm. From point A2, draw a shoulder line 15 cm long so that the extreme point of the shoulder lies on the arc - point P.
Armhole line of the back. Divide the segment VG1 in half - an auxiliary point is obtained for constructing the line of the armhole of the back. Connect the points P, the midpoint of the division of VG1 and the point G2 with a smooth line, as shown in Fig. 1.
Tuck on the shoulder of the back. From point A2 to the right on the shoulder, set aside 1/3 of the length of the shoulder - point B1, from the resulting point, lower the perpendicular 8 cm long - point B2.
From point B1 to the right along the shoulder line, set aside a tuck depth of 2 cm - point B3. Connect points B2 and B3 with a straight line. The right side of the tuck B2B3 \u003d B1B2. Connect points B3 and P with a straight line - get the back shoulder line. Draw the sides of the tuck with slightly concave lines.
The line of the side of the back at the waist. In order for the dress to comfortably fit the figure in the waist area, it is necessary to calculate the difference between the width of the backrest mesh and 1/4 of the waist circumference by measurement: (1/2 Back width with increase + 1/2 Armhole widths with increase) minus 1/4 FROM by measurement \u003d (21.5 + 6.75) - 24 ≈ 4 cm. We will increase this value by 2.5 cm, taking it from the increase to free fit. Thus, the total excess tissue that needs to be tucked away will be 6.5 cm.
Why is this needed: so that the silhouette of the dress is more fitting along the waistline. From point T1 to the left, postpone 2 cm - point T2. Connect the points T2 and G2.
Divide TT2 in half and lower the perpendicular down to the line of the hips. From the point of intersection with the waistline, set aside 1.5 cm to the left and right (tuck depth \u003d 3 cm). Draw a tuck without reaching 4 cm to the line GG1 and 3 cm to the line BB1.
Side seam of the back. Since the width of the grid is built according to the measurements of the chest, and the circumference of the hips is much larger, we calculate the lack of volume in the hips: BB1 \u003d (hips - chest circumference) / 4 \u003d (122-112) / 4 \u003d 2.5 cm. Set aside from points B1 and H1 2.5 cm and draw a line of the side seam through the points T2-B2-H2.
Middle back seam. With the kinky back, as well as to create a more tight-fitting silhouette from point T, set aside 1-1.5 cm to the right and draw the middle back seam as shown in Fig. 4.
Constructing
Extend all horizontal lines to the right. From the point H2 lay to the right 40-45 cm and put the point Н3.
From point H3, draw up a vertical line. The points B3, T3, G3 are obtained.
Width of the front of the dress. From the point G3 to the left, set aside 1/2 Width of the chest according to the measurement (Width of the chest by the protruding points) with an increase in the loose fit G3G4 \u003d 24 + 1.5 cm \u003d 25.5 cm. Draw up a perpendicular line of an arbitrary length.
Fig. 5. Pattern dresses for large size - back and front
The width of the armhole in front of the dress. From the G4 point to the left, set aside 1/2 of the width of the armhole with an increase of 6.75 cm (similar to the back) - the G5 point is obtained. From point G5 down, draw a vertical line to the bottom line: points T4, B4, H4 are obtained.
Front height. From point T3 upward, set aside 51 cm (Length to front waist by measurement) - point W.
The width of the front neck. From point W to the left, draw a horizontal line of arbitrary length and set aside 1/6 of the circumference of the neck to measure + 1 cm for all sizes: ШШ1 \u003d 42/6 + 1 \u003d 8 cm. With a radius of R \u003d 8 cm, draw a neckline in front of the intersection the point Ш2 is obtained.
Center of the chest. To find the location of the top point of the chest tuck C, use 2 measures:
Breast Height (HH) \u003d 33 cm
Chest Center (CG) \u003d 22 cm
From point W1, draw down a straight section of W1C with a length of 33 cm (measure chest height) so that the distance CC1 is 11 cm (½ measure the center of the chest).
From point C up, set aside h \u003d 12 cm (measure between the chest width and breadth levels). From point C, use a compass to draw an arc of radius CC2 \u003d 12 cm.
Depth of chest tuck. From the point C2 along the arc, set aside to the left ½ the difference between the measurements. Width of the chest and Width over the chest: (48 - 38) / 2 \u003d 5 cm - the point C3 is obtained. Connect points C and C3 with a straight line, extend the segment up. Length SS1 \u003d SS3.
The shoulder is in front of the dress. From point T3, draw an arc with a radius of R \u003d 50 cm (shoulder height oblique front to measure).
The length of the shoulder in front of the dress. Set aside 13 cm from the point Ш3 (shoulder length by measurement) so that the extreme point of the shoulder lies on the arc: Ш3П1 \u003d 13 cm.
A line of armholes in front of the dress. Set aside G5G6 ≈ 6.5 cm (an auxiliary point for constructing the front armholes) and draw an armhole line through points P1-G6-G5.
Fur tucks in front of the dress. Let's calculate the tucks: (Width of the front net minus ¼ waist circumference by measurement \u003d (25.5 + 6.75) - 24 \u003d 8. This is the value that needs to be removed in the side and in the waist tucks. The depth of the side tuck is 3 cm, the depth of the right tackle tuck - 3 cm, the depth of the left tackle tuck - 2 cm. From point T4, put 3 cm to the right to point T5. Connect point T5 to point G5. The length and location of the tack tucks are shown in Fig. 2.
The line of the back of the thigh. Side seam before. We calculate the lack of volume along the hips similarly to the back: B4B5 \u003d (Hips - Bust) / 4 \u003d (122-112) / 4 \u003d 2.5 cm. Set aside 2.5 cm from points B4 and H4 to the left and draw a line for the side seam through the points T5-B5-H5.
The dress pattern for a large size is ready. Then move on to building. To do this, you need to take measurements (see Fig. 1-2):
- The length of the sleeve
- Shoulder girth
- Girth of the wrist.
After the pattern is built, it needs to be checked. To do this, sew from the breadboard fabric. Try on and evaluate the accuracy of the base design. Make changes if necessary.
Now you know how to build an accurate basic dress pattern - share it with others! You will find even more original patterns and interesting ideas for creativity on the website of the Anastasia Korfiati Sewing School. Sign up for free and be the first to get new lessons!
Dear craftswomen! The editors of the site receive a huge number of letters asking them to develop and publish as many fashionable and elegant large-sized models as possible. We understand that it is difficult to buy beautiful and high-quality clothes with a non-standard figure in stores, and we try to take into account all your wishes and fulfill them. However, in order to simulate the desired style of a dress or blouse, a basic pattern or the basis of the dress is required, and it is from its construction that one must begin. Needless to say that the request to publish a basic pattern for downloading a large size is the champion among your requests? Today we are happy to fulfill the desire of many of our readers, women of luxurious shapes, publish the basic pattern for downloading in sizes 52-54-56, and we hope that this will help you create perfectly fitting clothes, and for someone, it may become new stage of the creative path.
In addition to the patterns of the back and front, we have developed a pattern for a single-seam sleeve, so that with this pattern you can sew not only dresses, but also blouses, and even light jackets.
The basic pattern of the dress is 52-54-56 sizes
But you will do the correction a little later, and only if it is needed. But first you need to download and print the pattern.
How to print a basic pattern
We have prepared for you two options for printing patterns - you can download and print the drawing in A0 format and in A4 format. A0 format allows you to print a full-size pattern, and you do not have to glue the sheets. Printers of such a large format are in the copy centers of any city.
On A4 format, the image is divided into 16 sheets, you can print it on any printer, and then glue the sheets into a seamless pattern using alignment marks. Some printers are capable of compressing the image (if the appropriate settings are set), and to prevent this from happening, we placed a test square on the pattern with a side length of 100 mm (see Fig. 1 mark 1).
IMPORTANT! After gluing the pattern, be sure to check the length of the test square!
After the pattern is printed, select your size in the upper left corner (Fig. 1 mark 2). Each size has its own line type. Circle the pattern as shown in fig. 1 on tracing paper and proceed to check the pattern.
IMPORTANT! An additional tacking tuck on the front half of the drawing (left) should be done only if additional fitting is necessary.
Fig. 1. How to reshoot the basic dress pattern
How to check the basic pattern
In order to check the pattern, keep your measurements handy. For the pattern, take measurements:
- Y1 \u003d Measure Length to Back Waist (TPA)
- Y2 \u003d measure Length to the front of the front (accident)
- X1 + X2 \u003d measure Chest girth with an increase of about 3-4 cm
- X3 + X4 + X5 + X6 \u003d measure Waist circumference with an increase of about 2-3 cm
- X7 + X8 \u003d measure Hips with an increase of about 2-3 cm
- Z1 \u003d measure Arm girth with an increase of about 3-4 cm.
Fig. 2. How to check the basic pattern
How to download a basic dress pattern in sizes 52-56
To download patterns in A0 or A4 formats, click on the appropriate button. Instructions for working with patterns are given above in this article.
You will find even more interesting new ideas on the Anastasia Korfiati Sewing School website. Subscribe to free lessons and sew fashionable clothes with us!
 Constructing a dress base pattern and design modeling
 Patterns of children's trousers and sewing master classes Building the back half of trousers
 Building a pattern of vests for boys: the easiest way