Round turn-down collar. Turndown Collars
The flat-lying collar lies exactly along the neck and is characterized by a small stance or its absence. This type of collar is most often used on children's clothing, bouffets and dresses, jackets and coats.
The design of a flat-lying collar is carried out directly on the combined front and back of the product with a slight overlap of shoulder sections in the armhole area. To do this, combine the vertices of the neck at points A 1 and A 2, and the final shoulder points P 1 and P 2 should go 1-3 cm at each other.

Thanks to this construction, the collar has a maximum take-off length, so the collar lies flat on the product.
To build a collar, a chest tuck on a shelf should be moved to the side seam or to the waist line.
The neckline stitching line exactly follows the neckline of the backrest and shelf.
The width of the collar and the departure line (its shape) are determined by the model.
Flat-layed collar with rounded ends

1. Temporarily transfer the tuck to the bulge of the chest to some section of the front, for example, to the side.
2. Attach the back to the front, combining the shoulder sections at the neck and laying them on each other at the armhole for 1-1.5 cm. Insignificant overlapping of the shoulder sections of the front and back of the armhole eliminates the flat collar from the ugly slack along the flight line.
3. In the drawing of the basic basis of the product, expand the neck along the shoulder line by 1 cm; deepen in the middle of the front by 2 cm, in the middle of the back - by 1 cm. Draw a new neck at a right angle to the middle of the back.
4. Draw a collar with a departure width of 6 cm in accordance with the drawing.
5. To improve the fit of the collar, lower the front middle section of the collar 0.7 cm below the cut of the front neck.
6. Copy the collar from the drawing of the front and back.
Below is a detailed video on how to sew a flat collar.
Shirts with a round collar entered our wardrobe reliably and for a long time. If you decide to sew blouses or dresses and are faced with a round collar, it will be useful to find out the rules for sewing it. So, how to sew a round collar with your own hands.
And for lovers of sewing lessons and master classes:
How to prepare fabric
We will need tracing paper, scissors, cloth, pencil, chalk, pins and a sewing machine. It is advisable to wash and dry the fabric beforehand so that the collar does not lead later.
The round gate slice must match the shape of the neck of the product. Therefore, you need to attach a dress or blouse to the tracing paper and draw the neckline.
Based on this line, draw a collar drawing. Its size depends on the size of the shirt. So, for example, the width of the round collar for a size 42 blouse will be 5.5 cm. Do not forget that you must leave a seam allowance of 0.5 cm.
Creation of a pattern of a collar
We make a pattern for a trim detail. With it, we will attach the collar to the product. Its base corresponds to the shape of the base of the collar, and the height is 1.5-2 cm.

We cut the collar along the warp thread. We add up the collar, if your model requires it (then the pattern of the collar and the trim part needs to be done less than the armhole by the size of the assembly). We seal the collar with non-woven fabric. Sew decorative trim as desired.


How to sew a collar to a shirt or dress
Attach the two parts of the collar to each other, facing inward. Lay a non-woven lining on top. Sweep the collar with the “forward needle” stitch, leaving a hole of 1.5-2 cm in the center of the lower base of the collar so that the collar can then be turned out.
Sew the part on the sewing machine and turn it to the front side. Sew the remaining hole with the overcast stitch. Iron and steam off the collar.
Tuck and stitch the bottom and sides (i.e. those that do not connect with the neck and collar) of the trim.
Attach the collar to the blouse, top on it, face down, put the trim part. Bast all the pieces, and then stitch them.

Then lift the trim part and tuck it in, into the neck. Stitch it to the wrong side of the blouse.


Good afternoon, our dear readers!
In the next lesson on modeling, we will analyze one of the most interesting and extensive topics on design - collars.
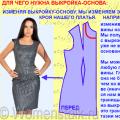
To start modeling collars, we need to have (fig. 1). For this, there is no need to perform calculations and build it with rulers and a pencil - just go to the main page of our website, select the “basic dress pattern” and indicate your measurements. Then the program instantly builds your individual pattern, you can print it even on a A4 printer. Instructions on how to do this are on the page
.png)
Let's start our “immersion” in the topic of modeling collars with the simplest and most understandable - stand-up collars.
All rack collars are built on the same in series, only they have different values \u200b\u200band line configurations. Collars can be with rounded or straight ends, go on top of each other and be modeled end-to-end, fit more or less to the neck. The clasp can be located both front and back.
.png)
Let's now analyze the construction of the stand collar as on a green blouse (Figure 2a).
To build a stand-up collar, it is necessary to measure the length of the neck of the back and the shelf. We get a specific number (for example, 20 cm). Then subtract 0.5 cm from this value and postpone this value in a straight line. To prevent the stance from moving away from the neck, raise the rake angle by 3-4 cm (the larger the value, the stiffer the stance will fit snugly to the neck). Now set the desired rack height (3 cm). And we draw smooth lines of our collar - racks. Remember to keep the rack height constant! The blue control notch separates the front and back of the collar - when stitching the stand collar, you will combine it with the shoulder seam.
Figure 2b shows a drawing of the stand collar as on a blouse with an ornament.
The sequence of drawing the collar remains the same. In a straight line, we postpone the length of the back of the neck minus 0.5 cm. We raise the front corner by 2-3 cm. We set the height of the rack according to the model - this value is arbitrary (4-6 cm). And draw a beautiful stand! Also, do not forget to check the height of the rack.
.png)
.png)
Often you can see sweaters and coats with a one-piece stand. This cut collar fits well to the neck due to the transition of tucks in the line of the rack.
As shown in Figure 3, we initially set the bead width (this is the amount by which one part of the shelf will go beyond the other). Usually it is about 2 cm for the central fastener (buttons in one row as in the photo) and 4 cm for the so-called double-breasted fastener (two rows of parallel buttons). So that the collar does not cut into the neck, you need to expand the neck of the shelf and back by 1-1.5 cm and deepen 0.5-0.7 cm. We connect the obtained points with lines (red color).
Determine the height of the rack. In the example with a one-piece stand, the height of the stand gradually decreases - the largest value is deposited on the middle back seam of 5-7 cm, on the shoulder cut is already 4-6 cm. On the middle seam of the back, we postpone the height of the post on the line extension, and in the area of \u200b\u200bthe shoulder seam, draw perpendicular to the red auxiliary lines. We understand that the line of transition of the strut into the shoulder seam should be smooth, so we adjust the line by cutting off a few corners (green lines). The final step is to draw the upper section of the strut rounding the front.
.png)
.png)
Now in turn flat collars. Also some of the easiest to build.
Pay attention to the jacket in the first photo. Initially, we need to transfer the shoulder tuck on the back and the chest on the shelf to the armhole line - it is much more convenient to draw a flat-lying collar. Now we impose the back detail on the shelf, leading 1-1.5 cm along the shoulder section. Determine the width of the collar and draw it directly on the folded parts (blue line)! On the middle seam of the back, we postpone the largest value (5-6 cm), slightly less on the shoulder seam (4.5 -5 cm) (Figure 4 and 5).
.png)
.png)
.png)
Stand-up collars. Probably each of us will find some thing with such a collar. Most often they can be found in shirts. To simplify sewing, the collar is made with a one-piece stand.
Let's start drawing a stand-up collar as on a blue blouse. As in the stand collars, we initially draw in a straight neckline minus 0.5 cm. From one edge (where the middle seam of the back will be) to set the required bend of the bottom line of the collar, we lay 3-4 cm perpendicularly, then the size of the stand (2, 5 - 3 cm), and the so-called "width of the collar to the rear" (5-7 cm). To draw the front corner of the stand-up turn-down collar, lay 5 cm to the left and about 9 cm up (the values \u200b\u200bmay be different - it depends on the height of the stand and the width of the flight you have chosen). And we try according to the patterns, draw a collar !!! The stand can be either detachable or one-piece (figure 6).
.png)
.png)
Collar Shawl. These collars are very effective and not laborious in comparison with jacket ones. The upper collar is cut along with the selection, which greatly simplifies all the work. So if you want to sew a jacket for the first time, we recommend starting with just such a model.
Pay attention to the line configuration on the last two models of jackets - we see clearly distinguished corners. This kind of shawl collar is called apache
Let's make a model design of the shawl collar as on the first model. First we set the bead width to about 2-2.5 cm. (Figure 7). Now, according to the model, you need to determine the depth of the cut and set the point x. We expand the neck of the shelf (and back) by 2.5-3 cm - we get the point a. Then, in the opposite direction, set aside 4 cm - set point b. Connect x and b with a line and continue this line a little to the top. The resulting line is called the collar kink line (red). Now we measure the length of the neck of the back and with the help of a compass from point a, make a notch (point c) on the collar's inflection line. The segment ac is equal to the length of the neck of the back.
To determine the position of the lower point of the middle of the collar (point d), from the point c along the tangent line we postpone the value of the collar departure plus 0.8 cm (for example: the departure width is 6 cm, then the segment with d \u003d 6.8 cm). We put a point d. Now we connect the points d and a with a smooth line, end the line on the neck - we get the bottom cut of the shawl collar.
We postpone the width of the shawl departure perpendicular to the lower cut of the collar (6-7 cm).
The last action is to draw a smooth line of the upper cut of the shawl collar (green line) from point x to the middle seam.
.png)
Now let's figure out what details we got in the end (Figure 8).
Subboard We need to draw the inner line of the fit to which the lining (blue dashed line) is sewn, draw it in a straight line, at a distance of 3 cm from the midline, and then a slightly convex line and end on the shoulder seam, at a distance of 3-4 cm from point a. On a separate sheet of paper, translate the part along the green line, then from point a along the shoulder seam (it is important that there is a right angle at the transition to the back stitching (Figure 8a)), along the inside and outside line of the pick (blue solid and dashed lines) .
The lower collar in shawl collars is detachable. Also, on a separate piece of paper, we translate the top of the collar (green lines) limited by the blue dotted line.
The shelf is copied completely, only without a section of the lower collar.
.png)
.png)
.png)
And lastly, we left the most interesting!
Jacket Collars. Such collars are made of four parts - the lower and upper collars and two rack parts. Sometimes racks do one-piece. The depth of the cutout varies - the first button can be located above or below the level of the chest, or completely go down to the waist. The width of the lapel is also diverse - from very narrow to covering most of the shelves. A jacket collar is a very important element. Such a collar must be made with special care, otherwise the appearance of the entire product will be damaged.
We carry out the model design of the jacket collar as on the latest model of a jacket made of black fabric with white print. The first steps of the construction are very similar to a shawl collar - we draw a board 4 cm wide (if the clasp is double-breasted) or 2-2.5 cm (for the central clasp). We expand the neck by 1-1.5 cm, we get the point a. To determine the position of the collar inflection line, set aside 1.5-2 cm to the left, set point b. We determine the desired depth of cut and draw a line of inflection of the collar. From point a, we make a notch with a compass, the radius (segment ac) is equal to the length of the neck of the back - we put the point c. Then, from the point c, tangentially, we postpone the collar departure width at the back plus 0.8 cm. We get the point d. Points d and a are connected by a smooth line. Now, at point d, we restore the perpendicular to the line dа and on it we postpone, first the height of the rack (2-2.5 cm), then the width of the collar (4-5 cm). (Figure 9 and 9a)
And now we will need to draw out the departure lines of the collar, raskep and lapel. To understand these concepts, pay attention to Figure 11.
To more clearly imagine how the collar will look in the finished product, draw it on the right side on the details of the shelf (blue lines). The depth of the lapel is about 5 cm, the width is 7 cm. The base point of the lapel is 3 cm down from the neck along the kink line of the collar. After we like the configuration of the lines of our collar, we reflect it relative to the inflection line (green lines). It is most convenient to do this with tracing paper.
Now it remains to draw a complete rack. The upper cut is carried out below the inflection line by 0.5 cm, the width is 2-2.5 cm (blue line).
.png)
Figure 10 shows all the resulting details:
- Subboard Drawn like a shawl collar. Dotted line at a distance of 4 cm from the middle of the shelf.
- Collar (lower and upper). It is copied completely with a rack.
- Shelf. We translate everything, only without a collar.
.png)
.png)
The theme of collars is voluminous, diverse and quite complex. So if you still have questions - feel free to ask them in
Who would have thought that a round collar, which many are accustomed to perceiving as a retro detail, can look so modern on a dress! Marc Jacobs dress, made of delicate silk, is an excellent confirmation of this.
Round Collar Pattern
Fig. 1. Round Collar Pattern
Work description:
1. Measure the length of the neckline of the front and back of the dress. The distance AB is equal to 1/2 the length of the neck of the front and back by the standard.
IMPORTANT! Please note that in the presented model of the dress, the collar is sewn before entering the fastener. The approach to the clasp here is 2 cm on each side.
2. Draw a rectangle. AB is equal to the neckline of the product along with the approach to the fastener.
3. Cut out the collar of the dress, as shown in the drawing of the pattern. The height of the round collar on the back is 6 cm.
4. When cutting, it is necessary to cut out 2 details of the round collar of the dress with a fold in the middle of the collar. The upper part of the round collar of the dress is reinforced with thermal fabric.
What is interesting to us from last season? There is something to note here, but let's start with the collars.
It is called differently - removable, consignment note, detachable or separate, but the essence of this does not change - it's a removable collar. He is not new to our wardrobe, he was invented, so to speak, a long time ago. Who! I will not clarify, since there are several versions on this subject, and therefore each of us can do an excursion into history independently, now it is easy and simple to do this.
The modern detachable collar is an independent accessory, first of all, for a woman’s suit.
How to transform a boring outfit? A collar will come to the rescue. Today we turn our attention to a lace collar, or a collar with embroidery, or just a fabric collar with a beautiful pattern, for example, with floral ornaments, etc.
We offer a pattern of three models of collars, or rather, these are finished patterns in three versions.
This type of collar refers to turndown collars.
Before cutting the collar, check the neck of the product, bring it into line with the pattern of the collar or, conversely, adjust the pattern of the collar to match the neck of the product, and only then you can start cutting.

Collars - small and large, straight and curly, classic and fantasy, modest and elegant. There are a lot of them, they are so different!
It’s very convenient to have on hand ready-made patterns of different types of collars.
After clarifying the neckline of the product, we take a ready-made pattern of the collar of the desired style, check for compliance with the stitching line, if necessary, adjust and can be cut. It is convenient, simple and fast.
Try it, I hope you enjoy this approach.
Valentina Nivina Alexander Nivin
This is the final part of the topic "Building a pattern for a shirt for a boy." The back, shelf and sleeve are ready, it remains to build a collar pattern.
The style of the collar to this shirt may be different. This is determined by you, guided by the desire of the client, the model of the product or suit as a whole.
As an example, we will show how to build a pattern of a stand-up and turn-down collar of a shirt type with a one-piece stand.
A collar pattern can be built on the principle of building a collar for a man’s shirt, but here we maintain the originality of this technique and follow all its recommendations.
We use the same measurements as in two.

Stand-up collars are one of the simplest collars.
However, for all its simplicity of construction, stand-up collars are very diverse. This diversity is expressed in the width (height) of the rack, in the configuration of the upper line, in the design of the ends, as well as in the degree of fit to the neck.
This group of collars can be divided into two subgroups:
1 - stand-off collars;
2 - one-piece stand-up collars with shelves and backs.
In this article, we consider several designs of this type of collars related to detachable racks that differ among themselves with a different degree of fit to the neck.
 Constructing a dress base pattern and design modeling
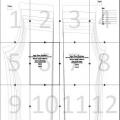 Patterns of children's trousers and sewing master classes Building the back half of trousers
 Building a pattern of vests for boys: the easiest way