Pattern and description of tailoring children's summer overalls. Pattern of overalls for the baby
On the street it is getting colder every day. It's time to warm up. Today I want to show how to sew a children's jumpsuit-suitcase with your own hands. I sewed this jumpsuit from a finished coupon, where a pattern of the right size has already been printed. Fabric with a pattern ordered in a store "Bobbin" (patterns on fabric with your prints) . Sublimation printing on fabric (I have fleece, you can choose another fabric). The daughter chose the drawing herself.
This is how the pattern on the fabric looks, seam allowances have already been taken into account (1 cm). Tags are also marked on the fabric. Instead of a collar, you can order a hood.

We cover all the details of the pattern: 2 back details, 2 front details, 2 sleeve details, a collar and 4 cuff details. Cuffs are best made from ribbed or cashmere. I decided to make a collar from the main fabric, that is, from fleece.

We grind both back parts from the wrong side, as shown in the photo below.


We connect the details of the front and back in the shoulder seams.

We straighten the front and back and sew the sleeve into the armhole, combining the marks.


We fold the jumpsuit along the shoulder seams and sew the side seams from the wrong side, including the sleeves and trouser-legs (where the dashed line is marked).


Then we sew one of the sides of the collar detail to the neck, connecting the labels.

Clips for fixing tissue are possible.


Getting to the lightning. On the size 128-134 cm, the length of the zipper \u003d 60 cm. We bend the collar in half and insert a zipper between the layers of fabric.

We knit and grind one of the two sides of the zipper along the entire length.

Before you notice the second part of the zipper, it is better to make a protective strip for the zipper. Since I made the cuffs from cashmere, the details of the cuffs made of fleece remained on the coupon. From one part I cut 2 parts in the form of a semicircle about 5x8 cm in size.

We put these parts on top of each other with their faces inward and stitch where marked with a dotted line.

We turn this part on the front side and sew to the second part of the zipper in the appropriate place. Moreover, most of the protective strip will be on the wrong side of the zipper.


Then we wipe the second part of the zipper, also folding the collar in half.

We turn and align the corners of the collar. We zip up and check that everything is smooth. If everything is smooth, then we sew (sew) a zipper.

We bend the second edge of the collar and sew manually by a blind seam.

A straight stitch can be made from the front of the seam next to the collar.

We fasten the zipper and fix it with a seam from below. Cut off the extra length of the zipper.

On the front side, we lay a straight line along the entire length of the zipper, where it is marked with a dotted line.

We sew a step seam.

It remains only to sew cuffs. We bend the details of the cuffs and sew into the ring with smaller sides.

We bend the cuffs in a circle so that the seams remain inside.

We insert the cuffs, as shown in the photo below and grind in a circle.


The fleece overalls for the daughter are ready.

Veronica is 7 years old, height 127 cm. She took a pattern of overalls for a height of 134 cm - the size fit perfectly.
Each newborn baby should have its own jumpsuit. Especially for those babies who were born in winter and cold. Overalls - a wonderful option for clothing, cozy and comfortable, does not constrain movements. The pattern of overalls for a newborn can be of different types. This article presents the simplest and most understandable patterns that even beginner seamstresses can handle.


Cute little thing for the baby
Such a warm jumpsuit can be done before childbirth, during pregnancy.
Ready-made pattern of knitted overalls for a baby is shown in the photo below:


The same patterns are suitable for transformer overalls.
Cozy fleece jumpsuit
Necessary options:
- fleece (1.5 meters);
- strong threads;
- 2 rivets;
- sharp scissors;
- paper;
- pins;
- ruler or centimeter.

First you need to measure the baby's parameters. Add to the measurements of 1-2 cm for seams for grinding. Transfer them to paper with a simple pencil.
Cut cut parts out of paper. Transfer them with chalk to the fabric. Cut out the outlines of the fabric that turned out. Start manually the parts that come out of the fabric. Try this product on the child. If all goes well, machine over overalls. After processing the edges again try on the baby.

Attach rivets in the required place. Then wash and iron the finished clothes. Cute fleece jumpsuit is ready!
Sewing technique
Thanks to the sewing machine, you can easily and quickly sew the necessary clothes for the baby. For a winter suit, the following pattern is suitable:

For a complete set for overalls, you can also make mittens or booties with your own hands.
The most optimal size is 62-68, such a jumpsuit is enough for a newborn for 1 or 2 seasons.
For work, you need to take the following materials:
- fabric from raincoat fabric;
- fleece lining;
- synthetic winterizer;
- 2 lightnings;
- a simple cord and a cord on an elastic band;
- fixer and lug for the cord.
Cut parts from raincoat fabric and lining. Transfer all patterns to a synthetic winterizer. Every detail will be insulated. When stitching, you get two layers.

To take manually patterns from raincoat fabric and synthetic winterizer. This action is necessary so that the fabric does not wrinkle when stitching. The protruding synthetic winterizer is removed with scissors on all the details. Make folds in the central part of the front below and sweep it with a yoke. Sew fleece strips to the central front part in places where there will be lightning.

Sew fleece to the inner edges of the sides of the front. Connect the sidewalls of the front with the central part below the level of lightning. The staple point is marked in red.

Sweep openings for locks. Then go to the back. Connect its parts and sew to the front, with the exception of the side edges that need to be sewn together with the sleeves.

Sew sleeves to the front and back, stitch the seams on the sides. Next, proceed to the hood. Cut out the hem, stitch the seam. After connecting the stitches with the edging.

To retreat from the laid seam 1.5 centimeters. Make a hood out of the lining. Insert two parts one into the other, face inward.

Sweep the lining and the main fabric, lay the seam on the machine.


Hide the zipper backing. Place parts of the front side inwards and stitch, leaving the connection point with the neck not stitched.

Unscrew and stitch the edge with stitches.

Fold the backing with a hood, backing to the backing. Sweep them and sew.

It should come out like this.

Connect the hood to the overalls with the front sides.

Insert a zipper.

Sew pad details.

Make drawstrings for gum from raincoat fabric.

Sew a drawstring onto the sleeves and pants.

Then sew on shoes and mittens.


Workshop on sewing summer overalls for girls.
The jumpsuit is sewn for a daughter, soon 11 years old.
And smartly and the most for the summer.
Sizes: AB -71 cm FROM -56 cm OG -62 cm.
Materials:
- 1 m of fabric (sooo thick calico) with a width of 150 cm;
- sewing threads yellow and blue;
- elastic in the drawstring approx. 55 cm;
- journal;
- paper for a pattern;
- a pencil is simple;
- scissors;
- tailor pins;
- 4 tips.
The overalls model is taken from the magazine Diana Moden. According to the size table, the pattern was made by age of 8 years. Our sizes coincided with the magazine precisely for this age. Feel free to take a size smaller.
In addition, the pattern is given immediately with 1.5 cm allowances. I was flashing with 1 cm allowances.
At the bottom of the product and at the waist 2.5 cm.
Our size required 1 meter of fabric with a width of 150 cm. Once upon a time, Polinka chose this fabric in the store, but I still could not adapt it, and now, the time has come.
Details:
- front bodice
- back,
- 2 pieces front and back halves of shorts,
- grind front and back,
- shuttlecock 1 pc.,
- armhole and shoulder straps - 2 pcs.,
- pocket turning 2 pcs.,
- pocket 2 pcs.
Overalls for sewing
Cutting parts on fabric
I arranged the details not quite as recommended in the magazine.
The lining of the armholes and straps should be one-piece, for the sake of economy I made the stitching strips in the middle. Do not forget that they should be cut at an angle of 45 degrees, this also applies to the top of the front and back.
On the right, I still have a decent piece of material, it will go to the little daughter’s dress, but more on that in another master class.
Also, when laying out, consider the direction of the shared thread.

Jumpsuit Top
Shuttlecock
Shuttlecock - 1 part with a fold is cut separately. The bottom of the shuttlecock can be handled in different ways.
Options: overlay, bend and hem; tuck, tuck and flash. And I just went through a role seam a couple of times.


Put a shuttlecock to the top of the front, sweep or immediately flash, make notches.

Fold the front facing in half inside out; you can steam it for convenience.


We put it on the front side on top of the shuttlecock, pulling, sew. We cut off allowances close to the seam, about 3 mm from the seam.


We bend the grind to the wrong side, sweep. Close up the shuttlecock so as not to hem it accidentally. Firmware.
Neat seam on the front side. In principle, it is not visible under the shuttlecock.


Sew the shuttlecock to the armholes.

We process the back with a grinder as well as before, only without a shuttlecock.

Stitch the side seams of the front and back. I'm right on the carpet. It can be done on a machine, cut the sections on an overlock or on a machine with a zigzag seam.

So. Turn the armhole and straps into one-piece. A seam in the middle of each.


Sew each grind to the armhole, aligning the middle. Do not forget to stretch a little sharpening.
For ease of processing, I sewed a seam on the machine from the edges of 1 cm. This is an allowance, it will be bent along the line inward. You can certainly not do this. But it seemed to me that it was more accurate and faster.
Tuck, sweep, flash immediately and straps.
The ends of the strapless can be tucked inward. I didn’t, because tips were planned for the tips or you could just tie knots.


Pockets
Tuck pockets glued with non-woven, processed the lower sections. Overlaid the details of pockets with the front sides to each other, sewn. I opened the grind to the wrong side, steamed it. Made two parallel lines.
I sewed a line 1 cm from the edge along the contour of the pockets from the edge on the machine.


I noticed a pocket allowance on the inside, steamed.


I put pockets on the details of the front halves of the shorts.
The side and top of the pocket were sewn to the base for the convenience of further processing.
I sewed a pocket in two parallel lines. Basting removed.
![]()

Shorts
Sew the front and back halves of the shorts together.
Then sew the middle seam, pulling the step sections slightly.
For reliability, I still went through the machine line.

On the bottom I made a machine line for the convenience of bending the allowance along the bottom of the shorts. Turned up, pinned with needles, hemmed.
Children's clothing is not a cheap item. This is especially true of outerwear: jackets, and overalls. In fact, at the cost of materials, these products almost do not differ from knitted clothes, because raincoat fabric is inexpensive! You can learn how to sew a children's jumpsuit right now. Let's start with jumpsuit with Velcro hood.
This type of clasp is quite simple: it’s much more difficult for beginners to sew a zipper. And at the same time, Velcro is suitable for outerwear of infants (newborns), because in the cradle the wind certainly will not blow into the space between the Velcro.
Materials (for overalls 68 sizes):
- Raincoat fabric with print - 0.8 m
- Winter insulation (in our case, silicone 150) - 0.8 m
- Lining fleece “lamb” (artificial sheepskin) - 0.8 m
- Threads matching the main fabric or contrasting
- Velcro tape - 25 cm
- Waste Basting Threads
- Tailor pins
Pattern of children's overalls with a hood
In this master class, a pattern of children's overalls from Ottobre magazine No. 4-2009 (model 1) was used. This jumpsuit in the magazine is wide, but made without insulation. Therefore, in order to get a thinner model with insulation, we did not increase or decrease the patterns. Accordingly, in order to get a wide winter jumpsuit for a well-fed baby, you need to add 2 cm wide on both sides. Well, if you want to get a warm, but thin overalls, use a thinner insulation - for example, Slimtex 200.
Making Velcro Jumpsuit:
1. Cut out all the necessary materials from all three materials (raincoat fabric, insulation and fleece): two back halves, two front halves, a front insert for comfortable dressing, two hood parts. Make the details of the hood from the lining fleece 2 cm longer on the side that will “hug” the face (at the end of the work, you will need to turn the fleece over, making it a small “edge” of the hood).

2. Any outerwear with the use of insulation is sewn from two parts: separately lining and raincoat fabric, connected to the insulation. Therefore, first of all, you need to sew the corresponding parts from the insulation to the details from the raincoat fabric. Set the machine to the largest straight seam interval (for example, interval 4) and grind the parts around their perimeter.

3. For parts of the hood (from raincoat fabric and insulation), immediately grind the cutouts of the darts to make these parts voluminous. Then sew both of these parts, folding them with their faces inward, along the occipital-parietal line. 
4. Sew its fleece lining to the insert part, folding them with their faces inward. In this case, leave the short lower arc of the part unstitched - through it, turn the part to the front side.
 5. Stitch the two rear parts of the overalls, folding them “face” inward. After grinding, cut the allowances close to the seam so that the inverted part has a neat appearance.
 6. Attach the front parts of the overalls to the joint part of the back (with the sides facing inward) and sew along the lines from the neck to the ends of the sleeves.
 7. Now sew the same parts (two front halves and the back of a winter overalls) along the side lines that lead from the ends of the sleeves through the sides to the bottom of the legs. Do not forget to cut off excess allowances close to the seam, after checking if you are satisfied with the result of the seam turned on the front side.

8. It is necessary to complete the “skin” of overalls by sewing a hood on the main part of the product. You also need to do this from the inside out, after comparing the central seam of the hood with the central seam of the back of the overalls.

9. After the outer part of the overalls is ready, you can begin to create a lining. Sew the fleece parts of the hood, before stitching the darts on these parts. Also cut off the excess fabric, slightly stepping back from the seam.

10. Then grind the main part of the lining - connect the two halves of the back with a central seam, and sew two front halves to them along the side lines and the lines of the sleeves.

11. Sew the lining hood to the lining base of the jumpsuit.

12. Lay the lining in the jumpsuit to imagine how the front panel will need to be sewn. Attach a short arc of insertion to the edges of the same arc in the lining of the back so that the fleece is facing inward. Grind this “sandwich” along the arc line using unnecessary threads.

13. Then lead the insertion arc through the top of the jumpsuit and close it with the rainbow arc of the main part of the jumpsuit. In this case, the parts must connect the raincoat sides inward. Sew the arc on a typewriter and twist the jumpsuit.

14. Turn the sleeves from the raincoat fabric inside the overalls and fold their edges with the edges of the lining sleeves so that the wrong side of the raincoat fabric and the wrong side of the fleece are outside. Sew the edges of the sleeves, twist them and check whether everything is sewn correctly.

15. Turn the entire jumpsuit to the wrong side and sew its sides - from the central insert through the center line to the neck. This must be done by folding the front sides of the inside of the raincoat fabric and lining fleece.

16. Turn the product to the front side and straighten all the bends to give the jumpsuit a neat appearance.

17. The hood of the lining must be fixed together with the main hood along the horizontal line of the seam with which you sewed the hood to the base of the product. If we conditionally divide this seam into three parts, then only the central part will need to be sewn - this is enough to prevent the lining from falling out of the hood, and such a product was comfortable to wear. Fold the lining hood towards you, the main one away from you - and sew this section directly along the previously made seams. (The photo was taken before the sides were grinded, but it would be easy to fix the hoods with the finished sides).

18. Bend the protruding edge of the lining hood twice and stitch it on the main hood to make the edge.

19. The children's winter overalls are almost ready - all that remains is to make a velcro fastener!

20. Divide the Velcro tape into 10 equal segments, with the scissors round the corners of all the segments. Gather Velcro in the right places: two fasteners will be on the upper part of the jumpsuit, and the remaining eight pairs will be symmetrically placed on the insert and side parts of the “legs”.

Velcro winter jumpsuit is ready! This is a very practical model with open legs: the baby is comfortable wearing such a robe, and thanks to Velcro, this process is also quite fast. Try sewing with your own hands!


Children's jumpsuit is a very comfortable and practical thing. The kid is free to run and jump and will not hamper his movements, while he does not have to endlessly pull up his pants and tuck his shirt. And besides, overalls on children look very beautiful. And if you know how to sew at least a little, it’s just a sin not to seize the opportunity and not to do the jumpsuit with your own hands. With love and soul. 🙂
I want to offer several patterns of children's overalls:
- for 6 years
- for 4 years
- for babies 1 year old.
Print sheets of all patterns in full size, i.e. the scale should be 100%.
Overalls pattern for a girl of 6 years
This pattern is designed for growth of 116 cm. You can download the pattern directly under the photo. For sewing this model, it is best to use light cotton fabrics, it is possible to use mixed materials suitable for the warm season.
How to sew a jumpsuit: a quick step-by-step instruction
Step 1. Stitch the shoulder seams and side seams on the bodice. Iron allowances.
Step 2. The neck. Treat the neck with an oblique trim. The video below simply and clearly explains how this can be done.
Step 3. On the sleeves complete the seams. Pin the sleeve to the cut of the armhole of the faces. side., aligning the seam with the side. To do this, undo the side seam allowances again. Sew.
Step 4 Sew side and step seams on your trousers.
Step 5. Insert half the trousers into one another's faces. by the parties. Sew the front and back middle with one line. stitches. Sew the stocks together and iron them. At the step of rounding, iron the stocks “on the edge”.
Step 6. Sew the bodice and upper section of the trousers. Iron down the seam allowances and sew. Iron the bottom allowances, tuck and sew.
Pattern of overalls for a child 4 years old
This wonderful jumpsuit comes with not only a pattern, but also a sewing workshop.

How to sew a summer jumpsuit for a child: a master class

Step 1. Download and print the pattern. In the photo above you can see the result.

Step 2. Transfer parts to the fabric. 2 parts of the top. 4 details of shorts - 2 front parts and two rear.

Please note that the back of the shorts is higher than the front


Step 3. Stitch the shorts.

Step 4. Perform side seams on the upper part of the overalls (for an example of a dress using a similar top pattern).

Step 5. Stitch the sleeve.

Step 6. Sew the drawstring from the wrong side along the neckline and upper section of the sleeves. Insert the rubber band.


Step 7 Connect the top to the bottom, leaving room for the elastic in the belt. Insert the elastic and the jumpsuit is ready.
Jumpsuit for 1 year old baby

Materials:
- main fabric: 50 cm by 150 cm or 1 m 90 cm wide,
- lining: 25 cm,
- 4 buttons
 Constructing a dress base pattern and design modeling
 Patterns of children's trousers and sewing master classes Building the back half of trousers
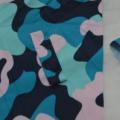 Building a pattern of vests for boys: the easiest way