Pattern shirt female light. Pattern - the basis of the women's shirt
His shirt is closer to the body. She is the basic thing in a ladies' wardrobe. No wonder this universal top for trousers and skirts is always included in a professional uniform. A fashionable women's shirt can be fitted or loose, of any color, with a pattern you like, fully repeat the cut of a man or be its diametrical opposite. The style is limited only by the hostess’s imagination or dress code requirements.
It remains only to sew a shirt with your own hands and wear it with pleasure!
Step One - Model and Fabric Selection
Women's shirt is much freer in choosing models, fabrics and patterns than men's. But still, it is better to sew it from natural or mixed fabrics (a little synthetics are always added to the shirt fabrics so that the product retains its appearance longer and does not wrinkle). The best choice is poplin.
If you are planning to use another fabric, then pay attention to its creasing, you can check this by tightly compressing the fabric in a fist for several seconds. If the folds quickly straightened out, then this is your option. The least crepes are wrinkled.
The pattern also matters: on plain fabrics, small elements and beautiful stitches are better visible, ornaments look more advantageous in concise models and large figures. A classic cage or strip can be used not only traditionally, but also safely combined with other prints or creatively placed in a shirt cut.
Any silhouettes are suitable for a slender one, for a full figure it is better to choose a semi-adjacent silhouette and opaque fabrics. Just remember that atlases and shiny fabrics treacherously emphasize volumes.
For office options, classic shirt fabrics (plain or with a soft pattern) and muted tones are best suited. Silhouettes - semi-adjacent or moderately loose with a minimum amount of detail and decoration. Such shirts fit best in the wardrobe of a business lady. By the way, even to the most boring office shirt, you can sew a removable frill, tie or bow tie from the same fabric and change the image depending on the situation. Women's silk shirts can be used as clothing for special occasions.
If the dress code is not a decree for you, then the field for experiments is unlimited!
Step Two - Pattern Women's Shirt
It is most relevant to sew a classic shirt in a semi-adjacent silhouette with a stand-up collar, a yoke on the back and long sleeves with cuffs. You will need a proven foundation of an adjacent silhouette. All modeling is the translation of the chest tuck into the side seam and the modeling of the yoke by translating the tuck into the armhole on the back.
You can find a suitable pattern in the magazine Burda 2015-2016 Autumn-Winter.
Step Three - Cut and Sew
A sewing machine with a straight stitch (or elastic, if the fabric is with elastane), an overlock (or a zig-zag stitch), a good mood - that's all you need!
Before we open natural fabrics, be sure to wash them, as they shrink! When buying fabrics made of cotton, silk, viscose, add 5-10 cm for an emergency. For fabrics with a pattern, another 10-15 cm will be required for the possibility of combining the pattern or its most favorable location.
Allowances for seams and hem of the bottom - 1.5 cm. We transfer all the marks (middle of the front, back, collar) to the fabric, mark the location of the pockets with hand stitches with contrasting threads (they are then removed).
We sew in this order:
- duplicate the pick, perform tucks on the shelf;
- we process the details of the pockets and sew them according to the marking to the shelf;
- we connect the yoke and the back part, we perform tucks;
- perform shoulder seams;
- duplicate and collect collar details;
- we sharpen the collar or draw a neck with a grind;
- we sew sleeves;
- we connect the bottom seam of the sleeve and the side seam of the product with one seam;
- we process and sew cuffs;
- we are bending the bottom of the product;
- we sew out loops, sew buttons.

Learning to sew. Nightgown (simple drawing and sewing technology)
Hello my dear mothers of the Country of Moms!
So, my dear mothers and grandmothers, we will learn to sew a nightgown for daughters, granddaughters, and for our loved ones!
We will need only six measurements (Fig. 1) and to help you will present an auxiliary card “Names of measurements and how to remove them correctly” (Fig. 2)
Fig. 1 Measurement table for a nightgown
Fig. 2 Names of measurements and how to take them correctly
P.S. Each girl will have her own, individual measurements.
Fig. 3 Construction of a drawing, a shoulder product with one-piece sleeves
Now, my dears, the easiest calculation begins to build a drawing for our future nightgown:
1) BH \u003d Di \u003d 90 (cm);
2) BB1 \u003d (Pog + Pg): 2 \u003d (35 + 7): 2 \u003d 21 (cm);
3) HH1 \u003d BB1;
4) BB2 \u003d (Post: 3) + Psh \u003d (20: 3) + 1 \u003d 7.6 (cm);
5) BB3 \u003d BB2: 3 \u003d 7.6: 3 \u003d 2.5 (cm);
6) BB4 \u003d BB2 + 1 \u003d 8.6 (cm);
7) B1G \u003d (Op: 2) + Pn \u003d 25: 2 + 6 \u003d 18.5 (cm);
B1B5 \u003d 6 cm;
9) GG1 \u003d V1V5 \u003d 6 cm;
10) GG2 \u003d GG1 \u003d 6 cm;
11) G4 \u003d G1G2: 2;
12) G3 \u003d from the point G4 up 1.5 cm;
13) H2H3 \u003d 1.5 cm;
14) H1H2 \u003d HH1: 2 \u003d 11.5 (cm).
That's the whole calculation is easy and simple, like twice two!
Cut the nightgown on the fabric
Fig. 4 Cut the nightgown on the fabric
My drawing was completely laid down across the width of the fabric folded along the shared thread, so I decided that the nightgown would be without shoulder seams. To do this, I folded the fabric into four, that is, first in two along the transverse thread, then again along the lobar thread. I will clearly show a drawing of the structure of the fabric, so that you understand.
The pattern is placed on the fabric folded along the front side inward with the middle towards its fold and circled. Girls, do not forget about the seam allowances. I fasten the paper pattern with needles to the fabric and immediately cut it with seam allowances along the side cut, sleeves and bottom of the shirt; I do not make an allowance for the seam on the neck, because I process the neck with a slanting inlay or as it is also called oblique edging. If the throat is treated with a fine cutter, then you need an allowance for the seam. An oblique hem can be applied to both the sleeves and the bottom of the shirt.
Seam allowance: bottom and sleeves - 2-3 cm; side seams - 0.5-0.7 cm; neckline - 0.8-1 cm.
Girls, it is very important that the allowance on the side seam is 0.5-0.7 cm, not more! Otherwise, after you turn the nightgown on the front side, the side seam will gather and pull together!
When cutting my shirt I cheated and saved time. I have one drawing, both in front and in the back, the neck for the front has not been cut out on paper. Immediately put the drawing on the folded fabric, cut it with allowances for seams, the neck of the back (without gaps on the seams), then laid out the cut shirt as in Fig. 4, marked the point B4 with a pencil, connected the marked point with the neckline on the back with a smooth line, only then cut the neck of the front of the shirt. It remains to process the slices and the nightgown is ready!
I talked about oblique trim and how to cut it here https://www.stranamam.ru/post/11199039/, so I’ll tell you about a trim trim.
So, to begin with, we will clarify the definitions of sprout and neck.
Sprout - neckline from the shoulder sections to the middle of the back.
The neckline is the neckline from the shoulder sections to the middle of the front.
Throat and sprout treatment. The neck and sprout are circled on a sheet of paper exactly according to the pattern. From the marked lines lay 3.5-5 cm - the width of the stitches and cut out the pattern. Sewings made of fabric are folded with their faces inward, wound and sew in the place of the shoulder sections with a seam 0.5-0.7 cm wide. The seams are ironed.
The finished grind is placed face on the wrong side of the product so that their midpoints are aligned. Shoulder seams of the facing are cleaved with pins with the shoulder seams of the product. Tidy up the stitching, then attach to the product, remove the basting. The facing is bent to the front side, swept with stitching stitches to form a piping and ironed. The second cut of the facing is bent to the side of the wrong side by 0.5 cm, minted and tuned to the product.

We sew a shirt or blouse from A to Z.
What does the post include:
Firstly, the easiest construction of a shirt pattern from all I know.
Further: sewing, transferring darts, video fitting, fitting, as well as many little tricks!
I wish you creative inspiration and good luck in the implementation of the plan.
Shrink fit for shirt
To begin with, I decided to pay decent attention to the increase. Please note that now we are talking about sewing a classic shirt made of non-stretch fabric.
Actually, why should we make increments to the standards?
People tend to move, especially to active girls like you, my dear subscribers. Well, let not move, at least breathe.
Therefore, we can determine the smallest increase in freedom by measuring our girth of the chest by taking a deep breath. I checked, cm 2 is added to the chest girth.
Here, they determined. The smallest increase in girth of 2 cm. With such an increase you will get the same shirt as the girls from the post “Always a fashionable shirt”
But, if you plan not only to breathe in this shirt, but also to move, then the allowance for freedom of fitting to the circumference of the chest should be increased to 6-8. We get a semi-adjacent silhouette.
For a completely loose shirt, give an increase of 8 cm.
Now to the hips.
The allowance for freedom of fitting to the girth of the hips (this place we are moving not so intensively) is usually taken 0.5 from the increase in the chest. But at least 2 cm.
I do not give an increase to the waist, since during construction we make the waist tucks minimal, and remove the excess by fitting.
Another important increase is the width of the back (cc) and the width of the chest (cc).
To the width of the back you need to add from 4 cm to the width of the chest - 80% of the increase to the width of the back.
When you begin to draw a drawing, you will understand how much to increase the width of the back and chest. It should correspond to the length of the shoulder and the total width of the product in the chest area.
We only add to the lengths if you sew a very loose shirt. Then we add 0.5 cm to Dpt (the length of the front to the waist) and Dst (the length of the back to the waist).
We will increase the width and depth of the neck after construction.
Building a shirt pattern
1. Draw a horizontal line. This is the waist line. We sign in order not to get confused.
2. Having departed from the right edge of the paper 5 cm, put on the waist line a point through which we draw a perpendicular. This is the midline.
3. We postpone from the waist up along this line of the middle of the front the measurement Dtp (Front waist length). Let's call the resulting point O.
4. To point O draw a perpendicular to the left.
5. On this perpendicular, we postpone the value of Osh (neck circumference): 6. We name the resulting point W.
6. Down from point O we postpone the depth of the neck. It is 1 cm larger than the width.
7. We postpone further to the left of point Ш the measurement Дп (shoulder length). Call point P.
8. From point P down, lay 4 cm for the bevel of the shoulder. We call point P1.
9. We draw the line ШП1. Extend slightly beyond point P1.
10. From the waist down along the line of the middle of the front, we postpone the value of Ob (hip circumference): 5.
Draw a perpendicular to the left from the resulting point. This is the line of the hips. We sign.
That is, the distance from the waistline to the hips line is calculated by the formula About: 5.
1. From the middle of the front along the thigh line, we postpone the value of Ob (hip circumference) plus an increase in the hips: 2.
From the obtained point, draw up the perpendicular. This is the midline of the back.
2. On the line of the middle of the back up from the waist, postpone the measurement Dst (length of the back to the waist). We call the resulting point O1.
3. From point O1 to the right we draw a perpendicular. We postpone the value of Osh (Girth of the neck): 6. Put the point W1.
4. Set aside 2 cm from point O1. This is the depth of the neck.
5. From point W1 to the right, we postpone the measure Dp (shoulder length) plus 1 cm for landing. We call point P2.
6. From point P2, we postpone 3 cm for the bevel of the shoulder. We get point P3.
7. We draw the line Ш1 П3. On it, once again postpone the measure Dn + 1.
8. Check whether the drawing corresponds to the measurement of VPC (shoulder height oblique). If more, leave before trying. The main thing is not less. If less, then reduce the bevel of the shoulder (distance P2 P2).
9. From the waistline we postpone the measurement of Wb (side height). Draw a line from the middle of the back to the middle of the front. Let’s sign the “chest line”.
We calculate the width of the shelf and back along the line of the chest.
Og2 (chest circumference 2) plus breast augmentation divided by 4. Now add 2 cm to the shelf, and subtract 2 cm from the back.
For example, Og2 is 100 cm. Plus, an increase in the chest of 8 cm.
It turns out (100 + 8): 4 \u003d 27. The width of the shelf will be 27 + 2 \u003d 29. The width of the back is 27−2 \u003d 25.
We postpone the resulting values \u200b\u200balong the chest line.
The resulting point of the width of the shelf is called Bp, the backs are called Bs. They will still be useful to us.
At the waistline, the shelf and back are made 1-1.5 cm narrower than these details at chest level.
We postpone the resulting values \u200b\u200balong the waistline.
We calculate the width of the shelf and back along the line of the hips.
It is calculated as well as for the chest.
О (Hip circumference) plus hips increase divided by 4. Add 2 cm to the shelf, subtract 2 cm from the back.
We postpone the resulting values \u200b\u200balong the hips.
We draw a line of the side, connecting the corresponding points on the line of the chest, waist and hips.
1. From the line of the middle of the shelf, draw a parallel line at a distance Tsg (Center of the chest): 2.
Let this line begin from the line of the hips and end on the line of the shoulder.
At the intersection of this line with the shoulder line, let's put the point G1.
2. From point G1 down to the resulting line, set aside the measurement of Br (chest height). We call point G.
3. From the point G1, we postpone the value (Og2 - Og1) +5 to the left along the shoulder line. We call the point G2. Connect the points G2 and G. The result was a chest tuck.
4. Fold the paper, closing the tuck. With the closed tuck, we continue the shoulder line from point W through point G1.
5. Set aside Dp (shoulder length) on the new shoulder line.
6. With the tuck closed, we postpone the measurement of Sr (chest width) plus an increase. We draw a line for laying off this measurement in the middle between the depth of the neck and the line of the height of the side.
7. We draw a smooth line from the point of the end of the shoulder, through the width of the front to the point Bp. This is the armhole line. We will embroider a sleeve here.
8. Check that the armhole line makes a right angle with the shoulder line. If not, correct without reducing the length of the shoulder.
9. From point G down, set aside 2 cm. This is the beginning of the waist tuck of the shelf. The end of this tuck will be on the hip line. Set aside 1 cm at the waist on either side of this tuck. Draw a tuck.
1. Set aside in the middle between the depth of the neck and the side height line the measure Шс (Width of the back) plus increase.
2. We draw a smooth line through points P3, the width of the back to point Bs.
3. Parallel to the midline of the back, at a distance equal to Tsg (Center of the chest): 2 −1. draw a line. This is the line of the waist tuck on the back. She goes from the line of the hips to the line of height of the side.
4. On the waist line from this line, lay 1 cm on both sides. It is enough to try on. We connect all sides of the tuck.
The drawing is almost ready. It remains to make small adjustments specifically for the shirt.
1. Deepen and expand the neck by 1 cm on the shelf and on the back. This is not to choke on the collar.
2. Draw another line parallel to the line of the middle of the shelf at a distance of 6 cm. Our shirt will be fastened with a strap.
Now important! We measure and check the drawing for compliance with the standards.
For a checkered shirt, we cannot leave a chest protrusion on the shelf where it is - in the shoulder seam. It is necessary to transfer the tuck into the side seam. There, the displacement of the cell will be less noticeable.
This is done simply: draw a line from the side seam (we start 5–7 cm below the armhole) to the point where the tuck begins. We cut the pattern along this line, open a new tuck, while closing the old one. The only thing, make a new tuck 2 cm shorter.
Here is a picture of my cut. The new start point of the tuck is marked with a pink dash.
If you want, you can cut the coquette on the shelves or the back. Just draw the desired yoke line on the pattern and cut it off.
Everything else in order, you can proceed to cut.
It is more convenient, of course, to use the full pattern of the shirt, and not half. If not laziness, then finish off the second half of the back.
With a cut of checkered tissue, we will take into account the following rules:
The most noticeable lobes are located in the middle of the main parts, sleeves, coquette and collars.
The dominant transverse stripes are located at the bottom or along the sleeve.
Do not place bright stripes at the level of the chest, waist or hips - they expand the silhouette.
Cross strips should match at the seams. It is easier to combine cells if, when cutting, lay adjacent parts side by side. You can navigate the bottom, you can along the waistline.
Luxuriously when the cells on the shoulder seams match.
The pattern on the pockets, flaps should coincide with the pattern of the parts on which they are located. If you are reluctant to suffer, cut out small parts and flirts at an angle of 45 degrees. By the way, this will decorate the shirt.
If you nevertheless cut the cloth in half, often, often chop it with pins to avoid displacement.
Important!
After tipping the part onto the fabric, once again check the coincidence of the cells, the direction of the lobar, allowances for the seams.
Building a pattern of sleeves
Now about the sleeve.
1. Draw two perpendicular lines. The intersection point is called O
2. Calculate the height of the okat. Measure the length of the armhole of the shelf and back, fold and divide by 3. For a shirt, subtract 1. from this number. For a short wide sleeve - 2 cm.
3. Put the resulting value up from point O. We get point O1
4. Calculate the sleeve width: shoulder girth (Op) plus an increase in freedom of fit. For a shirt it is 6-8 cm.
5. The resulting value is set aside equally on both sides of the point O. We call the resulting points P and C
6. We connect P with O1, C with O1.
7. Divide PO1 in half, and the resulting segments in half.
8. Divide the CO2 in half, the resulting segments in half.
9. We draw a curve from point P to point O1 with a deflection of 1.5–2 cm in the first half and 1.5 cm in the second half.
10. We draw a curve from point C to point O1 with a deflection of 1 cm in the first half and 1.5 cm in the second half.
Look at the drawing. All these deflections and “deflections” I designated on the drawing with the corresponding numbers.
11. Set aside the length of the sleeve from point O1 down. We call the point H
12. On both sides of H we distribute equally in half the width of the sleeve below.
13. Connect the resulting points with P and C, respectively.
14. We measure the size of the ridge of the front of the sleeve. This is a PO1 curve. Compare with the size of the armhole shelves.
15. We measure the size of the okat of the back of the sleeve. This is a CO2 curve. Compare with the size of the armhole of the back.
If the sleeve of the back of the sleeve corresponds to the armhole of the back, and the front of the sleeve of the sleeve corresponds to the armhole of the shelf, then everything is ready.
Most often, the armhole of the shelf is smaller than the armhole of the back. Consequently, the okat of the sleeve of the front should be smaller. We measure how many centimeters the difference is and cut half of this difference from the front of the sleeve, and add to the back of the sleeve. Look at the drawing. The new outline is turquoise.
When I build on paper, I take it straight and cut a strip from the front of the sleeve, stick it to the back.
Cutting, sweeping details
Where to start tailoring shirts after trying on
After fitting, make changes to the cut. First in a pattern, it will probably come in handy for you, and then in a cut.
1. If there are yokes, we grind them to the main details
2. Stitching tucks (chest and waist)
3. We carry out the processing of the middle cut of the shelf with a bar
4. Stitch the shoulder seams, combining the pattern, process the cut
I'll tell you about the bar a little more.
Remember, we added 6 cm to the middle of the shelf?
The simplest thing is to turn the middle section on the wrong side by 1 cm and turn it again by 3.5 cm. Sweep, stitch along the face. That's the whole bar. You can also stitch it around the edge.
Further:
It is already possible to determine the size of pockets, valves, cut them out.
The top of the pocket is processed with an overlog or a seam in a hem with a closed cut. Lateral and lower sections of pockets are tucked and swept.
The top flap of the pocket is glued with non-woven.
We fold the upper and lower valves face to face, chip or sweep, as we used to, grind. Stepwise cut the seam allowances, cut corners.
Try on a shirt and determine the location of pockets and flaps. Schedule and stitch them.
How to sew a stand-up collar
The pattern of the collar and the rack is imposed on the fabric folded in half, observing the direction of the shared thread and, accordingly, the fabric pattern, we circle once along the contour, the second one with allowances for the seams. We cut out. We check that there are 2 parts of the collar and 2 parts of the rack.
Non-woven duplicated upper collar and the upper part of the rack.
First we fold the collar details face to face
chop off
In order to get a roll on the edge of the collar, you need to chip the parts slightly shifting the upper part relative to the lower. It is convenient to do this by rounding the cut on the arm. Look at the photo below.
Stitching the collar details, scribbling along the lower bottom part
make stepping to reduce the thickness of the seam allowances
we cut allowances at the corners
twist
sweep
fold the collar in half - check the “sameness” of the left and right corner
we cut vkray or on the foot
ironing
Here is a photo where the roll of the front part to the inside is clearly visible.
We pin a stand to the collar, we grind it.
Please note: on the front side of the collar we apply the inside of the rack, to the inside - the outside. For accuracy, we begin to chip from the middle.
Gradually cut allowances for rack seams
We turn out
sweep
check for “same” left and right sides
Here is my collar. I made the bottom of the collar and stand from another fabric.
We apply the stand of the collar with the outer side to the front of the shirt, pin with pins, and grind.
We pin the inside of the rack to the wrong side of the shirt, gently sweep it, and grind it.
Consider a finished men's shirt. See how neatly the little stitch is sewn to the neck?
Do you think the whole thing is the professionalism of seamstresses? Not only. There is a little secret here. Now I will tell you.
Before attaching the stand to the collar on the inside of the stand, an undercut is made to the allowance width. The allowance is wrapped with which the stand is grooved to the neck. It needs to be swept or sewn on the wrong side. We begin to process the rack with the already made upwind.
This will allow in the future to neatly and easily grind the stand to the neck.
Finish tailoring the shirt
If you have sleeves, then:
Pin and stitch the sleeves, combining the midpoint of the sleeve ridge and the shoulder seam.
Stitch one side seam and sleeve seam.
I have a sleeveless shirt, and the armholes will be machined.
If you also sew a sleeveless shirt, then:
Cut out a steering wheel (oblique tie) 4 cm wide. Fold it in half, mark it in such a way as to fix it.
Pin, stitch the steering wheel to the armhole in the face
Turn inside out, sweep, stitch gently along the edge of the steering wheel
Are your pockets ready?
No? Let's prepare.
Overlay the top of the pocket, unscrew it on the inside, stitch it. Turn the rest of the pocket to the wrong side, swipe. Pin the finished pockets into place, sweep, stitch.
Fold cut valves face to face. Chop off, making a small inlet of the upper part of the valve to the lower one, so that later a pretty roll is obtained, grind.
Make a stepwise trimming of seam allowances, cut corners.
Turn out, sweep, having rolled the upper part of the valve to the lower. Stitch the pocket valve “edge” or “on the foot”. Iron. Pin the valves in place, stitch.
Stitch side seams, overlay
Fasten the seam allowance with a few stitches in the armpit area to the side of the shelf.
Overlap the bottom of the shirt, tuck 1 cm, sweep, stitch.
Put loops, sew buttons.
The shirt is ready!

Dress-shirt: patterns and description
Dress-shirt - a thing is very simple, but very necessary and multifunctional. In another way it is also called a safari dress, however, in order for it to fully and completely correspond to the style of the safari, you need to sew it from materials of sand, beige or khaki flowers. In general, depending on the texture and color of the fabric, this product can become clothing for any occasion. Today I want to offer patterns of dress-shirts of the simplest style. Download patterns at the end of the article.
How to sew a shirt dress
Here is a dress-shirt we will sew today
What is required:
- 1.65 x 1.50 m of striped cotton
- 0.10 x 1.50 m of white cotton cloth,
- 13 buttons
- Lightweight adhesive cushioning material.
Cut out of striped material:
- Front - 2 details (allowance on the bottom, with the exception of the section of the curly slots, should be 4 cm)
- Front clasp fastener - 1 item
- Back - 1 item (the fold runs in the middle, allowances at the bottom and at the edges of the slot should be 4 cm)
- Flirty back - 1 item with a bend in the midline
- Collar - 2 details with fold
- Stand Collar - 2 details with fold
- Sleeve - 2 details
- Grinding curly slots in front - 2 details (copy from part 1)
- 2 rectangle 12 x 17 cm plus allowances (for patch front pocket)
- 2 rectangle 8 x 24 cm plus allowances (for cuffs)
- 2 inlay 2 x 16 cm plus allowances
(for fringing the sleeve fastener) Cut out from white material:
- Cut part 2 along line D-E and cut it out 1 time (clasp strap on the left side of the front)
- Two rectangles 4 x 20 cm plus allowances (for pat sleeves)
Sewing shirt dresses
Duplicate the fastener strips, the cuffs half wide, the stitches of the sleeves also up to half wide and one piece of the collar and the collar stand each with adhesive material.
Pattern gluing sheet patterns
Handle breast tucks.
Handle patch pockets at the front.
Fold and sweep the creases along the upper cut of the back. Sew the yoke back to the upper cut, iron the seam on the yoke and sew on the hem.
Work the bottom of the back and the edges of the slot with a seam to hem with a closed cut, cut off the side allowances. sections at the end of the slot.
Treat the curly front splines: iron the cross sections of the inside out. Place the edge on the faces. side of the front by marking down faces. side and grind the curly front slit, laying a line along the seam line. Trim the seam to 5 mm, cut the allowances at regular intervals in the curly section. Notch the seam allowance at the end of the sewing line at the side. lines. Bend the inside out, straighten the edge you have finished. Iron the inner cut of the inside out and grind the fold, while at the same time building up the open section of the bottom before sewing the hem with the closed cut.
Work on the right side of the secret fastener and the stitch on the left side of the fastener.
Process the shoulder and then the side seams of the shirt dress. Cross-tighten at the upper ends of the slot.
Process the stitches of the sleeves: bend the part with the front side inward and cut one end of the stitch in the form of an angle. Grind the longitudinal and one transverse (in the form of an angle) sections of the stitch. Cut the seam to 5 mm, turn the part on the faces. side, straighten the edges, fold open across. cuts inward and sweep the folds. Sew the stitch along the perimeter of the stitch, stitching the noticeable folds. Sew a loop at the curly end of the stitch.
The next step is to sew stitches on the inside of the sleeves. Sew a button on the front side of the sleeve at the point where the stitch is sewn.
Now process the longitudinal seams of the sleeves.
Proceed to the processing of sleeves with cuffs and fasteners: fasten on each sleeve: cut the sleeve along the intended line and process them with a piping seam (you can stitch the fastener sections inside out). If necessary according to the model, pick up the sleeves in the lower sections or lay the folds in the lower sections of the sleeves. Fold each cuff with its face inward and grind the ends (or according to the model: fold the details of each cuff of the faces. Side inward and grind the bottom side and ends); twist, straighten seams, corners; iron The outer sides of the cuffs are sewn to the cuts of the sleeves, fold the slices of the inner sides of the cuffs inward and sew in the stitching seams, iron.
Sew sleeves into the armholes.
Work on the turn-down collar with a cut-off stand (shirt type).
Stitch the loops at the right end of the collar (on the strap, the loops are sewn during processing), at the ends of the cuffs. Sew buttons according to the buttonhole.
Stitch loops on the side seams of the product at the level of the waist line for the woven strap.
Based on materials from Patrones magazine 11-2016
Download dress shirt patterns:
Patterns are made in the RedCafe program, I wrote more about how to work with her in this article. Print the pattern at a scale of 100%.

Nightshirt. The construction of the pattern. Step-by-step instruction.
In addition to its intended purpose, clothing should bring aesthetic pleasure, even if we are talking about a nightgown.
And in the bedroom you can feel the queen, regardless of who is nearby. Even if today you fall asleep alone, what is dressed on you should contribute to a good mood, and therefore to well-being, which in turn fuels a sense of self-confidence, gives strength and gives inspiration.
Continuing the theme of clothing for home, let's create a nightgown. The style is simple, and the splendor of the appearance we can achieve due to the successful selection of fabric and finishing materials (lace, stitching, braid, contrasting edging, etc.). Indeed, for this type of clothing, the main thing is to fulfill the comfort requirement, which is achieved by using natural fabrics and a free cut.
When designing women's underwear, namely nightgowns, increases in free fit increase. For example, an increase in the chest line can reach 10cm or more. Therefore, it is possible to build a new pattern of the basis specifically for nightgowns, taking into account increased increases. This basis can still be useful to you for modeling loose-fitting home gowns.
But, there is another option. In our example, we will consider the averaged version and use dress base pattern, and freedom in fitting we achieve through the assembly.
If you have not yet built for yourself a pattern of the basis of the dress, we recommend that you use our step-by-step instruction and do it. You will need this drawing in the future when mastering the modeling of various types and styles of clothing.
Copy the back and shelf separately to a blank sheet of paper.
Side line.
Since we are building a pattern for a nightgown of free cut, it is necessary to bring the lateral lines into correspondence. To ensure freedom of movement, we will slightly expand the shirt along the bottom line.
Let's start from the back.
To do this, on the bottom line of the back from the point H4 to the right, postpone 6 - 10 cm and put the point H5. Points P and H5 are connected by a straight line.
On the line of the middle of the back down from point H, we postpone 1-2 cm, put point 1 and adjust the bottom line of the back, connecting the smooth curve of point 1 and H5.
We will do the same manipulations with the shelf.
On the bottom line of the shelf from point H3 to the left, postpone 6 - 10cm and put H6. Points P and H6 are connected by a straight line.
We also adjust the bottom line of the shelf.
Neckline
We expand and deepen the neck of the shelf and back. The neckline configuration can be the most diverse. The choice is yours.
In our model, we will expand and deepen the neck by 2 cm.
To do this, on the shoulder line and on the middle lines of the shelf and back, we postpone 2 cm and draw up a new neckline.
Armhole.
To ensure freedom, we will slightly deepen the armhole.
From point P down on the side sections of the shelf and back, we postpone 1-2 cm, put the points P1 on the back and P2 on the shelf. Making a new line of armhole.
Shelf.
At the time of construction of the coquette, the chest tuck will be transferred to the side line. To do this, arbitrarily put a point on the side line, in the drawing it is point P3, connect it to the top of the chest tuck (G7) with a straight line and make a cut along this line. We close the chest tuck, opening it to the side line.
Coquette shelves.
Determine the location of the line coquette shelves.
You remember that our example is one of many possible options. You proceed from your desires and intentions.
The yoke line can be of different configurations and located at different heights.
From the neck, extending the shoulder line of the shelf, we postpone 14cm, put the point K. On the midline from the neck down we postpone 10cm, put the point K1. Connecting the smooth curve of the points K and K1, we form the line of the coquette of the shelf.
At the intersection of the coquette line with the armhole line, put a control point, designate it with the letter O. When cutting the coquette, we will definitely make a notch on the coquette at this point, thus indicating the junction of the coquette with the shelf.
Return to the starting position chest tuck.
Parallel to the midline of the shelf with an interval of 7 cm, we draw two auxiliary lines along which we cut and extend the shelf by the size of the assemblies. In our example, the total increase in assembly is 10cm. (Two cuts of 5cm).
We glue paper inserts from below to fix all parts of the shelf.
You can lay out the pattern immediately on the fabric, observing the distance between the parts of the shelf, to grind and cut. Remember to give seam allowances.
The top cut of the shelf is decorated with a smooth line.
Back.
Back yoke we build in the same way as on the shelf. From the neck, extending the line of the shoulder of the back, we postpone 14cm. Do not forget to take into account the 2cm tuck, so we get 16cm and put the point K2.
In the midline of the back from the neck down, put off 12cm and set the point K3. We connect the points K2 and K3 with a smooth curve, thereby forming the line of the back of the coquette.
At the intersection of the coquette line with the armhole line, we set a control point, we denote it by the letter O1. When cutting the coquette, we will definitely make a notch on the coquette at this point, thus indicating the junction of the coquette with the back.
Cut the yoke and set it aside.
For the formation of assemblies, the backrest is expanded in the same way as the shelf.
Parallel to the midline of the back with an interval of 6 cm, we draw two auxiliary lines along which we cut and extend the back by the size of the assemblies. In our example, the total increase in assembly is 8cm. (Two cuts of 4cm).
We glue paper inserts from below to fix all parts of the back. Or immediately lay out the pattern on the fabric, observing the distance between the parts of the pattern. Remember to give seam allowances.
The upper section of the back will draw a smooth curve.
That’s probably all. Basic patterns of a nightgown are ready.
As a trim, you can add a frill or shuttlecock along the edge of the yoke and on the bottom of the shirt. With different widths of frills we get different models.
You can add lace, piping, embroidery, etc. Unleash your imagination. Create and enjoy the fruits of your labor.
There is a huge variety of styles of nightgowns. We will consider some of them in our next articles.
We are also preparing a separate section on the tricks of cutting and the features of the technology for processing garments.
In the near future we will continue the theme of home wear. Follow the site’s news, subscribe to our newsletterand you will always be up to date.
Good luck! Valentina Nivina.
Unforgettable to add to your bookmarks. The bookmark buttons are below.

Patterns of nightgowns for women
In bedding stores you can find a variety of models of bedding in all colors of the rainbow. Many women consider the most comfortable clothes for sleeping not a drop of Chanel No. 5, as Marilyn Monroe once joked, but a night dress, that is, a shirt, or a chemise sewn from a soft and comfortable fabric.
As you know, there are not many nightgowns. Warm, light, puritanical and sexy, bought on occasion, donated by mom or girlfriend - they all meet, or at least have to meet one common criterion - they must be comfortable.
What is a regular nightgown pattern?
A nightgown is a loose-fitting dress of simple style, decorated with lace, braid, frill or appliqués. The length can be different - from products to the floor to an extremely short mini. If you carefully study the patterns of nightgowns that are found in magazines, you will notice that they do not differ in the complexity of the cut. The main details that make up these wardrobe items are the shelf, back and sleeve.
Try stitching your nightgown with your own hands. Patterns of the most complex models with coquette, polo closures, collars, cuffs, various ruffles and shuttlecocks do not really require special modeling skills, however, the implementation of these details requires a lot of time, a lot of experience and skill.
Model with adjustable straps
A very simple pattern of a nightgown on the straps is only two parts - a shelf and a back. This model has a lot of options. One of the most successful is two trapezoidal panels with wings on the upper edge. A ribbon is threaded into these wings. The photo clearly shows what a nightdress with straps from a long ribbon looks like. The length of such elements is easily adjustable, because they are not sewn, but tied near the shoulder. At the bottom of the product, you can sew shuttlecocks, as in our models, or lace. If you sew from inelastic fabric - chintz, calico or silk, then choose the appropriate lace. Elastic lace is only suitable for knitted fabrics.
Universal pattern
The pattern of a simple nightgown with sleeves, which you see above, is a universal pattern for all sizes and types of figures. It consists of two parts with a fold. The sleeve is one-piece, with a straight shoulder line. Patterns of nightgowns, like this one, are very convenient for modeling. On the patterns you can draw a coquette of arbitrary shape, cut it off, and increase the shelf by 4-6 cm. The coquette, like the collar, the strap of the fastener and cuffs, is always double. In some cases, one of the parts from the inside is additionally duplicated with a thin lining made of non-woven fabric. This is done for the reason that the yoke carries a double load - parts of increased width are sewn to it, that is, heavier ones. That the coquette and connecting seams are not deformed, it is always strengthened.
If you do not want to bother with a yoke, but love spacious nightwear, then just place the line of the middle of the front not on the fold of the fabric, but back off by 2-3 cm. Trim the neckline with a drawstring into which you pass the linen elastic.
In the same way, you can increase the width of the sleeve by adding a yoke from under the coquette in the shoulder area. At the bottom of the sleeve, you can draw a drawstring, thread a ribbon into it and pick it up like a flashlight. A magnificent sleeve that ends with a frill looks very nice. Equally beautiful is a loose wide sleeve, along the edge of which lace is sewn. This option is especially well obtained from thin and softly draped cotton or silk fabrics.
Taking measurements
Sewing a nightgown is not difficult, since this thing does not require an exact fit. With a standard physique, it is enough to take only two measurements - chest circumference and product length.
The length of the product is measured along the back from the seventh cervical vertebra to the bottom of the shirt.
The circumference of the chest is measured with a measuring tape at the most prominent points of the chest and shoulder blades. To build a pattern, you need to divide the length of the chest circumference in half. Suppose a chest circumference is 100 cm, which means half is 50 cm. The width of the shirt is 50 cm plus an increase in loose fitting and on the seams.
An additional measure to improve the pattern on the corpulent figure
The pattern of a nightgown for obese women requires another measurement - this is the circumference of the sleeve. Measurement is carried out with a centimeter tape around the widest part of the arm. When measuring, the centimeter tape should fit snugly enough to the body, but not pinch it. Patterns of the night shirts of our grandmothers often contained small details of a rectangular or rhomboid shape. These are gussets. They were sewn under the arm so that the sleeve would not tear at this point, because there the fabric experiences the greatest tension and is torn first. The sewn-in gusset significantly extends the life of the shirt. Generally speaking, a gusset under the arm, even for a slender woman, will serve as a part that provides additional comfort.
Fabric count
For sewing a shirt with one-piece sleeves with a fabric width of about one and a half meters, two lengths of the product are required. If you plan to design with frills or ruffles, then when calculating, you should keep in mind: the length of this part should be three times longer than the one on which it is sewn. In addition, allowances for seams and hemming should be added, as well as possible shrinkage, if the fabric is made of cotton or viscose.
Knitwear or textiles?
Before buying a fabric, think of what material you want to sew the nightgown with your own hands. The patterns presented in our article are suitable for all sizes and types of figures, however, the increase in free fit depends on the type of material from which the thing will be sewn.
Knitted materials tend to deform. During operation, after several washings, your shirt can stretch very wide. Therefore, do not make it too loose and short. As for static cotton cloths, they are very resistant to stretching, but the shirt will bring discomfort and will tear quickly if it is tailored to a pattern designed for a knitwear item. Therefore, the patterns of nightgowns for women, which can be found in fashion magazines, are always built taking into account this feature of the material. Never use a static woven fabric if the model description indicates that it is made of knitwear.
When choosing a style, the composition of the fabric is important
For nightwear, fabrics made from natural fibers are most suitable. Silk due to the silky structure of the threads is often fragile at the seams. Patterns of nightgowns from this fabric should not abound with complex set-in elements. It is most correct to opt for one of the models that are described in detail in this article as universal, that is, consisting of one or two parts. One piece shirt in front of you. It is done with only two stitches. The linen seam is the most durable, so it is most suitable for stitching the shelf and back of a nightdress made of slippery silk.
Technology for the implementation of the clothes line
This seam is the same as the French one. Two parts are folded with the wrong sides inward, and with the front sides outward, and are ground. The seam is ironed. This is done so that it stabilizes. After the allowance is cut to a width of 3-4 mm. Then the part is laid out on the ironing board with an upward seam allowance. Details are located on either side of it. Using an iron, the seam is bent and ironed onto one of the parts. After performing this action, the part should be folded along the seam with the front side inward, and the wrong side outward. Iron the seam. Sew a line, stepping back from the edge of 5 mm. Iron the seam.
Linen stitch for a children's nightdress
This type of seam, made on the front side, was previously used when sewing children's clothing. He does not scuffle and looks very neat, and most importantly his dignity - he does not rub the delicate skin of the child. A nightgown for a girl (a pattern that fits with a one-piece sleeve), sewn with a linen seam to the outside, will be very comfortable, and the original seam will serve as an additional decoration for the shirt.
Instead of bending along the bottom of the sleeves, pseudo-cuffs can be made and trimmed with edging from a finished cotton inlay cut along an oblique thread and ironed along both sides. The hem of the shirt and neck can be trimmed with the same trim. A large neckline on a children's shirt is not a good option. It is better to make it almost under the neck, and to thread the head, leave a straight cut in the middle of the shelf. It should be treated with an oblique tie. The same or contrasting hem should be sewn along the neckline, leaving the ends protruding about 20 cm long. These are ties.
Exclusive flannel item
This fabric is a recognized leader among materials for home wear. Knitwear is currently the most popular fabric, but warm, soft and fluffy flannel will not soon leave the top positions in the rating of options for pajamas and nightgowns. Bright colors and various patterns allow you to choose the material for every taste.
When buying fabric, remember: sleeps most comfortably in linen made of natural material. Follow the recommendations given in our article - and your exclusive collection of nightwear bought in a specialized store will be replenished with an exclusive nightdress. With your own hands, make the patterns that you saw in our article in reserve, because they are considered the most suitable for making nightwear for both adult women and little girls.
Sewing a nightgown is very nice and interesting. Neither changeable fashion, nor the lack of special education can be an obstacle to the implementation of this venture, because the thing is not intended for prying eyes.
Hello.
In this article, we will learn how to build a shirt design.
The clothing of the shirt cut is primarily distinguished by the parameters and configuration of the armhole. The size of the shirt armhole is larger than the size of the armhole of the basic design of the dress, and the configuration of the shirt armhole is more extended and deepened. Therefore, the details of the shirt pattern - the back and the shelf also differ in their parameters and configuration.
There are two ways to build a shirt design: apply constructive modeling of the basic dress pattern, or use the developed technique to build a shirt design. In this article we will consider the second option.
To build a shirt pattern, we need the following measurements:
Names of measurements and conventions | cm |
|---|---|
Half Neck Girth (N) | |
Half Bust (Cg) | 40,5 |
Half Waist (St) | |
Half Hips (Sat) | 44,8 |
Back to Waist Length (Dts) | |
Chest height (Vg) | |
Shoulder length (dp) | |
Product Length (Di) |
In this cut technique, we will consider two shirt silhouettes: semi-adjacent and straight. A shirt with a semi-adjacent silhouette implies the presence of chest and tuck-in darts, while the product is quite free and dynamic. The shirt of a straight silhouette has no tucks, and the product itself is more free. As a result, the cut of these two silhouettes is distinguished not only by the increase in free fit, but also by some constructions of the structure. To build a shirt pattern of a straight and semi-adjacent silhouette, we will use the following increase in free fit:
The increase along the chest line between the structural parts is distributed as follows:
We will prepare a blank sheet of paper, the length of which is 5-10 cm longer than the measurement of the length of the product.
Drawing grid
Product Length and Width. Step away from the top edge of a sheet of paper 5cm, draw a rectangle AA 1 H 1 H, where the sides AH and A 1 H 1 are equal to the measurement of the length of the product, and the sides AA 1 and HH 1 are the measurements of the half-circumference of the chest with an increase in free fit (AN \u003d A 1 N 1 \u003d Di \u003d 68cm; AA 1 \u003d HH 1 \u003d Cr + CO \u003d 40.5 + 5.5 \u003d 46cm). note, in this example, I used the increase for a semi-adjacent silhouette, if you draw a straight silhouette, then do not forget to substitute the corresponding additions in the formulas for free fitting (see the table above).
Armhole Depth. From point A, down a straight line, set aside 1/3 of the half-girth of the chest + CO (see the increase table) and set point G (segment AG \u003d 1 / 3Cg + CO \u003d 40.5: 3 + 9 \u003d 22.5 cm). From the point Г to the right we draw a horizontal line to the intersection with the segment А 1 Н 1, we denote the intersection point Г 1.

Back width. From point Г we set aside 1/3 of the measurement of the half-circumference of the chest + CO (see the table of the distribution of the increase along the chest line) and get the point G 2 (segment ГГ 2 \u003d 1 / 3Сг + СО \u003d 40.5: 3 + 3cm \u003d 16.5cm) . From the point Г 2 up, we construct a perpendicular to the intersection with the side AA 1, we denote the intersection point P.

Armhole Width. From G 2 to the right, we postpone 1/4 of the measurement of the half-circumference of the chest + CO (see the table of the distribution of the increase along the chest line) and mark the point G 3 (G 2 G 3 \u003d 1 / 4Cg + CO \u003d 40.5 / 4 + 0.5 \u003d 10.6cm). From point G 3, we draw a perpendicular to the intersection with side AA 1, and denote the intersection point by P 1.

Waistline. From point A down, we postpone the measurement of the length of the back to the waist and put the point T (AT \u003d Dts \u003d 40cm). From point T we draw a horizontal line to the intersection with side A 1 H 1 and denote the intersection point of T 1.

Hip line. From point T, we lay aside half the measure of the length of the back to the waist and put point B (TB \u003d 1 / 2Dts \u003d 40: 2 \u003d 20cm). From point B, draw a horizontal line to the intersection with the segment A 1 H 1, mark the intersection point B 1.

Side line. Divide the segment G 2 G 3 in half, denote the intersection point G 4 (G 2 G 4 \u003d G 4 G 3), and lower the perpendicular down from this point to the intersection with the bottom lines, the intersection point will be H 2, and the intersection point with the waist lines and hips - T 2 and B 2.

Auxiliary armhole points. Divide the segments G 2 P and G 3 P 1 into three equal parts, the lower points of division we designate P 2 and P 3 (see. Fig.).

Backrest construction
Neckline cut. From point A to the right, put aside 1/3 of the neck half-measure + 0.5 cm (for all silhouettes) and get the point А 2 (AA 2 \u003d 1 / 3Сш + СО \u003d 15: 3 + 0.5 \u003d 5.5 cm). Upward from point A 2, lay 3cm (for all silhouettes) and mark point A 3 (A 2 A 3 \u003d 3cm). We draw the neckline with a smooth line, observing a right angle at point A.

Shoulder section of the back. From point P down, lay 3cm (for all silhouettes) and put point P 4 (PP 4 \u003d 3cm). Now we connect the points A 3 and P4, and on the line obtained from the point A 3, postpone the measurement of the length of the shoulder + CO (see the increment table) and put the point P 5 (A 3 P 5 \u003d Dn + CO \u003d 13 + 1,5 \u003d 14 5cm).

Back armhole cut. Connect the dots точки 2 and 4 4 with a dashed line and divide this segment in half, and from the point of division down, put it at a right angle of 2 cm and put the point 6 6.

We draw a smooth concave line cut armholes, connecting the points P 5, P 2, P 6 and G 4.

Yoke back. Set aside 8cm from point A and set point K (AK \u003d 8cm). From point K to the right we draw a horizontal line to the intersection with the armhole line of the back, and the intersection point is denoted by K 1.

Down from the point K 1 on the line of the armhole lay aside 1 cm and put the point K 2 (K 1 K 2 \u003d 1 cm). Connect the point K 2 with a smooth line with the line of the coquette.

Build a shelf shirt straight silhouette
Shelf neck cut. From the point Г 1 upward, lay aside half the measure of the half-girth of the chest and put the point P (Г 1 Р \u003d 1/2 Сг \u003d 40.5: 2 \u003d 20.3 cm). From point P to the left we draw a horizontal line of arbitrary length.

Now, from the point P to the left and down, we set aside 1/3 of the neck half-measure + 0.5 cm and mark the points P 1 and P 2 (PP 1 \u003d PP 2 \u003d 1/3 Сш + СО \u003d 15: 5 + 0.5 \u003d 5.5 cm ) Connect the points P 1 and P 2 with a dashed line, which we divide in half and from point P through this point of division we put aside 1/3 of the neck half-measure + 0.5 cm and get the point P 3 (PP 3 \u003d 1 / 3Sh + CO \u003d 15: 5 + 0.5 \u003d 5.5cm).
We draw a smooth line cut the neck through the points P 1, P 3 and P 2, observing a right angle at the point P 2.

Shoulder section of the shelf. We will draw an auxiliary line by connecting the point Р 1 with the upper division point of the segment ПГ 2 (see Fig.), On this line from the point Р 1 to the left we will postpone the measure of the length of the shoulder + СО and put the point П 7 (Р 1 П 7 \u003d Дп + СО \u003d 13 + 2 \u003d 15cm). Please note that we are now considering building a shelf for a straight silhouette shirt, so the increase in the formula corresponds to the increase for a straight silhouette.

Armhole cut. Connect the points P 3 and G 4 with a dashed line, divide this segment in half, drop the perpendicular from the division point 2 cm in size and mark the point P 8.

We draw a smooth line section of the armhole, connecting the points P 7, P 3, P 8 and G 4.

On this, the construction of the straight silhouette shirt design is completed.

Our pattern is ready!

Building a shirt shelf in a semi-fitted silhouette
Shelf neck cut. From the point Г 1 upward, lay aside half of the measure of the half-circumference of the chest + 0.5 cm and put the point P (Г 1 Р \u003d 1 / 2Сг + СО \u003d 40.5: 2 + 0.5 \u003d 20.8 cm). From point P to the left we draw a horizontal line of arbitrary length.

Down and to the left of the point P, put aside 1/3 of the neck half-measure + 0.5 cm and mark the points P 1 and P 2 (PP 1 \u003d PP 2 \u003d 1/3 S + CO \u003d 15: 5 + 0.5 \u003d 5.5 cm) . Connect the points P 1 and P 2 with a dashed line, which we divide in half and from the point P through this division point we put aside 1/3 of the neck half-measure + 0.5 cm and get the point P 3 (PP 3 \u003d 13 / Сш + СО \u003d 15: 5 + 0.5 \u003d 5.5cm). We draw a smooth line cut the neck through the points P 1, P 3 and P 2, observing a right angle at the point P 2.

Shoulder section and chest tuck. To the left of the point P 1 we postpone 4cm and put the point B (P 1 B \u003d 4cm), down from the point B we postpone 1cm, we get the point B 1 (BB \u200b\u200b1 \u003d 1cm). Connect the points P 1 and B 1.

Add the lengths of the segments PP 1 and P 1 B (5.5 + 4 \u003d 9.5 cm), subtract 1 cm (9.5-1 \u003d 8.5 cm) from this amount, put the resulting value to the left of the point Г 1 and put the point Г 5 (G 1 G 5 \u003d PP 1 + P 1 B-1 \u003d 8.5 cm). We connect the points G 5 and B 1, the segment G 5 B 1 - the right side of the chest tuck.

Now we will build an auxiliary line, connecting point B with the upper division point of the segment GH 2. Up from point Г 4 we draw a vertical line to the intersection with the auxiliary line, the intersection point is denoted by O.

To the right of point O, we set aside the shoulder length on the auxiliary line with an increase in free fit minus the length of the segment P 1 B and put the point B 2 (OB 2 \u003d Dn + CO-P 1 B \u003d 13 + 1.5-4 \u003d 10.5 cm) . Next, from point Г 5 upwards through point В 2 we draw a segment whose length is equal to the right side of the tuck and get point В 3 (Г 5 В 3 \u003d Г 5 В 1).

Down from the point O we set aside 3 cm and put the point O 1 (OO 1 \u003d 3 cm). Connect the thin line of the point O 1 and B 3.

From point B 3 to the left, on a thin line, we postpone the length of the shoulder with an increase in free fit minus the length of the segment P 1 B and put the point P 7 (B 3 P 7 \u003d Dn + CO-P 1 B \u003d 13 + 1.5-4 \u003d 10 5cm).

Armhole cut. Connect the points P 3 and G 4 with a dashed line, divide this segment in half, drop the perpendicular from the division point 2 cm in size and mark the point P 8. We draw a smooth line section of the armhole, connecting the points P 7, P 3, P 8 and G 4.

Waist line calculation. Subtract the measurement of the half-circumference of the waist from the size of the product’s width with an increase in free fit (AA 1 - (St + CO) \u003d 46- (30 + 3) \u003d 13cm), the result obtained is the sum of the solution of all the darts along the waist line, where
the size of the front tuck solution \u003d 0.25 of the total tuck solution (13 x 0.25 \u003d 3.3 cm),
the size of the solution of the lateral tuck \u003d 0.45 of the total solution (13 x 0.45 \u003d 5.8 cm),
the size of the back tuck solution \u003d 0.3 of the total solution (13 x 0.3 \u003d 3.9 cm).
Determining the width of the shirt along the hips. Now, from the measurement of the half-circumference of the hips with an increase in free fit, we subtract the width of our product (Sat + CO-AA 1 \u003d 44.8 + 4-46 \u003d 2.8 cm), the result is the amount of product extension along the hips.
Side cut. From the point T 2 along the waist line to the right and left, we will postpone half of the solution of the lateral tuck (we calculated its value a little higher) and mark the points that we connect with straight lines with the point G 4.

From point B 2 along the thigh line to the right and left, we set aside half of the product's extension along the thigh line and put the points that we connect by smooth convex lines with the points of the lateral tuck solution at the waist and extend these lines until they intersect with the bottom line.

Construction of a tacky tuck on the back. To the right of the point T, set aside 1/3 of the neck half-measure + 0.5 cm and set the point T 3 (TT 3 \u003d 1 / 3Sh + CO \u003d 15: 3 + 0.5 \u003d 5.5). From the point T 3 to the right, we postpone the value of the whole back tuck solution and get the point T 4 (T 3 T 4 \u003d 3.9 cm).

We divide the segment T 3 T 4 in half, and draw a perpendicular through the division point, without bringing it to the chest line 6 cm, and to the hips line 12 cm, this perpendicular is the midline of the tuck. Connect the points 6 and 12 with the points of the tuck solution T 3 and T 4.

Refinement of the waist line and the bottom line of the shelf. From the point T 1 down we postpone 1 cm, we connect the resulting point with a notch along the waist line along the side cut, observing a right angle at the point 1 cm. Down from the point H 1 we will also set aside 1 cm and connect a smooth line with the point of the bottom line along the side cut, while the angle at the point 1 cm should be straight.

Building a tackle tuck on a shelf. Subtract 1.5 cm from the size of the segment Г 1 Г 5, we will postpone the resulting value to the left of the 1cm point along the new waist line and put the point T 5 (1T 5 \u003d Г 1 Г 5 -1.5 \u003d 8.5-1.5 \u003d 7cm ) Connect the points T 5 and G 5.

On the new waistline to the left of point T 5, we postpone the size of the front tuck solution and put the point T 6 (T 5 T 6 \u003d 3.3 cm). On the line Г 5 Т 5 down from the point Г 5 we put aside 6 cm, we connect the resulting point with Т 6.

Divide the segment T 5 T 6 in half, and from the point of division we lower the perpendicular, without bringing to the waist line 12cm. Now connect point 12 with points T 5 and T 6.

This completes the construction of the shirt design.

If the shirt model has a button closure, then the shelf must be extended along the neckline and the bottom line to the same distance - 1.5-2 cm and draw a new cut line for the shelf. The resulting line is a half-drift line, and on the middle line are buttons on one part of the shelf and button loops on the second part.
Clasp sections can be processed in several ways:
Stitched bar ,

The width of which is twice the width of the half-drift, the length of the strip is equal to the length of the shelf along the half-drift line, while the upper section of the strip repeats the section of the neck of the shelf over the entire width of the strip.

1-piece bar ,

Its configuration is completed by extending the bottom line of the shelf by twice the width of the half-drift, and then draw a vertical line upward from the resulting point. The neckline on the bar is drawn symmetrically to the neck of the shelf relative to the half-drift line. When sewing shirts with a one-piece plank, the plank itself is bent along the line of a half-drift to the wrong side of the product.

Fastener Clasp

It is a hidden fastener, buttons in such a fastener are hidden and are not visible from the front side of the product. The configuration of such a fastener is being completed from the one-piece bar, extending the bottom line of the product by a length equal to twice the width of the bar. As a result, three widths of the bar are obtained along the bottom line, a vertical line is drawn up from each width. The line of the neck of the fastener is drawn symmetrically with respect to the line of the first bar. On the half-wear line of the shirt, the fastener bends to the wrong side, the fastener bends along the next vertical line, and the fastener bends again to the wrong side and the cut line of the shelf (on the fastener) is sharpened from the wrong side of the product. The fastener clasp is built on only one part of the shelf on which the button loops are located, and on the part with buttons only a whole-cut bar is built.

Hello.
In this article, we will learn how to build a shirt design.
The clothing of the shirt cut is primarily distinguished by the parameters and configuration of the armhole. The size of the shirt armhole is larger than the size of the armhole of the basic design of the dress, and the configuration of the shirt armhole is more extended and deepened. Therefore, the details of the shirt pattern - the back and the shelf also differ in their parameters and configuration.
There are two ways to build a shirt design: apply constructive modeling of the basic dress pattern, or use the developed technique to build a shirt design. In this article we will consider the second option.
To build a shirt pattern, we need the following measurements:
Names of measurements and conventions | cm |
|---|---|
Half Neck Girth (N) | |
Half Bust (Cg) | 40,5 |
Half Waist (St) | |
Half Hips (Sat) | 44,8 |
Back to Waist Length (Dts) | |
Chest height (Vg) | |
Shoulder length (dp) | |
Product Length (Di) |
In this cut technique, we will consider two shirt silhouettes: semi-adjacent and straight. A shirt with a semi-adjacent silhouette implies the presence of chest and tuck-in darts, while the product is quite free and dynamic. The shirt of a straight silhouette has no tucks, and the product itself is more free. As a result, the cut of these two silhouettes is distinguished not only by the increase in free fit, but also by some constructions of the structure. To build a shirt pattern of a straight and semi-adjacent silhouette, we will use the following increase in free fit:
The increase along the chest line between the structural parts is distributed as follows:
We will prepare a blank sheet of paper, the length of which is 5-10 cm longer than the measurement of the length of the product.
Drawing grid
Product Length and Width. Step away from the top edge of a sheet of paper 5cm, draw a rectangle AA 1 H 1 H, where the sides AH and A 1 H 1 are equal to the measurement of the length of the product, and the sides AA 1 and HH 1 are the measurements of the half-circumference of the chest with an increase in free fit (AN \u003d A 1 N 1 \u003d Di \u003d 68cm; AA 1 \u003d HH 1 \u003d Cr + CO \u003d 40.5 + 5.5 \u003d 46cm). note, in this example, I used the increase for a semi-adjacent silhouette, if you draw a straight silhouette, then do not forget to substitute the corresponding additions in the formulas for free fitting (see the table above).
Armhole Depth. From point A, down a straight line, set aside 1/3 of the half-girth of the chest + CO (see the increase table) and set point G (segment AG \u003d 1 / 3Cg + CO \u003d 40.5: 3 + 9 \u003d 22.5 cm). From the point Г to the right we draw a horizontal line to the intersection with the segment А 1 Н 1, we denote the intersection point Г 1.
Back width. From point Г we set aside 1/3 of the measurement of the half-circumference of the chest + CO (see the table of the distribution of the increase along the chest line) and get the point G 2 (segment ГГ 2 \u003d 1 / 3Сг + СО \u003d 40.5: 3 + 3cm \u003d 16.5cm) . From the point Г 2 up, we construct a perpendicular to the intersection with the side AA 1, we denote the intersection point P.
Armhole Width. From G 2 to the right, we postpone 1/4 of the measurement of the half-circumference of the chest + CO (see the table of the distribution of the increase along the chest line) and mark the point G 3 (G 2 G 3 \u003d 1 / 4Cg + CO \u003d 40.5 / 4 + 0.5 \u003d 10.6cm). From point G 3, we draw a perpendicular to the intersection with side AA 1, and denote the intersection point by P 1.
Waistline. From point A down, we postpone the measurement of the length of the back to the waist and put the point T (AT \u003d Dts \u003d 40cm). From point T we draw a horizontal line to the intersection with side A 1 H 1 and denote the intersection point of T 1.
Hip line. From point T, we lay aside half the measure of the length of the back to the waist and put point B (TB \u003d 1 / 2Dts \u003d 40: 2 \u003d 20cm). From point B, draw a horizontal line to the intersection with the segment A 1 H 1, mark the intersection point B 1.
Side line. Divide the segment G 2 G 3 in half, denote the intersection point G 4 (G 2 G 4 \u003d G 4 G 3), and lower the perpendicular down from this point to the intersection with the bottom lines, the intersection point will be H 2, and the intersection point with the waist lines and hips - T 2 and B 2.
Auxiliary armhole points. Divide the segments G 2 P and G 3 P 1 into three equal parts, the lower points of division we designate P 2 and P 3 (see. Fig.).
Backrest construction
Neckline cut. From point A to the right, put aside 1/3 of the neck half-measure + 0.5 cm (for all silhouettes) and get the point А 2 (AA 2 \u003d 1 / 3Сш + СО \u003d 15: 3 + 0.5 \u003d 5.5 cm). Upward from point A 2, lay 3cm (for all silhouettes) and mark point A 3 (A 2 A 3 \u003d 3cm). We draw the neckline with a smooth line, observing a right angle at point A.
Shoulder section of the back. From point P down, lay 3cm (for all silhouettes) and put point P 4 (PP 4 \u003d 3cm). Now we connect the points A 3 and P4, and on the line obtained from the point A 3, postpone the measurement of the length of the shoulder + CO (see the increment table) and put the point P 5 (A 3 P 5 \u003d Dn + CO \u003d 13 + 1,5 \u003d 14 5cm).
Back armhole cut. Connect the dots точки 2 and 4 4 with a dashed line and divide this segment in half, and from the point of division down, put it at a right angle of 2 cm and put the point 6 6.
We draw a smooth concave line cut armholes, connecting the points P 5, P 2, P 6 and G 4.
Yoke back. Set aside 8cm from point A and set point K (AK \u003d 8cm). From point K to the right we draw a horizontal line to the intersection with the armhole line of the back, and the intersection point is denoted by K 1.
Down from the point K 1 on the line of the armhole lay aside 1 cm and put the point K 2 (K 1 K 2 \u003d 1 cm). Connect the point K 2 with a smooth line with the line of the coquette.
Build a shelf shirt straight silhouette
Shelf neck cut. From the point Г 1 upward, lay aside half the measure of the half-girth of the chest and put the point P (Г 1 Р \u003d 1/2 Сг \u003d 40.5: 2 \u003d 20.3 cm). From point P to the left we draw a horizontal line of arbitrary length.
Now, from the point P to the left and down, we set aside 1/3 of the neck half-measure + 0.5 cm and mark the points P 1 and P 2 (PP 1 \u003d PP 2 \u003d 1/3 Сш + СО \u003d 15: 5 + 0.5 \u003d 5.5 cm ) Connect the points P 1 and P 2 with a dashed line, which we divide in half and from point P through this point of division we put aside 1/3 of the neck half-measure + 0.5 cm and get the point P 3 (PP 3 \u003d 1 / 3Sh + CO \u003d 15: 5 + 0.5 \u003d 5.5cm).
We draw a smooth line cut the neck through the points P 1, P 3 and P 2, observing a right angle at the point P 2.
Shoulder section of the shelf. We will draw an auxiliary line by connecting the point Р 1 with the upper division point of the segment ПГ 2 (see Fig.), On this line from the point Р 1 to the left we will postpone the measure of the length of the shoulder + СО and put the point П 7 (Р 1 П 7 \u003d Дп + СО \u003d 13 + 2 \u003d 15cm). Please note that we are now considering building a shelf for a straight silhouette shirt, so the increase in the formula corresponds to the increase for a straight silhouette.
Armhole cut. Connect the points P 3 and G 4 with a dashed line, divide this segment in half, drop the perpendicular from the division point 2 cm in size and mark the point P 8.
We draw a smooth line section of the armhole, connecting the points P 7, P 3, P 8 and G 4.
On this, the construction of the straight silhouette shirt design is completed.
Our pattern is ready!
Building a shirt shelf in a semi-fitted silhouette
Shelf neck cut. From the point Г 1 upward, lay aside half of the measure of the half-circumference of the chest + 0.5 cm and put the point P (Г 1 Р \u003d 1 / 2Сг + СО \u003d 40.5: 2 + 0.5 \u003d 20.8 cm). From point P to the left we draw a horizontal line of arbitrary length.
Down and to the left of the point P, put aside 1/3 of the neck half-measure + 0.5 cm and mark the points P 1 and P 2 (PP 1 \u003d PP 2 \u003d 1/3 S + CO \u003d 15: 5 + 0.5 \u003d 5.5 cm) . Connect the points P 1 and P 2 with a dashed line, which we divide in half and from the point P through this division point we put aside 1/3 of the neck half-measure + 0.5 cm and get the point P 3 (PP 3 \u003d 13 / Сш + СО \u003d 15: 5 + 0.5 \u003d 5.5cm). We draw a smooth line cut the neck through the points P 1, P 3 and P 2, observing a right angle at the point P 2.
Shoulder section and chest tuck. To the left of the point P 1 we postpone 4cm and put the point B (P 1 B \u003d 4cm), down from the point B we postpone 1cm, we get the point B 1 (BB \u200b\u200b1 \u003d 1cm). Connect the points P 1 and B 1.
Add the lengths of the segments PP 1 and P 1 B (5.5 + 4 \u003d 9.5 cm), subtract 1 cm (9.5-1 \u003d 8.5 cm) from this amount, put the resulting value to the left of the point Г 1 and put the point Г 5 (G 1 G 5 \u003d PP 1 + P 1 B-1 \u003d 8.5 cm). We connect the points G 5 and B 1, the segment G 5 B 1 - the right side of the chest tuck.
Now we will build an auxiliary line, connecting point B with the upper division point of the segment GH 2. Up from point Г 4 we draw a vertical line to the intersection with the auxiliary line, the intersection point is denoted by O.
To the right of point O, we set aside the shoulder length on the auxiliary line with an increase in free fit minus the length of the segment P 1 B and put the point B 2 (OB 2 \u003d Dn + CO-P 1 B \u003d 13 + 1.5-4 \u003d 10.5 cm) . Next, from point Г 5 upwards through point В 2 we draw a segment whose length is equal to the right side of the tuck and get point В 3 (Г 5 В 3 \u003d Г 5 В 1).
Down from the point O we set aside 3 cm and put the point O 1 (OO 1 \u003d 3 cm). Connect the thin line of the point O 1 and B 3.
From point B 3 to the left, on a thin line, we postpone the length of the shoulder with an increase in free fit minus the length of the segment P 1 B and put the point P 7 (B 3 P 7 \u003d Dn + CO-P 1 B \u003d 13 + 1.5-4 \u003d 10 5cm).
Armhole cut. Connect the points P 3 and G 4 with a dashed line, divide this segment in half, drop the perpendicular from the division point 2 cm in size and mark the point P 8. We draw a smooth line section of the armhole, connecting the points P 7, P 3, P 8 and G 4.
Waist line calculation. Subtract the measurement of the half-circumference of the waist from the size of the product’s width with an increase in free fit (AA 1 - (St + CO) \u003d 46- (30 + 3) \u003d 13cm), the result obtained is the sum of the solution of all the darts along the waist line, where
the size of the front tuck solution \u003d 0.25 of the total tuck solution (13 x 0.25 \u003d 3.3 cm),
the size of the solution of the lateral tuck \u003d 0.45 of the total solution (13 x 0.45 \u003d 5.8 cm),
the size of the back tuck solution \u003d 0.3 of the total solution (13 x 0.3 \u003d 3.9 cm).
Determining the width of the shirt along the hips. Now, from the measurement of the half-circumference of the hips with an increase in free fit, we subtract the width of our product (Sat + CO-AA 1 \u003d 44.8 + 4-46 \u003d 2.8 cm), the result is the amount of product extension along the hips.
Side cut. From the point T 2 along the waist line to the right and left, we will postpone half of the solution of the lateral tuck (we calculated its value a little higher) and mark the points that we connect with straight lines with the point G 4.
From point B 2 along the thigh line to the right and left, we set aside half of the product's extension along the thigh line and put the points that we connect by smooth convex lines with the points of the lateral tuck solution at the waist and extend these lines until they intersect with the bottom line.
Construction of a tacky tuck on the back. To the right of the point T, set aside 1/3 of the neck half-measure + 0.5 cm and set the point T 3 (TT 3 \u003d 1 / 3Sh + CO \u003d 15: 3 + 0.5 \u003d 5.5). From the point T 3 to the right, we postpone the value of the whole back tuck solution and get the point T 4 (T 3 T 4 \u003d 3.9 cm).
We divide the segment T 3 T 4 in half, and draw a perpendicular through the division point, without bringing it to the chest line 6 cm, and to the hips line 12 cm, this perpendicular is the midline of the tuck. Connect the points 6 and 12 with the points of the tuck solution T 3 and T 4.
Refinement of the waist line and the bottom line of the shelf. From the point T 1 down we postpone 1 cm, we connect the resulting point with a notch along the waist line along the side cut, observing a right angle at the point 1 cm. Down from the point H 1 we will also set aside 1 cm and connect a smooth line with the point of the bottom line along the side cut, while the angle at the point 1 cm should be straight.
Building a tackle tuck on a shelf. Subtract 1.5 cm from the size of the segment Г 1 Г 5, we will postpone the resulting value to the left of the 1cm point along the new waist line and put the point T 5 (1T 5 \u003d Г 1 Г 5 -1.5 \u003d 8.5-1.5 \u003d 7cm ) Connect the points T 5 and G 5.
On the new waistline to the left of point T 5, we postpone the size of the front tuck solution and put the point T 6 (T 5 T 6 \u003d 3.3 cm). On the line Г 5 Т 5 down from the point Г 5 we put aside 6 cm, we connect the resulting point with Т 6.
Divide the segment T 5 T 6 in half, and from the point of division we lower the perpendicular, without bringing to the waist line 12cm. Now connect point 12 with points T 5 and T 6.
This completes the construction of the shirt design.
If the shirt model has a button closure, then the shelf must be extended along the neckline and the bottom line to the same distance - 1.5-2 cm and draw a new cut line for the shelf. The resulting line is a half-drift line, and on the middle line are buttons on one part of the shelf and button loops on the second part.
Clasp sections can be processed in several ways:
Stitched bar ,
The width of which is twice the width of the half-drift, the length of the strip is equal to the length of the shelf along the half-drift line, while the upper section of the strip repeats the section of the neck of the shelf over the entire width of the strip.
1-piece bar ,
Its configuration is completed by extending the bottom line of the shelf by twice the width of the half-drift, and then draw a vertical line upward from the resulting point. The neckline on the bar is drawn symmetrically to the neck of the shelf relative to the half-drift line. When sewing shirts with a one-piece plank, the plank itself is bent along the line of a half-drift to the wrong side of the product.
Fastener Clasp
It is a hidden fastener, buttons in such a fastener are hidden and are not visible from the front side of the product. The configuration of such a fastener is being completed from the one-piece bar, extending the bottom line of the product by a length equal to twice the width of the bar. As a result, three widths of the bar are obtained along the bottom line, a vertical line is drawn up from each width. The line of the neck of the fastener is drawn symmetrically with respect to the line of the first bar. On the half-wear line of the shirt, the fastener bends to the wrong side, the fastener bends along the next vertical line, and the fastener bends again to the wrong side and the cut line of the shelf (on the fastener) is sharpened from the wrong side of the product. The fastener clasp is built on only one part of the shelf on which the button loops are located, and on the part with buttons only a whole-cut bar is built.
Good afternoon. Here you can download for free a pattern for a woman’s shirt of a simple cut without tucks with a long sleeve and with a collar for chest girths 80 - 104 cm.
According to this pattern, you can sew a shirt or blouse in a shirt style from a softer fabric.
The pattern looks like this:

If my patterns do not suit you, and the model is suitable, you can.
The shirt has a yoke at the back and a bow fold on the back under the yoke.

The yoke height is small, when sewing it is difficult to pack the shoulder seams inside, I did this:

You can enlarge the yoke, or, like me, overcast the allowances.
On the sleeve pattern, the length of the arm, taken for construction, is indicated. If your arm length is different, change the length of the pattern.
Sleeve pattern length \u003d Arm length - 7 (cuff) + 2 (lap).
Shirt collar with a one-piece uncut stand. I like this collar: it looks no worse and much easier to handle.

Pattern in a PDF file in full size. When printing, set the scale to 100%. After printing, you need to glue the sheets joint to joint, without overlaying the sheets on top of each other and without cutting off the margins.
Patterns are given without allowances for seams.
Patterns:
| Bust / Hips / Back Length | Pattern |
| 80 cm / 86 cm / 40 cm | Download |
| 84 cm / 90 cm / 40.1 cm | Download |
| 88 cm / 94 cm / 40.2 cm |
Electronic pattern dresses detachable "waterfall + warehouses"
Vera Olkhovskaya
Sizes: 42-52
File Format: PDF
Sewing difficulty level: medium
Sewing dresses of this style can cause difficulties for beginning tailors, both because of the asymmetric cut of the skirt, and because of the need to calculate the warehouse.
For sewing, you can use only thin lightweight fabric from silk or stretch assortments.
The set of patterns includes: a bodice pattern with a neck type "waterfall" ("swing") and patterns of PP and ZP skirts (Fig. 1).
The consumption of fabric for a dress, depending on the choice of layout, is approximately
Bodice length + skirt length + 20 (40) cm.
The dress pattern was made by the numerous requests of the participants of the group Vera Olkhovskaya “Cut, sewing and free patterns” . Photo models are also provided by members of this group.
How to cut and sew a dress with a collar "waterfall" ("swing") and warehouses
Particular attention should be paid to the choice of fabric for this dress: only thin, well-draped fabrics are suitable. Cutting for stretch and silk is different.
Let's start by cutting dresses from stretch. For convenience and economy of tissue, it should be done in two steps (Fig. 2).
First, open the skirt. Since the PP skirt is asymmetric, we tailor it, ZP is symmetrical and when it is cut for it, the fabric folds in half.
After the skirt, we fold the fabric in half and cut out the bodice, applying a half-carried shelf to the fold of the fabric.
Seam allowances depend on the processing of the product.
If you are going to sew your stretch dress with a knitted seam, then allowances are needed only on the bottom of the skirt for hemming and on the bottom of the bodice to clarify the connection line between the bodice and the skirt.
The sprout of the back should be treated with a stitch, which is cut out according to the pattern or part of the back (see the video tutorial on how to process the neck with a stitch or).
The “waterfall” itself (“swing”) is treated with a seam with a rudder (role seam).
Warehouses are laid at random, but it should be borne in mind that the length of the shoulder section of the back should be equal to the length of the corresponding section of the shelf after the warehouses or warehouse are laid down.
For a skirt, it is important that the lengths of the waist sections of the PP on both sides of the semi-skid are equal.
Sewing dresses made of silk fabric requires the presence of allowances for seams. To the lateral, middle and shoulder, add 1 - 1.5 cm, a sprout, a neck, armholes and a waist cut of a skirt - we cut out for a line of a stroke of patterns. At the bottom of the skirt, add 1.5 - 2 cm, and at the bottom of the bodice - 3 cm to clarify the connection line between the bodice and the skirt by fitting.
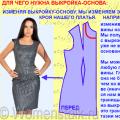 Constructing a dress base pattern and design modeling
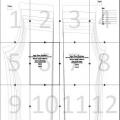 Patterns of children's trousers and sewing master classes Building the back half of trousers
 Building a pattern of vests for boys: the easiest way