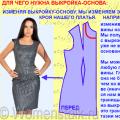
To sew a school jacket for the girl independently. Modeling a children's jacket from a basic foundation a summer jacket for a girl with her own hands video lesson
Summer is rapidly approaching the end, and with it school holidays. On September 1, boys and girls will again sit at their desks, meet with their classmates and teachers. And to make them comfortable at school, they need a comfortable school uniform. We already published patterns of a jacket, trousers and a shirt for a boy, and now, according to your numerous requests, we offer a pattern of a jacket for a girl.
This jacket for the girl with reliefs, pockets with rounded flaps and two-seam sleeves is a real find for the first cool days of September! And with the help of our step-by-step instructions, you can sew such a jacket yourself.
TIP! To open patterns in full size - open each in a new window!
Pattern of a jacket for a girl: take measurements
Fig. 1. Pattern of a jacket for a girl - take measurements
To build a jacket pattern, we need to take the following measurements (size 32):
Height - 128 cm
--------------– 1/2 volume
Bust - 64 cm 32 cm
Waist - 54 cm 27 cm
Hip circumference - 66 cm 33 cm
Neck circumference - 28 cm 14 cm
Shoulder length - 10 cm
Arm length - 40 cm
The length of the back to the waist (TPA) - 28 cm
The length of the front to the waist (Traffic Accident) - 30 cm
Back Width (SH)
Chest Width (SH)
The length of the jacket on the back is about 43 cm.
The increase in freedom of fitting to the half-girth of the chest is 3 cm. Distribute the increase as follows: to the back - 0.7 cm, to the armhole - 1 cm, to the front - 1.3 cm.
How to measure the width of the back (SH) and the width of the chest (SH), see fig. 1.
Pattern of a jacket for a girl - building
Fig. 2. Pattern of a jacket for a girl - building
The construction of the pattern of the jacket begins with the construction of the mesh. Mesh width AB \u003d 35 cm (half-chest by measure + 3 cm (increase in freedom of fit for all sizes)). Grid length AC \u003d 43 cm - the length of the jacket by measurement.
The depth of the armhole. AG \u003d (armhole depth by measurement + 1 cm). From point Г draw a horizontal line to the right. The intersection point with the aircraft is designated G1.
Waistline. AT \u003d Length of the back to the waist (TPA) + 0.5 cm (increase on the shoulders) - point T. Draw TT1 parallel to AB.
From point A, put to the right 1/2 the Width of the back to measure (SH) + 0.7 cm - point P. From point B to the left, 1/2 to the left of the Width of the chest to measure (SH) + 1.3 cm - point P1. From the received points, lower the perpendiculars to the line GG1 - points G2 and G3 are obtained.
Auxiliary points of the armhole of the back and front. Divide PG2 and PG1 into 4 equal parts.
Building a pattern on the back of a jacket
The neck of the back. Set 5.5 cm to the right from point A (1/3 of the half-circumference of the neck to measure + 0.5 cm: 14/3 + 0.5 \u003d 5.5 cm) and upwards 1.5 cm. Connect points A and 1.5 concave line.
Lowering the shoulder. set aside from point P 1.5 cm down. Connect the points 1.5 (neck) and 1.5, lowering the shoulder with a straight line, continue the line. Set aside 11 cm (shoulder length by measure + 1 cm for all sizes: 10 + 1 \u003d 11 cm). The shoulder of the back of the jacket is sewn when sewing.
Armhole line of the back. From the corner with the apex at point G2, draw a bisector 2 cm long. From point G2, lay 2 cm to the right and 1 cm up. Draw a line of the armhole of the back from the extreme point of the shoulder, the midpoint of the division of PG2, point 2 (bisector of the angle), to point 1.
The line of the side of the back. From point 1 (the lower point of the armhole of the back) draw a vertical line to the CD line, the point T2 is obtained at the waist, the intersection with GG1 is the point G4, the intersection with the DC line is the point N.
Calculation of tucks at the waist. The total solution of tucks along the waist: Half-circumference of the chest - Half-circumference of the waist \u003d 32 cm - 27 cm \u003d 5 cm. We distribute the tucks - from the point T2 to the left put 2 cm - to the side tuck of the back, 1 cm - to the right - side tuck in front. Connect the points G4, 2 and N.
The middle line of the back of the jacket. If necessary, you can tighten the jacket along the line of the middle of the back. In this case, the tuck is built from the point T with a depth of about 1-1.5 cm and smoothly reduced to the point G. However, so that the jacket does not appear narrow in the hips, it is necessary to control the girth of the hips after constructing the pattern.
Building a pattern of the front of the jacket
Neckline in front. From the point B to the left, postpone 5.5 cm (1/3 of the neck half-measure by measure + 0.5 cm: 14/3 + 0.5 \u003d 5.5 cm) and down 6.5 cm (1/3 of the neck half-measure by measure + 1.5 cm: 14/3 + 1.5 \u003d 6.5 cm). Connect the points 5.5 and 6.5 with a concave line.
Raising the front shelf. Through point 5.5, draw a vertical dotted line up and down - to the waist line - point T3. From point T3, put upward the Length of the front to the waist by the measurement (accident) + 0.5 cm, point B1 is obtained.
Lowering the front shoulder. Postpone 2 cm visas from point P1. Draw a segment B1P1 equal to the shoulder length by measurement.
Front armhole line. From a corner with a vertex at point G3 draw a bisector 2 cm long. Draw a line of armholes in front from the extreme point of the shoulder, the lower division point P1G3, point 2 (bisector of the angle), to point 1, touching the segment G3G4.
Relief line shelves. From the midpoint of the P1G3 division, draw a smooth relief line to the DC line. The point of intersection with the waist line is T4.
Tucks at the front of the waist. Set aside 1 cm from point T4 left and right, smoothly connect to the relief line. The tuck top is 5 cm below the armhole line.
The increase on board. From point C, put 3 cm to the right and 1.5 cm down, draw a vertical line of approach to the fastener. Draw the line of the side as shown in the drawing of the pattern.
Pocket valve and overboard. Mark the pocket entry and pocket valve configuration as shown in the pattern drawing. Mark the pick-up line and reshoot the pick-up separately for tracing paper. The configuration of the pocket valve and jacket lapel can be modified, depending on your preference.
The construction of a pattern of a collar and sleeve for a jacket for a girl
Fig. 3. Pattern of a jacket for a girl - building a collar
The pattern of the two-seam sleeve and the pattern of the collar for the jacket for the girl is constructed in the same way as the pattern of the collar for the jacket for the boy. The collar is one-piece with a collar flap.
Pattern details - back, barrel, shelf, collar, collar and both details of the sleeve should be removed separately and cut out with allowances for seams - 1.5 cm, allowances at the bottom of the jacket and sleeves - 3 cm. Shelf, barrel, allowances of sleeves, collar, external the details of the flap pockets and both collar jackets are fully duplicated with thermal cloth.
A short jacket with small sleeves is a great option school uniform. This jacket harmoniously combines a strict silhouette and soft lines.
Download a cropped jacket pattern for a girl is freeyou can use the following links:
* As a result of payment, a file will automatically be sent to you with a pattern to the email you specified. If the file did not arrive, then you need to check whether you entered the mailing address correctly when paying. If the mailing address is correct, but the file has not arrived, you must immediately contact the address [email protected]
** You can offer your payment option in the site feedback
Patterns are given without allowances for seams.
The composition of the set of patterns:
A stylish model of a shortened jacket for a girl with short sleeves will be a great alternative to a school uniform. The strict fitted silhouette of this model will be perfectly combined with trousers or a skirt. Soft embossed lines, a rounded bottom, a neat strict collar and an original small sleeve make this jacket feminine and elegant.
Cutting from the main fabric:
. the central part of the back - 2 parts;
. the central part of the front - 2 children;
. barrel before - 2 children;
. barrel back - 2 children;
. subboard - 2 children;
. sleeve - 2 children;
Non-woven parts:
. collar - 2 children with a fold;
. back of the neckline - 1 child. with fold
. subboard - 2 children
. back bottom hem - 2 children
When cutting parts, it is necessary to leave allowances for seams and cuts - 1.5 cm, for bending of sleeves - 4 cm. You also need to make notches on the parts for proper alignment.
Work Stages:
1. Iron non-woven to the details of the collar, collar, hem of the back of the neck and hem of the bottom of the back.
2. Fold the details of the central part of the back with the sides inward and make the middle seam.
3. On the shoulder sections of the backrest, grind the tucks and iron them towards the middle of the part.
4. Fold the front barrel to the front side of the central part of the front and make embossed seams, combining the notch.
5. Slices should be ironed to the middle of the shelf part and processed on the overlock.
6. Perform embossed seams on the back of the shelf, folding the backrest barrel and the backrest center with the sides facing inward. Iron the seams on the back and work on the overlock.
7. Make notches to align the sleeves at a distance of 0.2 cm from the seam.
8. Stitch side and shoulder seams. Slices should be ironed on the central part of the back.
9. Picking up the sleeves by okat to the desired size. Iron the bottom of the sleeves inward by 4 cm, and stitch or fasten manually as desired.
10. Stitch the sleeves in the armholes, starting from the shoulder seam, combining the center of the sleeve with the shoulder seam.
11. Fold the two parts of the collar with the sides inward and grind. Cut the seam allowances along the outer cuts and turn them on the face. Iron the outer edge and, if desired, lay the finishing stitch.
12. Taking together open sections of the collar, sweep and sew it into the neck, combining notches with shoulder seams, starting from the line of the middle of the front.
13. Place the bead on the front side of the front and grind along the outer edge and neck. Cut the seams close to the stitch, turn them to the front side and iron the outer edge.
14. To grind the back of the neck of the back to the rebounds and to the cut of the neck of the back on top of the seam of the stitching of the collar.
15. Apply the bottom hem of the back to the lower edge of the back part with the sides facing inward and stitch. Cut the seams close to the stitch and unscrew the hem on the wrong side of the jacket.
16. To grind the edges of the grind to the cut edges and fix the grinder manually on the relief seams.
17. Make three welt loops on the details of the shelf and sew the buttons to match the fabric of the jacket.
Summer is rapidly approaching the end, and with it school holidays. On September 1, boys and girls will again sit at their desks, meet with their classmates and teachers. And to make them comfortable at school, they need a comfortable school uniform. We have already published, and for the boy, and now, according to your numerous requests, we offer a pattern of a jacket for the girl.
This jacket for the girl with reliefs, pockets with rounded flaps and two-seam sleeves is a real find for the first cool days of September! And with the help of our step-by-step instructions, you can sew such a jacket yourself.
Take measurements
Fig. 1. Measurements for the girl
Height - 128 cm
------------– 1/2 volume
Bust - 64 cm 32 cm
Waist - 54 cm 27 cm
Hip circumference - 66 cm 33 cm
Neck circumference - 28 cm 14 cm
Shoulder length - 10 cm
Arm length - 40 cm
The length of the back to the waist (TPA) - 28 cm
The length of the front to the waist (Traffic Accident) - 30 cm
Back Width (SH)
Chest Width (SH)
The length of the jacket on the back is about 43 cm.
The increase in freedom of fitting to the half-girth of the chest is 3 cm. Distribute the increase as follows: to the back - 0.7 cm, to the armhole - 1 cm, to the front - 1.3 cm.
How to measure the width of the back (SH) and the width of the chest (SH), see fig. 1.
Building a pattern of a jacket
Fig. 2. Building a pattern of a jacket for a girl
The construction of the jacket pattern begins with the construction of the grid. Mesh width AB \u003d 35 cm (half-chest by measure + 3 cm (increase in freedom of fit for all sizes)). The length of the net AC \u003d 43 cm - the length of the jacket by measurement.
The depth of the armhole. AG \u003d (armhole depth by measurement + 1 cm). From point Г draw a horizontal line to the right. The intersection point with the aircraft is designated G1.
Waistline. AT \u003d Length of the back to the waist (TPA) + 0.5 cm (increase on the shoulders) - point T. Draw TT1 parallel to AB. From point A, put to the right 1/2 the Width of the back to measure (SH) + 0.7 cm - point P. From point B to the left, 1/2 to the left of the Width of the chest to measure (SH) + 1.3 cm - point P1. From the received points, lower the perpendiculars to the line GG1 - points G2 and G3 are obtained.
Auxiliary points of the armhole of the back and front. Divide PG2 and PG1 into 4 equal parts.
Building a back pattern
The neck of the back. Set 5.5 cm to the right from point A (1/3 of the half-circumference of the neck to measure + 0.5 cm: 14/3 + 0.5 \u003d 5.5 cm) and upwards 1.5 cm. Connect points A and 1.5 concave line.
Lowering the shoulder. set aside from point P 1.5 cm down. Connect the points 1.5 (neck) and 1.5, lowering the shoulder with a straight line, continue the line. Set aside 11 cm (shoulder length by measure + 1 cm for all sizes: 10 + 1 \u003d 11 cm). The shoulder of the back of the jacket is sewn when sewing.
Armhole line of the back. From the corner with the apex at point G2, draw a bisector 2 cm long. From point G2, lay 2 cm to the right and 1 cm up. Draw a line of the armhole of the back from the extreme point of the shoulder, the midpoint of the division of PG2, point 2 (bisector of the angle), to point 1.
The line of the side of the back. From point 1 (the lower point of the armhole of the back) draw a vertical line to the CD line, the point T2 is obtained at the waist, the intersection with GG1 is the point G4, the intersection with the DC line is the point N.
Calculation of tucks at the waist. The total solution of tucks along the waist: Half-circumference of the chest - Half-circumference of the waist \u003d 32 cm - 27 cm \u003d 5 cm. We distribute the tucks - from the point T2 to the left put 2 cm - to the side tuck of the back, 1 cm - to the right - side tuck in front. Connect the points G4, 2 and N.
The middle line of the back of the jacket. If necessary, you can adjust the jacket along the line of the middle of the back. In this case, a tuck is built from a point T with a depth of about 1-1.5 cm and smoothly reduced to a point G. However, to prevent the jacket from being narrow in the hips, you should check the hip circumference after constructing the pattern.
Construction of the pattern of the front
Neckline in front. From the point B to the left, postpone 5.5 cm (1/3 of the neck half-measure by measure + 0.5 cm: 14/3 + 0.5 \u003d 5.5 cm) and down 6.5 cm (1/3 of the neck half-measure by measure + 1.5 cm: 14/3 + 1.5 \u003d 6.5 cm). Connect the points 5.5 and 6.5 with a concave line.
Raising the front shelf. Through point 5.5, draw a vertical dotted line up and down - to the waist line - point T3. From point T3, put upward the Length of the front to the waist by the measurement (accident) + 0.5 cm, point B1 is obtained.
Lowering the front shoulder. Postpone 2 cm visas from point P1. Draw a segment B1P1 equal to the shoulder length by measurement.
Front armhole line. From a corner with a vertex at point G3 draw a bisector 2 cm long. Draw a line of armholes in front from the extreme point of the shoulder, the lower division point P1G3, point 2 (bisector of the angle), to point 1, touching the segment G3G4.
Relief line shelves. From the midpoint of the P1G3 division, draw a smooth relief line to the DC line. The point of intersection with the waist line is T4.
Tucks at the front of the waist. Set aside 1 cm from point T4 left and right, smoothly connect to the relief line. The tuck top is 5 cm below the armhole line.
The increase on board. From point C, put 3 cm to the right and 1.5 cm down, draw a vertical line of approach to the fastener. Draw the line of the side as shown in the drawing of the pattern.
Pocket valve and overboard. Mark the pocket entry and pocket valve configuration as shown in the pattern drawing. Mark the pick-up line and reshoot the pick-up separately for tracing paper. The configuration of the pocket valve and jacket lapel can be modified, depending on your preference.
Fig. 3. The construction of the pattern of the collar and sleeve to the jacket
The pattern of a two-seam sleeve and the pattern of the collar to the jacket is constructed in the same way as. The collar is one-piece with a collar flap.
Pattern details - back, barrel, shelf, collar, collar and both details of the sleeve should be removed separately and cut out with allowances for seams - 1.5 cm, allowances at the bottom of the jacket and sleeves - 3 cm. Shelf, barrel, allowances of sleeves, collar, external the details of the flaps of the pockets and both collar jackets are fully duplicated with thermal cloth.
The pattern of the classic jacket is built for girls 4, 5, 6, 7 years old. Remember that this is still children's clothing and “classic” does not mean “strict,” even the sewing technique of the jacket is not as complicated as that of adult clothes.
The jacket is designed as a set with, both models should be sewn from the same fabric.
Cutting details of a jacket for a girl
Built without allowances for seams, add them yourself 1 cm wide.
To cut the lining of the jacket, use the back pattern from the marking of the neckline, adding 2 cm along the midline for freedom of movement, like y, the front pattern without collar connected to the part of the corresponding barrel, the patterns of the two parts of the sleeve from the marking of the slots, the back barrel, pocket valve and pocket lining - no change. Shorten the lining details by 2 cm.
Before sewing, duplicate the stand, the upper collar, the pocket valve, the collar and the back of the back of the neck with glue non-woven.
Classic Jacket Sewing Instructions
 Fold the backrest details with the front sides, sweep and grind the middle seam, iron.
Take shelves to the shelves, combining the control marks of the pattern. Stitch barrels. Sweep open pocket sections with oblique stitches. Sweep and stitch the barrels of the back to the barrels in front of the jacket.
Fold the details of each valve and the valve linings with their faces inward, equalize the sections and grind them on the side and bottom. Unscrew, straighten the seam, iron and lay a double finishing stitch along the edges.
At the front of the jacket, make a slotted pocket into the frame by inserting a valve into the pocket entrance until the lining of the main material is sewn to the upper edge of the pocket. Stitch the barrels of the back to the back, combining the signs of the pattern.
Sweep and grind off the shoulder seams of the jacket, iron the allowances.
Stitch the duplicated stand of the collar to the upper collar. Stitch the unfinished stand to the lower collar. Iron the seam and stitch.
To process the shoulder seams of the collars and the back of the neck. Stitch the lower collar into the neck of the front and back of the jacket. Stitch the upper collar into the neck of the rebounds with the back of the neck. Fold the jacket with the lower collar and fit the upper collar with the front sides inward and grind sections of the sides, collar, ledges of the lapels and lower corners of the sides. Corners carve. Turn out, straighten seams, iron.
Fold bottom hem allowance and hem with hidden stitches. On the seamy side, fasten the seam allowances of the sewing in of the upper and lower collar to each other.
On the front side, lay a double line along the bottom of the back and front of the jacket for the girl, continuing the line also along the board, the outer contour of the collar and on the other side. To process sleeves from two parts with a slot in an elbow seam. Sweep and sew sleeves into armholes.
Sew the upper shoulder pads (shoulders) from the wrong side to the allowances for the shoulder seam and armhole seam. Connect the lining with the jacket, using the instructions for the pattern of the female jacket
Trim the loops on the right side of the front and the false loops on the top of the sleeve according to the markings on the pattern. Sew buttons according to the buttonhole on the left side of the front and according to the markings on the top of the sleeve.
Modeling a children's jacket from the basic foundation Summer jacket for a girl with her own hands Video lesson Before you dress Carolina, on our channel there are all the videos *,
This disk contains a photo of my granddaughters, the pattern looks like this, I want to remind you that without a cut system of 10 measurements *** 

In order to build a pattern of a jacket, we will use the ready-made basic pattern of Carolina. This pattern is for a dress, but on its basis we can easily model a jacket pattern. To do this, transfer the shelf, back and sleeve from the main pattern from the base pattern to the tracing paper and remove it, since we will no longer need it.
After that, we begin modeling the pattern of the jacket. To do this, we add a pattern of parts of the shelf and back along the shoulder line and define the neckline so that it is not very close to the neck, since we will have a jacket with a collar and a small lapel.
About how to make a lapel according to the finished pattern, determine the width of the half-skid, build the collar of the required size, various videos were shot about this earlier, which you can review if you wish or, which is quite likely, you will have enough information on these issues from this material on the video about all these points and nuances.
So let's get started. We remove from the neckline a minimum of 1.0 cm

We remove from the neckline a minimum of 1.0 cm
We cut off all that is superfluous along the neckline from the pattern, we retreat 2 cm to the half-drift width along the front center line and draw another line parallel to the front center line (we sign all the lines!) Remember the topic of half-drift and fastener widths for various products? If not, reconsider! 
All the best, we were with you: Pakshte Irina Mikhailovna, Karolinochka and Yastrebov Alexey!
 Constructing a dress base pattern and design modeling
 Patterns of children's trousers and sewing master classes Building the back half of trousers
 Building a pattern of vests for boys: the easiest way