Building a base pattern is the most understandable way (for beginners). Basic pattern dresses for large size Pattern pdf dresses sheath 56 size
Hardworking - a bright light burns through life, lazy - a dim candle
Building a base pattern - THE MOST CLEAR METHOD (for beginners)
Good afternoon! I would even say a beautiful day. Because we are finally starting a series of articles on sewing clothes for adults. We already sewed a lot of things for little girls - and the dresses and bodysuits are different - now we will sew for big girls. That is for yourself. And since we have already trained to sew, the fear of the pioneer has passed.
And it means it's time to take a new frontier. And by ourselves, with our own hands and with our brains, master the wisdom of sewing on real adult patterns. We ourselves will draw the base pattern - in a new easy way (I spent more than one week to create this lightweight method of constructing the base pattern). And then we will sew a bunch of any dresses, tops and tunics.
No - I will not give you a single finished pattern!
I'm not Madame Burda. I am Madame Klishevskaya.))) And the main harmfulness of my character is ... that I will make your head work and give birth to bright and clear discoveries in the field of sewing. The easiest and most understandable of all types of arts. Believe me, it is.
Yes - Sewing yourself is very easy and simple!
Right from scratch you will get more and more beautiful and well-sewn things.
And you will do everything yourself, without a state of hypnosis, but in a sober mind and bright memory. YOU WILL DO IT - moreover you will UNDERSTAND what exactly you are doing.
I will tell you the secrets that I know.Moreover - I will teach you to discover more and more secrets of the world of sewing and modeling clothes.
I will not lead you (blind and stupid) by the handle in the chaos of letters and numbers denoting the intricacies of numerous lines of drawing patterns. NO, I WILL NOT TELL YOU HERE:
Well, you see, one such picture can catch fear and make a girl who doubts her own abilities really, really wants to sew a dress - but i was not friends at school with geometry and drawing. Even I, who adored both of these school subjects, went around and around for several years — not daring to start delving into the construction of such a drawing: “How long does it take to draw such a thing and you need to calculate everything correctly and not get lost in letters…”.
And, nevertheless, today we will draw a pattern.
We will draw a pattern-base (this is a piece of it you see from above.))))
But - do not rush to be scared - we will create our pattern a little differently. Away from the engineering method - and closer to human understanding.
We will draw one with you - only one - pattern.
And then from it we will create more and more new models of dresses. And it will be very easy and simple.
- No obscure formulas
- No confusing calculations.
- And without the letter-spider web.
How? Have I removed a bit of your concerns?
I now relax - we will not start drawing right now. To begin with, we will take a pleasant walk through the pattern. The purpose of the walk is to get acquainted, make friends with the pattern and remove the last doubt that you can sew any dress.
So ... what is a pattern - the basis?
To put it figuratively, it is a cast from your body. This is your personal print. Any thing sewn according to YOUR pattern-base will ideally sit on YOUR figure.
Yes, you heard right - ANYTHING can be sewn on the basis of one and only pattern. All-all models of dresses - are born, modeled, and sewn from one source - this is the base pattern.
I’ll prove it to you now with an example. Even in three examples - in the form of photos and pictures.
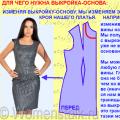
Here is the first photo (below). Our base pattern is, in fact, your sheath dress (one that fits perfectly on the figure). Custom Made Dress your pattern-based, will repeat all the bends your his body. This simple sheath dress is sewn according to the usual pattern-based. See, it’s like a plaster cast from a girl’s figure.
And already today, having drawn the base pattern, you can safely do the cutting on the fabric - and you will get such a dress. The only thing you can change the neckline is to give it the shape that suits your face contour.
All other (any-adorable) dress models are just a modification of the sheath dress - a fantasy on a free theme.
Here's how it goes in the fashion world.
Once a fashion designer thought ...“But what if the bodice of the dress at the top will hold a round yoke (yellow outlines - the figure below), and the bodice itself will be made in the form of oncoming triangles overlapping (red outlines - see the figure below). The result is what we see in the photo below.

Handsomely? Handsomely! What did the fashion designer base his fantasies on? On a pattern basis. And you can come up with something of your own. In us - in women - just a lot of imagination.
By the way - since we are talking about a round yoke - this site already has one of my articles on creating and
And another fashion designer thought: “And what if you give the sheath dress a looser cut - make it wider. And make the line of the shoulder longer so that it hangs on the arm. ” And in the end, a new model is born (photo below) - also very beautiful. And very simple.
You can do that too. If you will UNDERSTAND what the base pattern consists of. And by what laws does it exist.
That is why i do not want to stupidly give you instructions to create a base pattern (such as “draw a line from point P6 to point P5 and mark the point of its intersection with line X as the next point ...” - pah!).
I want to wake you up little thing. I want you to feel the pattern, know its soul. Learned to see what a simple essentially drawing hiding behind a photograph of any, even intricately tailored, dress.
Therefore, we will not draw anything in the next 30 minutes - we will walk around the pattern itself. We will get acquainted with all its elements - we will find out why each line serves, and why it is located here and drawn just like that.
After such a “cognitive walk” you will feel joyful clarity of understanding of all-all-all. It’s as if you have already painted the base patterns many times. And take up the drawing with the feeling that this is a couple of trifles. Ha! Business!
As the sage said: “We are only afraid of what we cannot understand and explain logically. But as soon as the thing that scares us becomes clear to us, it ceases to cause us fear. ”
So let's go and tame this "terrible beast" - the base pattern. Tame and draw in 20 minutes. Yes, in 20 minutes - because after a walk - the drawing of the pattern will seem to you an old and well-known simple pattern - like a grating for playing tic-tac-toe.
Where does the base pattern come from?
So where does the pattern come from - usually it is extracted from such a Thursday:
In the drawing there is half of the back part + half of the front part.
We will also draw a similar drawing with you - only more simply and clearly.
And why are these halves needed, and where to apply them - now I will clearly show everything.

Here (!) I dug up a wonderful mischief - below - in the photo of a black and white dress, our halves are very clearly visible - both the half of the back and the half of the front. So to speak - clearly and clearly.
Yes, in Potnovsky language halves are called "shelves." We will draw these very shelves of the front and back today. But first, a detailed look at what elements each shelf consists of. And most importantly, I will tell you why each element is needed, what it serves.
To make everything as clear as possible, I will illustrate each of the elements both in pictures and in photographs of real models of dresses.
First, get acquainted with two obscure words: TAP and ARMHOLE.
Of course, maybe you know them. Or maybe not. My business is to introduce.
So, get acquainted - PROYMA
When drawing the base pattern, you will create exactly that bend and the sizearmholes that suits you - when the armhole does not pull and does not stick into the arm.
That is, the pattern base contains permissible minimum armhole size. You can simulate the armhole for your taste, any configuration. But your fantasy armhole should not be less than on a pattern-based. That is, an armhole on a pattern basis - these are the boundaries beyond which your imagination should not cross.
Your model armhole can be arbitrarily larger - but it cannot be smaller than on a pattern-based basis. More - yes, less - no - otherwise it will dig into the armpit. Here is a rule in modeling design armholes.
Now let's get to know the tucks.
REVERSE DOORS - shoulder tuck + waist tuck
Here in the picture above, I wrote everything about the back tucks - and in the photo of the dress you can find 2 waist tucks - one to the right of the zipper, the other to the left of the zipper.
But you don’t see a shoulder tuck on this dress. And on many dresses she is not there either. Because for convenience and beauty - this tuck is transferred from the middle of the shoulder to the zipper (or along the edge of the armhole, where the sleeve will simply be cut off the corner). That is, the excess tissue does not pinch at the middle of the shoulder and does not stitch inside the tuck. And excess tissue cropped as a corner at the edge of the shelf, where the zipper is sewn in, or at the edge of the armhole, where the sleeve will be sewn.
Tucks are also optional if you are sewing from stretch fabric - it repeats the bends of your body and is compressed both in the area of \u200b\u200bthe shoulder and in the area of \u200b\u200bthe waist.
Next, get to know ... REVERSE HALF REAR
Oh, you can write a whole poem about her.
I took a long time to figure out how to explain it more clearly - why it is needed and by what laws it lives. Thought, thought ... and came up with.
The fact is that a woman has breasts.))) That is, the front adult girl is no longer flat. This means that the dress in the chest should be convex. A tuck on the shoulder is in front and gives the dress this same bulge in the chest area. Now I will show everything in the pictures. How does this happen.
For example - we have a flat piece of fabric, but we need to make a convex piece of it. To do this, you need to make a tuck on it. For example - this flat circle made of cardboard, with the help of a tuck, will now become convex.
And here is how the chest protrusion creates a bulge on the front part
You noticed that the peak of the bulge (that is, the peak of our rounded pyramid) is at the tip of the tuck. Pay attention to this. Because when we draw the tuck for the chest, the tip of our tuck will be on top of the chest (where the nipple or dome of the bra is usually located).
Remember that sometimes you measured in a store a dress of your size, which somehow strangely skewed on your chest - this is because the tuck in the dress with its tip was directed past tops of your chest. Here the chest did not fit perfectly into the bulge of the dress. This product is not tailored to your breast shape in the factory.
But that is not all, what do I want to say about a chest tuck.
The fact is that in almost all dresses this chest dart is located not on the shoulder - a side just below the armpit. It is made for beauty. The tuck on the shoulder is more striking, but on the side, and even covered with a hand, it is not noticeable.
Creating a base pattern, we draw a chest tuck on the shoulder just because it is more convenient to draw it there from the point of view of drawing construction.
And after the drawing of the base pattern is ready, we very easily and simply transfer the tuck from the shoulder zone to the axillary zone. Do not think that for this you need to make new drawings. Nah, everything is simple - how to open a package of milk - one minute and that’s all.
Here, in the picture below, I schematically depicted transfer of chest tuck from the shoulder to the side suture at hand.
Well, how do you already feel how you have grown wiser in these 15 minutes?))) Or else it will be ... We continue to walk on the pattern and now we will get acquainted with the lines. Horizontal lines
BREAST LINE
The first acquaintance is the line of the chest. (A beautiful dress, isn't it? We will sew it with you. Do not even doubt it)

The chest line is the most wonderful line on the pattern. It is so convenient to focus on it when drawing the base pattern, because:
- We know that we are finishing drawing a waist tuck in the back on the chest line.
- We know that we finish drawing the waist tuck in front before reaching 4 cm to the chest line.
- We know that the humeral tuck is in front - we finish drawing on the chest line.
- We know that the lower edges of the armholes also extend along the chest line.
Well no, of course, you still don't know that. I will give all these simple rules when we start drawing. And now I just want you to know that when drawing many elements of the pattern, you can just focus on the chest line (and there is no need to painstakingly put down these letters and letters).
As you can see, there are a lot of things !! Therefore, forward - to learn, sew and enjoy life)))
WHAT SHOULD BE NEXT DONE - WITH A BASIS Pattern? - you ask
And we will begin to sew on the pattern-based TOPA. It is tops, T-shirts, tunics and then dresses.
You ask: "Hey, why not dresses right away?" The answer to this question I give already in the first article of the cycle So to be continued)))
Good luck with your tailoring!
Admin 2017-02-25 at 10:59 pm
In this section, I published ready-made female patterns that were used in my work. They are checked and I hope you will be useful too. When I sewed to order, then I accumulated a huge number of patterns. I began to digitize them to save space in the apartment. And now I am sharing with you some patterns.
Then I began to build drawings of patterns in the program Valentine, Optitex, AutoCAD, RedCafe, Assol. But in the end I chose the free program Valentine. And now I'm building parametric drawings of the basics. Then I change the measurements in the program and print out any basis in 5 minutes. You can also make tremendous progress in this matter if you study Valentina. It is free and easy to use.
The base of the dress

The pattern is the basis of the dress of the adjacent silhouette with a set-in sleeve. The basis allows you to simulate a variety of styles of dresses, jackets, shirts. A single-seam set-in sleeve pattern is in a separate PDF file. Patterns are designed on the figures, dimensional characteristics of which are indicated below. Before cutting, adjust, if necessary, the pattern to your measurements. The base also has the necessary allowances for freedom of fit used when sewing an adjacent dress.
Total increase in chest: 3 cm. Total increase in waist: 5 cm. Total increase in hips: 5 cm
Dress length on the back: 100 cm (from 7 cervical vertebra down)
The main parameters of the pattern:
Cg 42 p \u003d Ob 46. Cg 44 p \u003d V 48. Cg 46 p \u003d V 50. Cg 48 p \u003d V 52. Cg 50 p \u003d V 54. Cg 52 p \u003d V 54. Cg 54 p \u003d V 56. Cg 56 p \u003d About 58. Cg 58 p \u003d About 60. Cg 60 p \u003d About 62.
All patterns are divided into 2 groups - sizes 42-50, sizes 52-60. You need to download the pattern with your size in the group and after gluing the sheets just cut your own.
Download patterns:
Coat - Cape

Blouse

Women's blouse 46 size. Growth 168, og-92, from 74, about 98.
Back length approx. 70 cm
You will need: Fabric 2.30 m wide 140 cm; thin adhesive non-woven; 10 buttons for sewing. Recommended fabrics: Double-faced fabrics only.
Pattern: Print the pattern details. Detail 2 retake twice. Of these, cut one part for the right front bar along the drawn seam line .. The label for the bottom button is the same for all sizes.
Tolerances: For seams and for cuts - 1.5 cm, for cuts of sides and neck of shelves - 1 cm, for cuts of planks - 1 cm, for cuts of collar - 1 cm, for hem-bottom-2 cm.
1- Shelf 2 parts.
2- Plank of the right shelf 1
Plank left shelf 1 piece
3-back with fold
b) collar frill 87 cm long and 13 cm wide, including allowances;
c) 2 ruffles of sleeves 60 cm long and 15 cm wide, including allowances;
d) 2 slanting collars for edging cuts of sleeves 21 cm long and 3 cm wide, including allowances.
Blouse size 44 growth-168, og-88, from-70, ob-94
Back length approx. 53 cm.
You will need: Poplin 1.30 m wide 150 cm; gasket flap; 4 flat buttons.
Print pattern details.
Allowances: For seams and cuts, 1.5 cm, for hem; 2 cm.
21- Shelf with one-piece collar 2 details
22- Backrest with fold 1x)
2 slanting collars for a fringing of sections of sleeves 44 cm long and 4 cm wide, including allowances.
Gasket: To duplicate the hinges on the shelves, press them to the edges along the small seam.
Leather women's jacket, size 46
Measurements: height 168, og-92, from 74, rev-98.
Back length approx. 57 cm.
Blouse
size 46: height-168, chest-92, waist-74, hip-98.
size 50: height-168, chest-100, waist-82, hip-106.
Women's jacket
Size 46. Height 168, bust 92 cm, waist 74 cm, hips 98 cm.
Woman coat
size 46: height 168, og-92, from-74 to-98.
Back length approx. 85 cm.
Dear craftswomen! The editors of the site receive a huge number of letters asking them to develop and publish as many fashionable and elegant large-sized models as possible. We understand that it is difficult to buy beautiful and high-quality clothes with a non-standard figure in stores, and we try to take into account all your wishes and fulfill them. However, in order to simulate the desired style of a dress or blouse, a basic pattern or the basis of the dress is required, and it is from its construction that one must begin. Needless to say that the request to publish a basic pattern for downloading a large size is the champion among your requests? Today, we are happy to fulfill the desire of many of our readers, women of luxurious shapes, publish the basic pattern for downloading in sizes 52-54-56, and we hope that this will help you create perfectly fitting clothes, and for someone, it may become new stage of the creative path.
In addition to the patterns of the back and front, we have developed a pattern for a single-seam sleeve, so that with this pattern you can sew not only dresses, but also blouses, and even light jackets.
The basic pattern of the dress is 52-54-56 sizes
But you will do the correction a little later, and only if it is needed. But first you need to download and print the pattern.
How to print a basic pattern
We have prepared for you two options for printing patterns - you can download and print the drawing in A0 format and in A4 format. A0 format allows you to print a full-size pattern, and you do not have to glue the sheets. Printers of such a large format are in the copy centers of any city.
On A4 format, the image is divided into 16 sheets, you can print it on any printer, and then glue the sheets into a seamless pattern using alignment marks. Some printers are capable of compressing the image (if the appropriate settings are set), and to prevent this from happening, we placed a test square with a side length of 100 mm on the pattern (see Fig. 1 mark 1).
IMPORTANT! After gluing the pattern, be sure to check the length of the test square!
After the pattern is printed, select your size in the upper left corner (Fig. 1 mark 2). Each size has its own line type. Circle the pattern as shown in fig. 1 on tracing paper and proceed to check the pattern.
IMPORTANT! An additional tacking tuck on the front half of the drawing (left) should be done only if additional fitting is necessary.
Fig. 1. How to reshoot the basic dress pattern
How to check the basic pattern
In order to check the pattern, keep your measurements handy. For the pattern, take measurements:
- Y1 \u003d Measure Length to Back Waist (TPA)
- Y2 \u003d measure Length to the front of the front (accident)
- X1 + X2 \u003d measure Chest girth with an increase of about 3-4 cm
- X3 + X4 + X5 + X6 \u003d measure Waist circumference with an increase of about 2-3 cm
- X7 + X8 \u003d measure Hips with an increase of about 2-3 cm
- Z1 \u003d measure Arm girth with an increase of about 3-4 cm.
Fig. 2. How to check the basic pattern
How to download a basic dress pattern in sizes 52-56
To download patterns in A0 or A4 formats, click on the appropriate button. Instructions for working with patterns are given above in this article.
You will find even more interesting new ideas on the Anastasia Korfiati Sewing School website. Subscribe to free lessons and sew fashionable clothes with us!
This section is devoted to women with magnificent forms. We will consider and learn how to build patterns according to several methods that are used when sewing clothes for obese women. Here, as in previous lessons, are used step by step instructions constructing drawings of the basis of the dress, sleeves, etc.
As an example, in the first version, we will take measurements that correspond to 54 sizes (108 cm chest circumference), so to speak, for women of average splendor. In the second version, we use, as an example, measurements corresponding to 60 sizes (chest circumference 120cm), for women with more magnificent forms. In both cases, we build patterns of the basis for the dress semi-adjacent silhouette, in accordance with this, we take into account the increase in free fit along the lines of the chest, waist and hips.
You take measurements from your figure or from the figure of the person to whom you will sew the dress.
In any case, we recommend that after constructing the drawing and making the pattern, check it for something simple. For example, sew a dressing gown made of cheap fabric. If you are not at all sure, use an old sheet or another thing that has served your age for sewing.
As parting words: I wish you courage in your endeavors, perseverance, perseverance and patience in achieving your goal. Step by step, moving forward, you will overcome the path to excellence.
We use exactly step-by-step instructions for building drawingsto demonstrate and convince you that in reality everything is not so complicated as it might seem at first glance. When you look at the finished drawing of the base pattern and have never encountered anything like it before, you may get the impression that all this is incredibly complicated and almost impossible. However, I note that the impossible is most often just what we have not tried to do. Good luck!
SEMI-APPROXIMATE DRESS FOR WOMEN OF MIDDLE FULL (for example, size 54)
To build a drawing of the pattern, you must take the following measurements:
To take measurements more accurately, it is necessary to note the starting points: the seventh cervical vertebra, which is well defined when the head is tilted, as well as the shoulder line at the base of the neck and at the junction of the arm with the shoulder. Use pins or chalk for this if the woman is wearing. If you need to put a point on the body, use a felt-tip pen, which is easily erased with alcohol-containing liquid after the end of this procedure.
It’s good if the person you are taking measurements with is wearing a thin dress, or better, only underwear. He, or rather she, since we are talking about a woman, should stand upright, without tension, i.e. maintain your normal posture. This is what I draw your attention to. Because, often a woman takes measurements or when trying on, especially if she sees herself reflected in a mirror, wanting to look slimmer, tightens her stomach, straightens her back, etc. The desire to look better is a good desire, but when taking measurements it can distort the real state of things. And a well-fitting dress on a fitting, in ordinary life, will not be as comfortable as we would like, and as it should be.
Therefore, in view of the above, turn the client away from the mirror, distract them in a peaceful conversation, tie a lace around the waist, mark the starting points and proceed with measurements.
There are some differences in the proposed methods. in methods of taking measurements, in the number of measurements, in the name of measurements, etc. In this method, the procedure for taking measurements is as follows:
Names of measurements and conventions | cm | Taking measurements |
|---|---|---|
Product Length (Di) | Measured from the cervical point (seventh cervical vertebra), bringing a centimeter to the waist and to the required length. |
|
Armhole Depth (GPR) | Measure from the seventh cervical vertebra to the horizontal, carried out with a centimeter through the axillary hollows. |
|
Back length to the waist (Dst) | Measure from the seventh cervical vertebra to the waist line, given the bulge of the shoulder blades. To do this, a thin ruler can be attached to the protruding points of the blades, a centimeter tape should pass over the ruler. |
|
Back Width (W) | Measured horizontally by the shoulder blades, between the upper corners of the armpits. |
|
Half Neck Girth (N) | A centimeter tape should pass along the base of the neck, behind the seventh cervical vertebra, in front of the jugular cavity (indentation). |
|
Half Chest 1 (CgI) | The centimeter tape runs horizontally, behind the protruding points of the shoulder blades, in front of the base of the chest. |
|
Half Chest Girth 2nd (CgII) | A centimeter tape runs horizontally behind the protruding points of the shoulder blades, in front of the protruding points of the chest. |
|
The size of the groove solution (VRV) | Measured vertically. Taken at the same time as the measurements of the half-girth of the chest. This is the distance from the base of the chest to its highest point. |
|
Half Waist (St) | Measured horizontally in the narrowest place. |
|
Half Hips (Sat) | Measured horizontally, behind the protruding points of the buttocks, in front, taking into account the convexity of the abdomen. |
|
Sprout height (Vp) | Measure from the back from the shoulder at the base of the neck to the waistline. A centimeter tape runs parallel to the spine. |
|
Back Arm Height (Air Force) | Measure on the back from the point of articulation of the arm with the shoulder to the waist. |
|
Armhole width (Shpr) | Measured horizontally at hand: from the place of articulation of the arm with the trunk from the back to the articulation of the arm with the trunk from the front. Can be calculated using a ruler located horizontally in the armpit. |
|
Side length (db) | Measured from the back from the upper edge of the ruler located in the armpit to the waist line. |
|
Shoulder length (dp) | Measure on the shoulder from the base of the neck to the point of articulation of the arm with the shoulder. |
|
Chest height (Vg) | Measure from the shoulder line at the base of the neck to the protruding point of the chest. |
|
Front shoulder height (Runway) | Measured from the point of articulation of the arm with the shoulder to the waist. |
|
Front Length to Waist (Dpt) | Measure from the shoulder at the base of the neck to the waistline. |
|
Breast Center (Cg) | Measure horizontally between the most prominent points of the chest. |
|
Front Width (Shp) | Measured horizontally above the base of the chest between the corners of the armpits. |
|
Front width at the protruding points of the chest (BpII) | Measured horizontally between the corners of the axillary hollows at the most prominent points of the chest. |
|
Sleeve length (dr) | Measured from the point of articulation of the arm with the shoulder to the desired length. |
|
Sleeve Length to Elbow (DRL) | Measured from the point of articulation of the arm with the shoulder to the elbow. |
|
Arm Girth (Op) | It is measured horizontally in the fullest upper part of the arm (at the level of the armpits). |
|
Wrist (brush) girth Oz | Measured by the wrist joint taking into account the bones. |
|
Free fit allowance On loose fit to the measurement of the second half-circumference of the breast CrII add 4-5 cm, to the measurement of the semi-circumference of the hips Sb - 3 cm and to the measurement of the semi-circumference of the waist St - 2 cm. |
||
Getting to the construction.
We draw in the right corner of the prepared sheet of paper a right angle with a vertex at a point R (fig. 1).
Dress length.
From point P down, we postpone the taken measurement of the length of the dress Di(100 cm) and set the point N.

The depth of the armhole.
From point P down we postpone the taken measurement of the depth of the armhole ( Gpr\u003d 21 cm) and set the point G.

Waistline.
From point P down we postpone the taken measurement of the length of the back to the waist (Dst \u003d 39cm) and put a point T.

The line of the hips.
From point T down usually delayed 18 - 19 cm. We will take the average 18,5 see and put a point B.

From points G, T, B and Hto the left at right angles we draw horizontal lines: the depths of the armhole, waist, hips and bottom.

The width of the back.
From point Г to the left, we postpone the taken measurement of the width of the back Cc (19.5) plus 0,5 cm (increase in free fit) and put a point G1:
GG1 \u003d Шс + 0.5 \u003d 19.5 + 0.5 \u003d 20cm.

Distance to the sideline.
From point G1 to the left we postpone half the taken measure of the width of the armhole Shpr (12.5) minus 1 see and put a point G2:
G1 G2 \u003d Spdr: 2 - 1 \u003d (12.5: 2) -1 \u003d 5.25cm.
From point G2 draw a straight line down and at the intersection of it with the waist and hips lines set points T2 and B1.
Sprout width.
From point R put off to the left 1/3 half neck N (19cm) a plus 1 cm and put a point P1:
PP1 \u003d 1/3 N +1 = 19:3+1=7,3 cm.

Sprout height.
From point P1 up, we postpone the difference between the measures of the height of the sprout VR (41cm)and the length of the back to the waist Dst (39cm) and put a point P2:
P1P2 \u003d Bp - Dst \u003d 41 - 39 \u003d 2 cm.
Points R and P2 connect a concave smooth curve. We get the line of the neck of the back (line of the sprout).

The height of the back.
From point T1 upward we postpone the measured measurement of the height of the back of the shoulder Air force (36 cm) and put a point P.

From point G1 set aside 1/3 cut distance G1P and put a point ABOUT. Compass from the point ABOUT draw left through the point P an arc.

Shoulder length.
From point P2 as from the center, with a radius equal to 15cm (measured shoulder length Dp (13cm)a plus 2cm to the tuck), draw an arc to the intersection with the previously constructed arc (see Fig. 12).
At the intersection of two arcs, put a point P1.
R2 P1 \u003d 13 + 2 \u003d 15cm.
Points R2 and P1 connect.

Connecting the dots P1, O and g2 smooth curve, as shown in Figure 12, complete the construction armholes of the back.
Tuck on the shoulder of the back.
From point R2 left on the line R2 P1 set aside 1/3 of the taken measure of the shoulder length Dn and set point B:
P2B \u003d 13: 3 \u003d 4.3cm.
From point B down we draw a vertical line of length 8 cm and put the point B1.

From point IN left along the line P2P1put off 2 cm and put a point IN 2.
From point IN 1 through point IN 2 draw a line of length 8 cm and put a point AT 3.
Points B3P1 connect with a straight line and get back shoulder line.

Sideline of the back.
From point T2 put off to the right 2 cm and put a point T3.
Points T3 and G2 connect.

Waistline design.
From point T3 set aside 1 cm and put a point T4, points T4 and T we connect a smooth curve (see fig. 16).

From point B1 put off to the left 1/2 C6 (60 + 3 \u003d 63 cm) and the second half of the chest CgII with an increase in free fit (54 + 4 \u003d 58cm) and put a point B2:
B1, B2 \u003d (63-58): 2 \u003d 2.5cm.
Points G4 and B2 connect a smooth curve.

The width of the bottom of the back.
From point N to the left we postpone a value that is equal to the width of the back along the line of the hips (see drawing, this distance BB2) a plus 2-3 cm and put a point H1.
Points H1 and B2 connect a straight line.
From point H1 set aside 1cm and put a point H2.
Points H2 and Nconnect a smooth curve.

Tuck back.
Distance GG1 G3.
From point G3 draw a vertical line down and at the intersection of it with the waist line we put a point T5, with a line of hips - a point B3.
From point G3 put down 4 cm and put a point AT 4, but from the point B3 up - 3 cm and put a point B4.

Tuck Depth.
From point T5 to the right and left on the waist line we postpone 1 cm and put the dots T6 and T7 AT 4 and B4 (see fig. 20).


The construction of the back is completed.
Front
Backline HH1 continue to the left.
From point H1 set aside approximately 45-50 cm and put a point H3.
From point H3 draw a vertical line up.
From points G2, T2, B2 to the left we draw horizontal lines to the intersection with the vertical.
The points of intersection with the vertical line are denoted respectively G4, T8, B5.

The width of the front.
From point G4 to the right we postpone the taken measure of the half-girth of the chest second CrII with an increase in free fit (54 + 4) minus the width of the back with an increase (according to the drawing GG1 \u003d 20 cm)and minus the width of the armhole (taken measurement 12.5 cm) and put a point G5:
G4G5 \u003d 58-20-12.5 \u003d 25.5cm.
Through point G5 draw a vertical line down, at the intersection of which with the waist line we put a point T9.

Distance to the sideline. From point G5 to the right we postpone half the width of the armhole Spd (12.5) a plus 1 cm and put a point G6:
G5G6 \u003d 12.5: 2 + 1 \u003d 7.25cm.
From point G6 draw a vertical line down and put dots at its intersection with horizontal lines T10 and B6.

Front height.
From point T8 postpone the measured measure of the length of the front to the waist Dpt (44 cm)and put a point P3

Neck width.
From point P3 draw a horizontal line to the right and put it off 1/3 half neck NW! (19cm) a plus 1 cm and put a point P4:
R3 R4 \u003d 19: 3 + 1 \u003d 7.3cm.

Neck depth.
From point P3 put down 1/3 half neck N (19cm) a plus 1.5 cm and put a point P5:
P3P5 \u003d 19: 3 + 1.5 \u003d 7.8cm.
Points R4 and P5 we connect the line, divide it in half and mark the middle with a point O1.
From point O1 set aside at a right angle 1.25 cm and put a point 02 .
Points P5, 02 and P4 we connect a smooth curve and get the line of the neck of the shelf.

Center of the chest.
From point G4 to the right we postpone the taken measurement of the center of the chest Tsg (11 cm) and put a point G7.
Points P4 and G7 connect.

Chest height.
From point P4 down extending the line R4G7postpone the measurement of chest height Vg (29.5 cm) and put a point Ts.

The end of the tuck.
On the same line from the point Ts set aside 2.5 cm and put a point C 1.
At this point, the chest tuck ends.

The size of the tuck solution.
From point Ts upward we postpone the taken measure of the size of the tuck solution VRV (12 cm) and put a point U.
From point Ts, as from the center, through the point At draw an arc to the right.

Tuck disclosure.
From point At on the conducted arc we postpone the difference between the measurements of the half-circumference of the chest of the second CgII (54cm) and chest half first CgI (49cm) and put a point U1.
YU1 \u003d CrII - CrI \u003d 54 - 49 \u003d 5cm
This construction can be done with the help of a compass. From point At, as from the center, radius 5cm draw an arc to the intersection with the previously built arc.
Mark the intersection U1.
Through the dots C1 and U1 draw a line, continuing it upward by an amount that is equal to the distance Ts1R4 and put a point P2:
Ts1P2 \u003d Ts1R4.

The height of the shoulder before.
On a straight line T9G5extending it up from a point T9 postpone the measured shoulder height Runway (35 cm) and put a point P3.

Auxiliary armhole point.
From point G5 set aside 1/4 distances G5P3 (4.5 cm)and put a point 03 . Point 0 3 - check Point. When bushing a sleeve into an armhole, it connects to the mark on the sleeve at a point ABOUT
From point 0 3 compass through the point P3 draw an arc to the right.

Shoulder length.
From point P2 , as from the center, with a radius equal to the taken measure of the length of the shoulder Dpl, (in our case 13cm) draw an arc to the intersection with the previously constructed arc and put a point P4 .
Points P4 , 0 3 and G6 we connect a smooth curve, thereby completing the construction of the front armhole .

The side line is the front.
From point T10 put off to the left 1.5 cm and put a point T11.
Points G6 and T11 connect the line.

Waistline design.
From point T11 set aside 1 cm and put a point T12.
Points T8 and T12 connect a smooth curve.

The design of the lateral line in the hips.
From point B6 put off to the right 1/2 the difference between the measurements of the hips Sat with an increase in free fit (60 + 3 \u003d 63 cm) and the second half of the chest CgII with an increase in free fit (54 + 4 \u003d 58cm) and put a point B7:
B6 B7 \u003d (63-58): 2 \u003d 2.5cm.
Points T12 and B7 connect a smooth curve.

The width of the bottom of the front.
From point H3 to the right we postpone the value, which is equal to the width of the front along the hips (see drawing, this distance B5B7), a plus 2-3 cm and put a point H4. Points B7 and N4 connect a straight line.
From point H4 set aside 1 cm and put a point H5.

Extension of the front.
From point H3 put down 2 cm and put a point H6. Points N6 and H5 connect a smooth curve.

Build tucks.
Distance G7G5 divide in half and put a point G8. From point G8 draw a vertical line down, and at the intersection with the waist and hips, set the points T13 and B8. From point G8 put down 6 cm, and from the point B8 up - 2 cm and put the dots B5 and B9.

Recess depth.
From point T13 left and right 1.25 cm and put the dots T14 and T15which we connect with points B5 and B9. (See Fig. 42)

Construction completed.
But before proceeding with the cutting, do not be too lazy to take a centimeter and once again check the basic measurements. Especially pay attention to the waist circumference, since in this method, when constructing tucks along the waist line, not a calculated value, but a constant is used. If during the check you find significant differences between the figure and the drawing (namely in the waist circumference), they can be easily eliminated by reducing or increasing the solution of the tucks along the waist line.


This drawing is a pattern of the basis of the dress - a guide for creating a wide variety of models. Before proceeding to modeling, it is necessary to check the pattern, "put" it on the figure, if necessary, make adjustments. And only after full confidence that everything is in order, you can safely begin to create.
And remember, the road will take the road!
I sincerely wish you success!
Base pattern for full figures, for 50-58 sizes, It is built according to the same method as But, but differs in some specific features: allowances and a line of the shoulder seam, due to the fact that the lush bust and, very often, the full waist and abdomen, require other increases in free fitting. A must be measured especially carefully.
Therefore, in this article, I decided to place a table with real measurements of my clients, 50-58 sizes, with types of figures "apple", "pear", "hourglass". They will help you independently build an individual pattern-base.
Measurement table 50-58 sizes.

Features of the calculations for the base pattern of 50-58 sizes.
Rule 1
If for 44-50 sizes, 0.5 cm is added to half the circumference of the chest, then for patterns on full figures 54-58 - 0.7-1 cm. This is done so that the side seam does not move towards the front.
Rule 2
When constructing the pattern of the front, 54-58 sizes, due to the large size of the tuck - 11-15 cm, the line of the shoulder seam can be drawn at a significant slope. Because of this, the armhole in front is small and short for such a size. It is very difficult to sew a sleeve into it correctly and beautifully.
Therefore, when I am building a pattern, I usually check the shoulder slope line with a reference measure - the height of the chest oblique - VGK. Even if it coincides with the drawn shoulder line, I “lift” the shoulder seam by 1-1.5 cm - a picture on the lower collage. And, as a rule, when trying on, if we sew a dress model with sleeves, we deepen the armhole by 1.5-3 cm for blouses and dresses, and for jackets - by 2-4 cm
Rule 3
For full “apple” silhouette figures, the side seam line usually runs through the points at the intersection of the chest, hips and control lines. And the width of the lateral and central tucks is only 2-2.5 cm
For the “hourglass” and “pear” silhouette figures, it is more difficult to build a base pattern because of the large difference in the sizes of the chest, waist and hips. For example, if the exhaust gas is 110 cm, the from is 90 cm, and the OB is 118, the width of the tucks is 3 cm
As a result, a rather sharp bend of the side seam is obtained, which is difficult to iron when sewing a dress or jacket. Therefore, it is preferable to sew patterns with a central seam on the back, and redistribute the width of the tucks. If the deflection along this seam is 1 cm, then the lateral tucks can be reduced by 0.5-0.7 cm each. And I prefer to sew lightning when the style allows this to be done, in the central seam of the back. If the model of the dress with the skirt is “half-sun”, then the zipper is sewn into the side seam.
Calculations for a base pattern of 50-58 sizes.
An allowance for loose fitting to the girth of the chest, for a dress and blouse, even an adjacent silhouette, it is better to make 7-8 cm, for a semi-fit and for a jacket - 9-10 cm
Calculation of measurements for 50 size.
OT - 78 or OT - 84

(Exhaust gas + 8): 2 \u003d 108: 2 \u003d 54: 2 \u003d 27
For the front pattern, add 0.5, for the back pattern - subtract 0.5 cm
Exhaustion along the front of the chest - 27.5
Exhaust backs - 26.5
Calculation of tuck sizes.
From \u003d 78 cm + 4 \u003d 82: 2 \u003d 41
From the calculated measurement of half of the exhaust gas with allowance, subtract the obtained value of half the waist circumference with allowances: 54 - 41 \u003d 13: 4 \u003d 3.2 - for the figure of the hourglass silhouette.
When OT \u003d 84, the size of the tucks is as follows: 84 + 4 \u003d 88: 2 \u003d 44
54 - 44 \u003d 10 cm: 4 \u003d 2.5 cm - for the silhouette figure "apple".
Hip line size calculation.
(OB + 4): 2 \u003d 104 + 4 \u003d 108: 2 \u003d 54
For a figure with such measurements, the points of the front line of the chest and the line of the hips are located on the same control line.
If OB \u003d 110 cm, then after calculating: (110 + 4 \u003d 114): 2 \u003d 57, the difference between half of the chest circumference with allowances and half of the hips with allowances would be 3 cm.
57 - 54 \u003d 3: 2 \u003d +1.5 cm - this value must be postponed from the control line on the front and back patterns along the hips. For the front - to the left, for the back - to the right.
Calculation of measurements for a pattern of 52 sizes.
OG \u003d (104 + 8): 2 \u003d 112: 2 \u003d 56: 2 \u003d 28
0.5 \u003d 28.5 - front, - 0.5 \u003d 27.5 - back
OT \u003d (92 + 4): 2 \u003d 48
Tucks \u003d 56 - 48 \u003d 8: 4 \u003d 2 cm - each tuck
OB \u003d (112 + 4): 2 \u003d 116: 2 \u003d 58
58 - 56 \u003d 2 cm: 2 - + 1 cm along the hips from the control line.
Calculation of measurements for 54 sizes.
OG \u003d (108 + 8): 2 \u003d 116: 2 \u003d 58: 2 \u003d 29
Exhaust gas \u003d 29 + 0.7 \u003d 29.7
Exhaust back \u003d 29 - 0.7 \u003d 28.3
From \u003d (94 + 4): 2 \u003d 98: 2 \u003d 49
Tucks \u003d 58 - 49 \u003d 11: 4 \u003d 2.7
OB \u003d (116 + 4): 2 \u003d 120: 2 \u003d 60 - 58 \u003d 2: 2 \u003d +1 cm from the control lines along the hips
Calculation of measurements for size 58.

Exhaust gas \u003d (116 + 8): 2 \u003d 124: 2 \u003d 62: 2 \u003d 31
Exhaust gas \u003d 31 + 1 \u003d 32
Exhaust back 31 - 1 \u003d 30
OT \u003d (98 + 4) \u003d 2 \u003d 102: 2 \u003d 51
62 - 51 \u003d 11: 4 \u003d 2.7 cm - tucks
OB \u003d (122 + 4): 2 \u003d 126: 2 \u003d 63
63 - 62 \u003d 1 cm: 2 \u003d + 0.5 cm from the point of the control line on the thigh line.
In order to build a pattern-base of a dress of a direct silhouette, draw lines parallel to the middle of the front and back, from a point on the hips to the required length of the dress.
Using such a pattern, if it is built accurately and verified, you can simulate and sew any of the models
For a dress of a silhouette “trapeze” - continue the control line to the required length and put the slope of the side seam at a distance of 12-22 cm to the left of it - for the front half of the pattern. To pattern the back, respectively, to the right. This distance can be increased to 25 cm, but no more, especially if the length of the dress is up to the knee. Side seams will simply “fold” inward, and the dress will look sloppy.
If you want a more flared dress, then choose a model with a cut under the chest and the bottom of the half-sun style or a trapeze cut along the oblique. You can choose a model of the dress with reliefs - each detail changes along the bottom line to the required width.
 Constructing a dress base pattern and design modeling
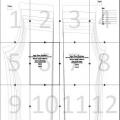 Patterns of children's trousers and sewing master classes Building the back half of trousers
 Building a pattern of vests for boys: the easiest way